
Canva has quietly become one of the most accessible video editing tools available, and you don't need a Creative Cloud subscription or a film degree to use it. This canva video editor tutorial walks you through everything from your first cut to adding AI-powered captions and animations, so you can start producing clean short-form content without a steep learning curve.
Whether you're trimming clips for a product launch or building a full talking-head video with branded elements, Canva's timeline editor gives you enough control to produce professional-looking results. This guide covers each core feature step by step: timeline management, trimming, transitions, text overlays, audio syncing, AI tools, and export settings.
At SocialRevver, we build managed short-form content systems for founders and business owners who need production quality without the time sink. We know what separates a scroll-stopper from background noise, and tools like Canva can be a solid starting point. Below, you'll find the practical walkthrough to get your videos right from the jump.
What to know before you start
Before you open a blank canvas and start dragging clips around, take five minutes to understand how Canva's video editor is structured and which version of the tool you're working with. Skipping this step is exactly why most people get halfway through an edit and hit an unexpected wall, whether that's a missing feature, an upload error, or an export limit they didn't anticipate. Setting up correctly from the start keeps the whole workflow clean.
Getting clear on your setup before touching the timeline will save you more time than any editing shortcut.
Canva Free vs. Canva Pro: what you actually get
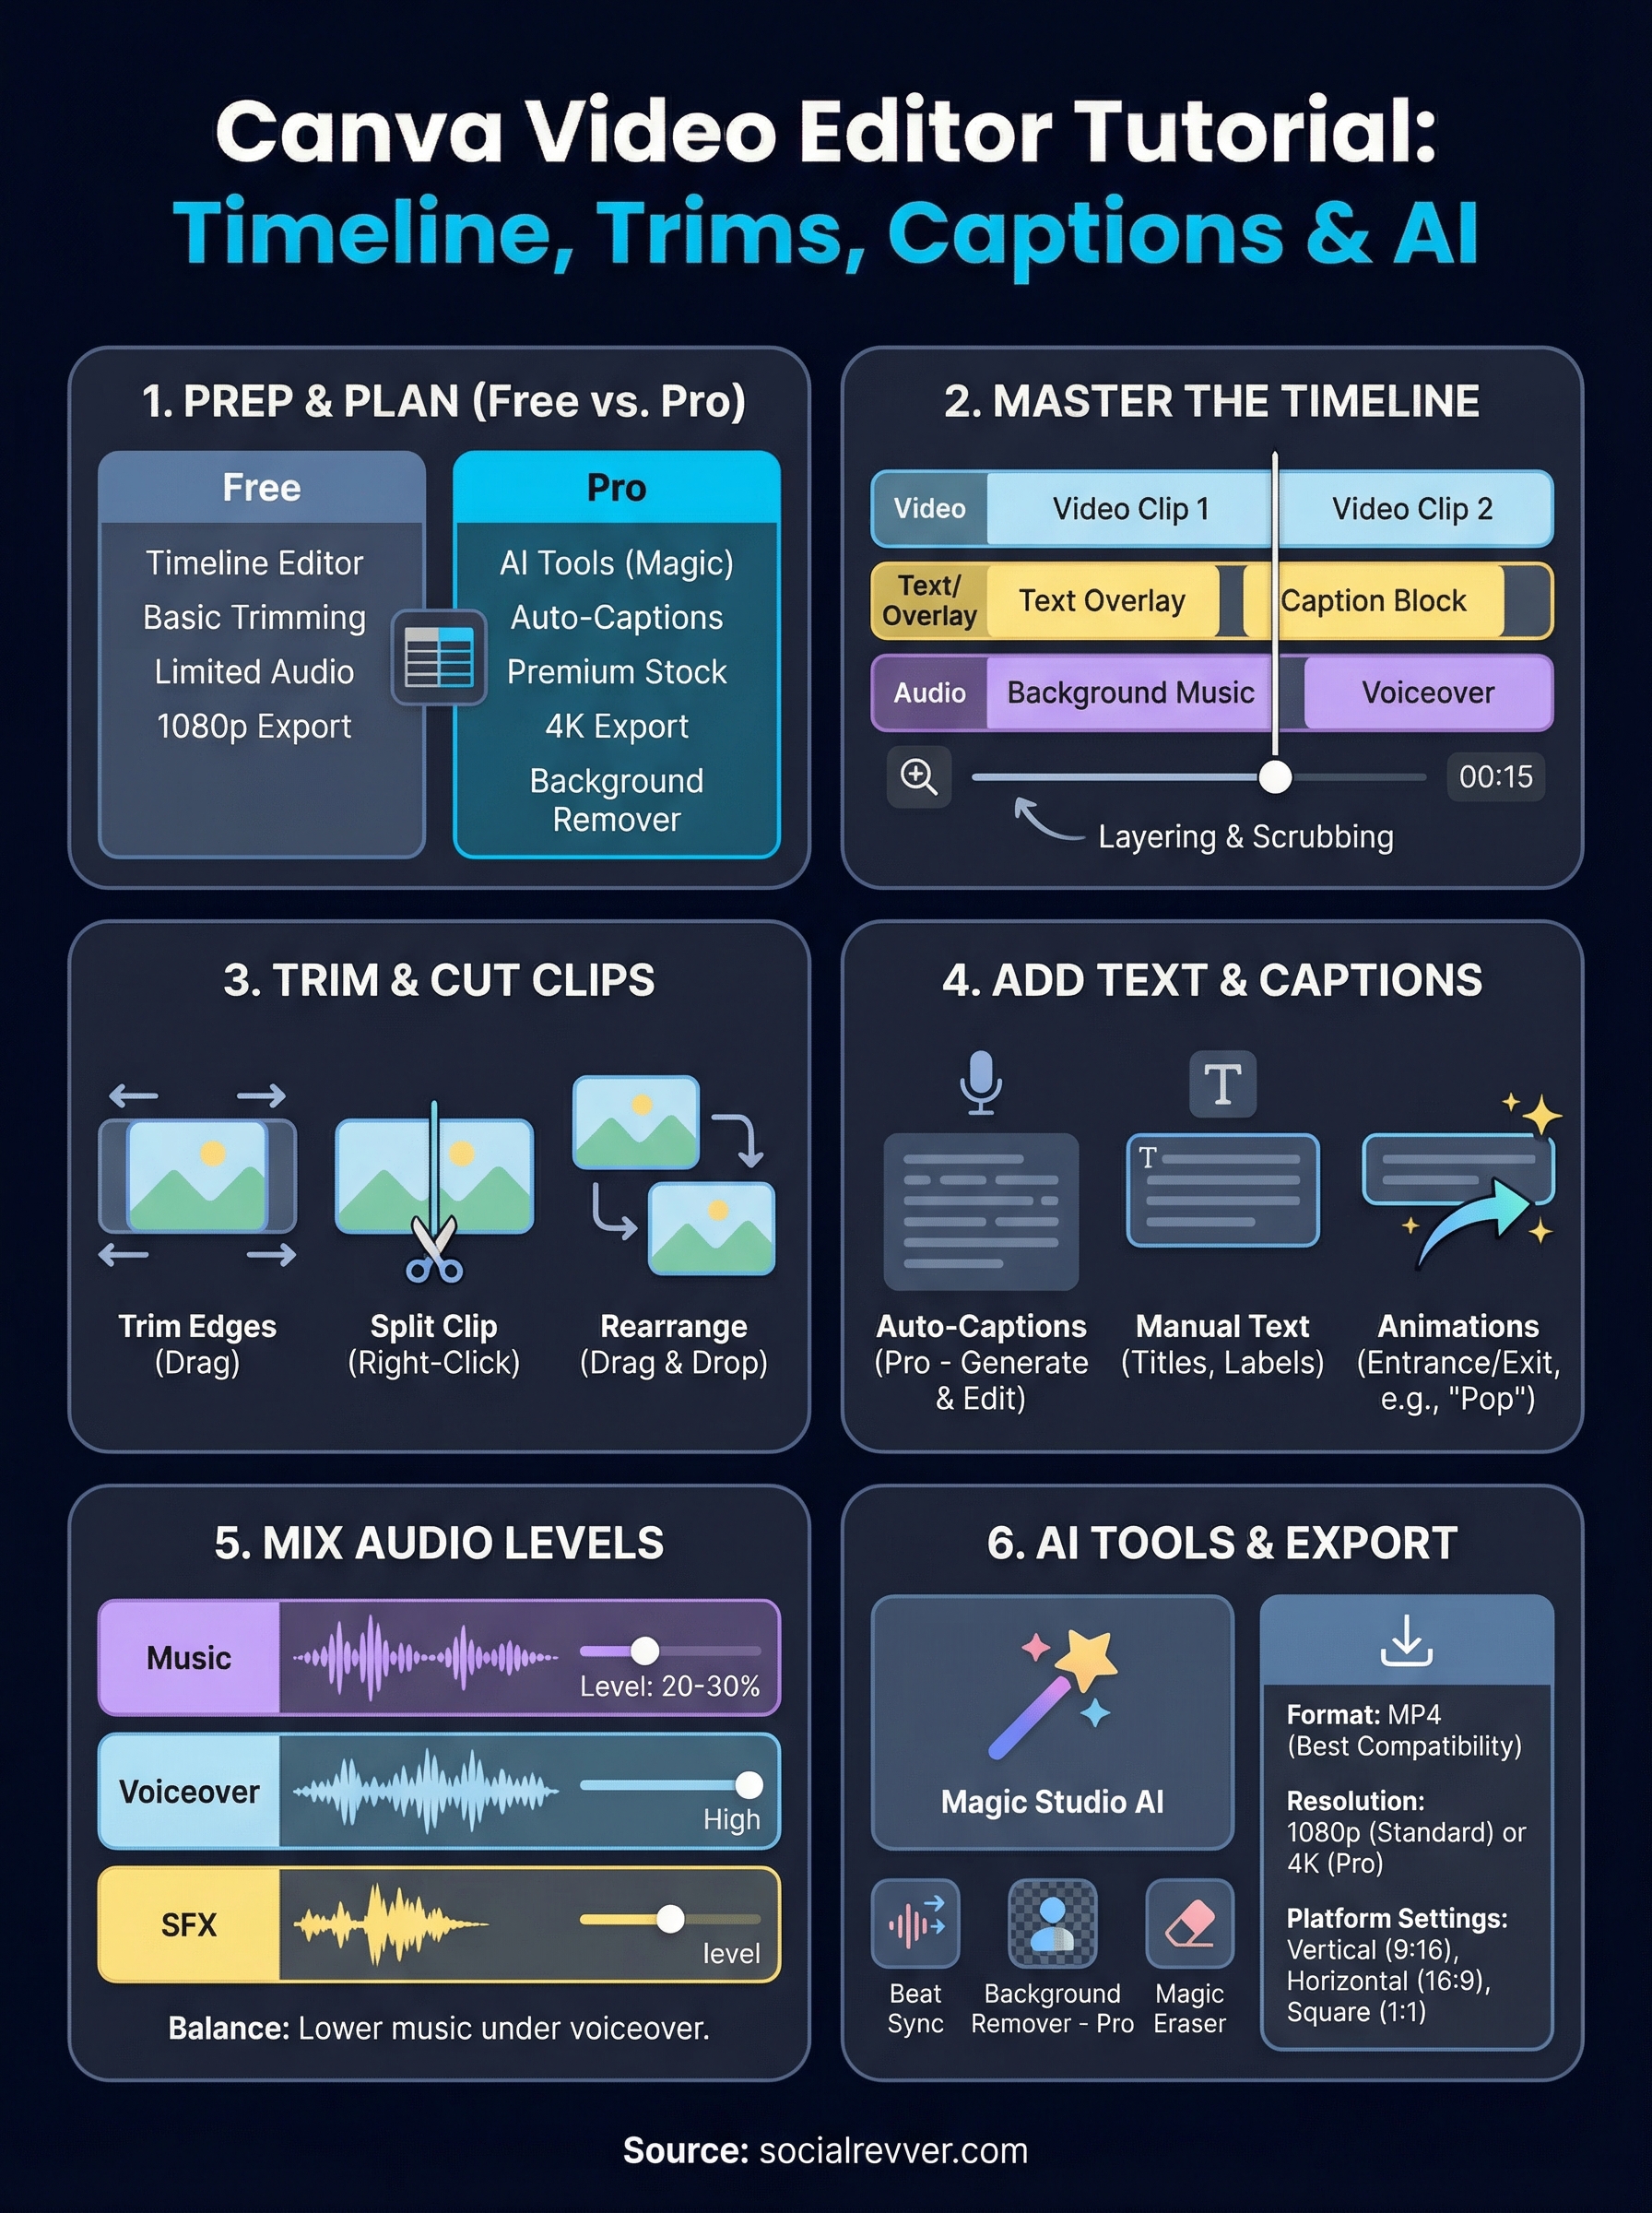
Not every feature covered in this Canva video editor tutorial is available on the free plan, so knowing the difference before you begin matters. Canva Free gives you access to the timeline editor, basic trimming, text overlays, limited transitions, and a restricted audio library. Canva Pro unlocks the full toolset, including AI background removal, Magic Studio features, premium stock footage, Brand Kit integration, and one-click resizing for multiple platform formats at once.
Here's a quick breakdown of what each plan covers for video editing:
| Feature | Free | Pro |
|---|---|---|
| Timeline editor | Yes | Yes |
| Clip trimming and splitting | Yes | Yes |
| Transitions | Limited | Full library |
| AI tools (Magic Studio) | Limited | Full access |
| Background remover | No | Yes |
| Brand Kit | No | Yes |
| Stock video library | Limited | 100M+ assets |
| Export resolution | Up to 1080p | Up to 4K |
| Auto-captions | No | Yes |
If you're starting out, the free plan covers the majority of this guide. Any step that requires a Pro feature will be flagged clearly so you know what you're working with before you get there.
Browser vs. desktop app
Canva runs in your browser and also offers a dedicated desktop app for Mac and Windows. Both support the full video editor, but you'll notice performance differences depending on your hardware and project complexity. The browser version handles shorter clips and lighter edits without issue. If you're working with multiple audio tracks, high-resolution footage, or timelines longer than two minutes, the desktop app tends to run more smoothly because it manages memory more efficiently than a browser tab can.
You can find the desktop app on Canva's official site. Whichever version you use, sign in to your account before you start editing. Canva auto-saves projects to your cloud account, and any work done in a guest session or disconnected state risks getting lost.
File types and size limits
Canva's video editor accepts the most common video formats, but it does impose upload limits that can catch you off guard if you're bringing in raw footage straight from a camera. The maximum file size per upload is 250 MB, and clips above that threshold will fail to import without an error message that makes the cause obvious.
Accepted formats by file type:
- Video: MP4, MOV, AVI, FLV, MKV, WEBM, OGV, MPEG
- Audio: MP3, WAV, OGG, M4A, FLAC
- Images (within video projects): JPG, PNG, SVG, GIF
If your source footage exceeds the size limit, run it through a free compression tool like HandBrake before uploading. Keeping individual clips under 100 MB also reduces lag during timeline playback inside the editor and speeds up the upload process significantly. When you're importing multiple files, upload them in small batches rather than all at once to avoid timeout errors on slower connections.
Step 1. Create a video and choose a template
When you log into Canva and click Create a design, you'll see a search bar at the top of the template browser. Type "video" into that bar and you'll get format options ranging from YouTube intros to TikTok-sized vertical clips. Pick the format that matches your intended platform before you do anything else, because resizing a finished project is messy and eats time you don't have.
Start from scratch or pick a template
Canva gives you two starting paths: a blank canvas with your chosen dimensions or a pre-built template. If you already have a clear idea of your layout, start blank and build cleanly. If you're new to this canva video editor tutorial workflow and want something to react to rather than invent from scratch, grab a template. Search by niche or style, such as "business promo" or "social media reel," and Canva will surface options sorted by category.
Choose a template that matches your brand's tone rather than one that just looks visually impressive, because you'll spend more time undoing design choices that don't fit than actually editing.
Once you select a template, every element on the timeline is editable. You can swap out placeholder clips, change fonts, recolor shapes, and delete any element you don't need. Think of the template as a structural scaffold, not a finished product.
Set your project dimensions correctly
Vertical video (1080 x 1920 pixels) is the standard for TikTok, Instagram Reels, and YouTube Shorts. Horizontal video (1920 x 1080 pixels) fits YouTube, LinkedIn, and embedded website content. Square format (1080 x 1080 pixels) works on Instagram feed posts and some LinkedIn placements. Picking the wrong dimension at the start forces you to either crop your footage awkwardly or leave distracting blank bars on the sides of your frame.
Here's a quick format reference:
| Platform | Recommended Size | Aspect Ratio |
|---|---|---|
| TikTok / Reels / Shorts | 1080 x 1920 px | 9:16 |
| YouTube / LinkedIn | 1920 x 1080 px | 16:9 |
| Instagram Feed / Square | 1080 x 1080 px | 1:1 |
After you confirm your dimensions, name your project in the top-left field before you add a single clip. Canva auto-saves to your account, but labeled projects are far easier to find and revisit later than a folder full of "Untitled design #47" files.
Step 2. Master the timeline and tracks
The timeline is the control center of the entire Canva video editor. Once you add media to your project, every clip, audio file, and animation lives on a horizontal track at the bottom of your screen. Clicking on any element in the timeline highlights it in the canvas above and surfaces its editing options in the toolbar. Understanding how Canva layers tracks on top of each other is the foundation for everything else in this canva video editor tutorial, and it's worth spending a few minutes here before you start making cuts.
How tracks layer and interact
Canva stacks multiple tracks within the same timeline view. Video clips sit on the primary track, while additional clips, text overlays, stickers, and audio each occupy their own separate track directly below. The order of tracks determines which elements appear in front of others on screen. If a text overlay track sits above a video track, the text renders on top of your footage during playback, which is exactly what you want for captions and titles.
The more tracks you stack, the harder your timeline becomes to navigate, so keep layers minimal and intentional from the start rather than adding elements without a clear reason.
You can drag any track element left or right to shift when it appears in the video. Stretching or compressing the duration of static elements like images or text boxes is done by dragging their left or right edge. To change which layer sits on top visually, click the element and use the "Position" controls that appear in the top toolbar. This lets you bring an overlay forward or push it behind other elements without rearranging anything else on the timeline.
Navigate and scrub the timeline efficiently
Scrubbing means dragging the white playhead indicator along the timeline ruler to jump to a specific moment in your video. Click anywhere on the ruler to place the playhead at that exact timestamp, then press the spacebar to start or stop playback from that position. This is significantly faster than watching a clip from the beginning every time you want to check a cut or a transition.
Zoom in on the timeline using the plus and minus buttons at the bottom-left corner of the editor. A tighter zoom gives you frame-level control when aligning an audio cue with a visual cut. Zooming out shows your full video length, which helps you see how all your tracks relate to each other at a glance. Use the horizontal scroll bar along the bottom to move through the timeline without changing the zoom level.
Step 3. Add clips and make clean cuts
With your timeline set up, you're ready to bring in footage and shape it into something clean. Click the "Uploads" tab in the left panel, select your files, and drag them directly onto the timeline. You can also drop a clip onto the canvas itself, and Canva will place it at the current playhead position. Dragging straight to the timeline gives you more precise placement, so use that method when clip order and timing matter from the start.
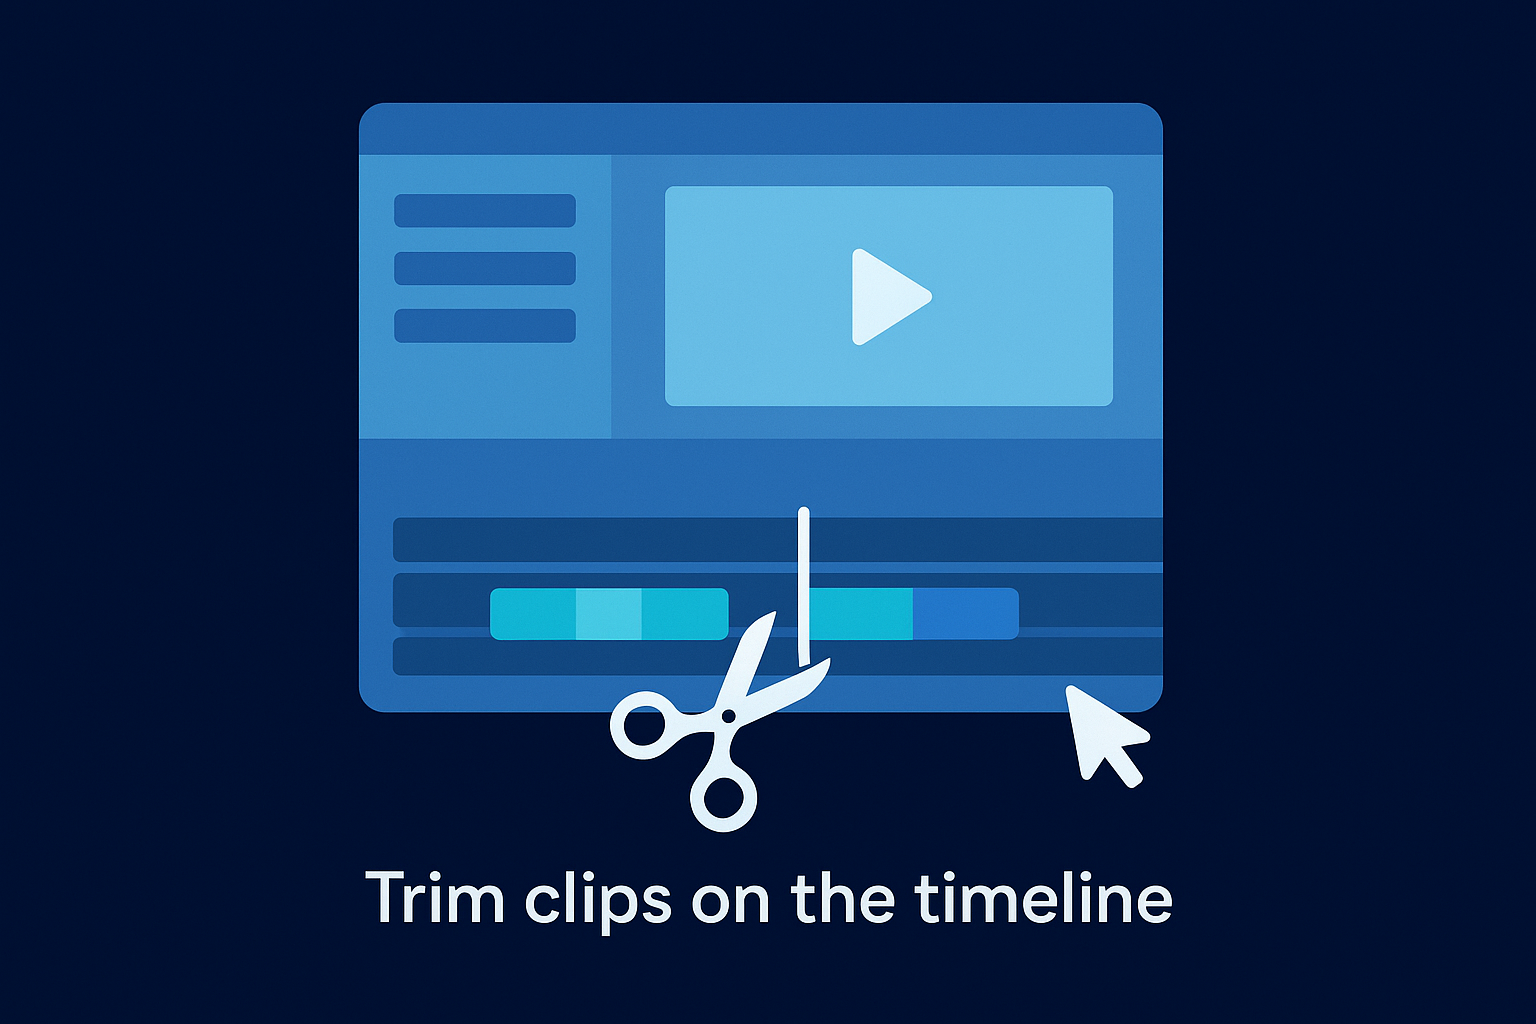
Trim clips on the timeline
Trimming removes unwanted footage from the start or end of a clip without deleting the source file. Click the clip on the timeline to select it, then hover over either edge until your cursor changes to a double-sided arrow. Drag that edge inward to shorten the clip. This is the most frequently used action in any canva video editor tutorial workflow because raw footage almost always has dead air or false starts that drag your pacing down.
Cut earlier than you think you need to. Viewers stop watching the moment momentum slows, so err on the side of tighter clips rather than longer ones.
For frame-accurate trimming, double-click the clip to open the dedicated trim panel. This view gives you a scrubber specifically for that clip and lets you set a precise start and end point without affecting anything else on the timeline. Use this mode whenever a rough drag trim leaves a few extra frames that are hard to remove at the default zoom level.
Split and rearrange clips
Sometimes the cut you need sits in the middle of a clip rather than at either end. Place your playhead exactly where you want to divide the footage, then right-click the clip and select "Split clip" from the context menu. Canva creates two independent segments that you can move, delete, or trim separately. To rearrange clips, drag them left or right along the timeline and Canva shifts adjacent clips automatically to close or create space. Here are the core cut actions in sequence:
- Drag clip edges to trim from the start or end
- Double-click to access the precise trim panel
- Right-click and split to cut at any midpoint
- Drag and drop segments to reorder the sequence
- Delete a segment by selecting it and pressing Backspace
Working through these actions in order keeps your editing process linear and prevents you from losing track of which clips you've already shaped.
Step 4. Add captions, text, and animations
Text elements and captions are where your video shifts from raw footage to something that holds attention on a muted feed. Most short-form videos are watched without sound, which means your text and captions carry as much weight as your audio. This part of the canva video editor tutorial covers the three tools you'll use most: auto-captions, manual text overlays, and animations.
Add auto-captions with Canva Pro
Canva's auto-caption feature is available on Pro accounts and works directly inside the editor. Click your video clip on the timeline, then select "Edit video" from the toolbar that appears above the canvas. Inside that panel, find the "Captions" tab and click "Generate." Canva processes your audio and produces a timed caption track synced to your speech within a minute or two for most clips.
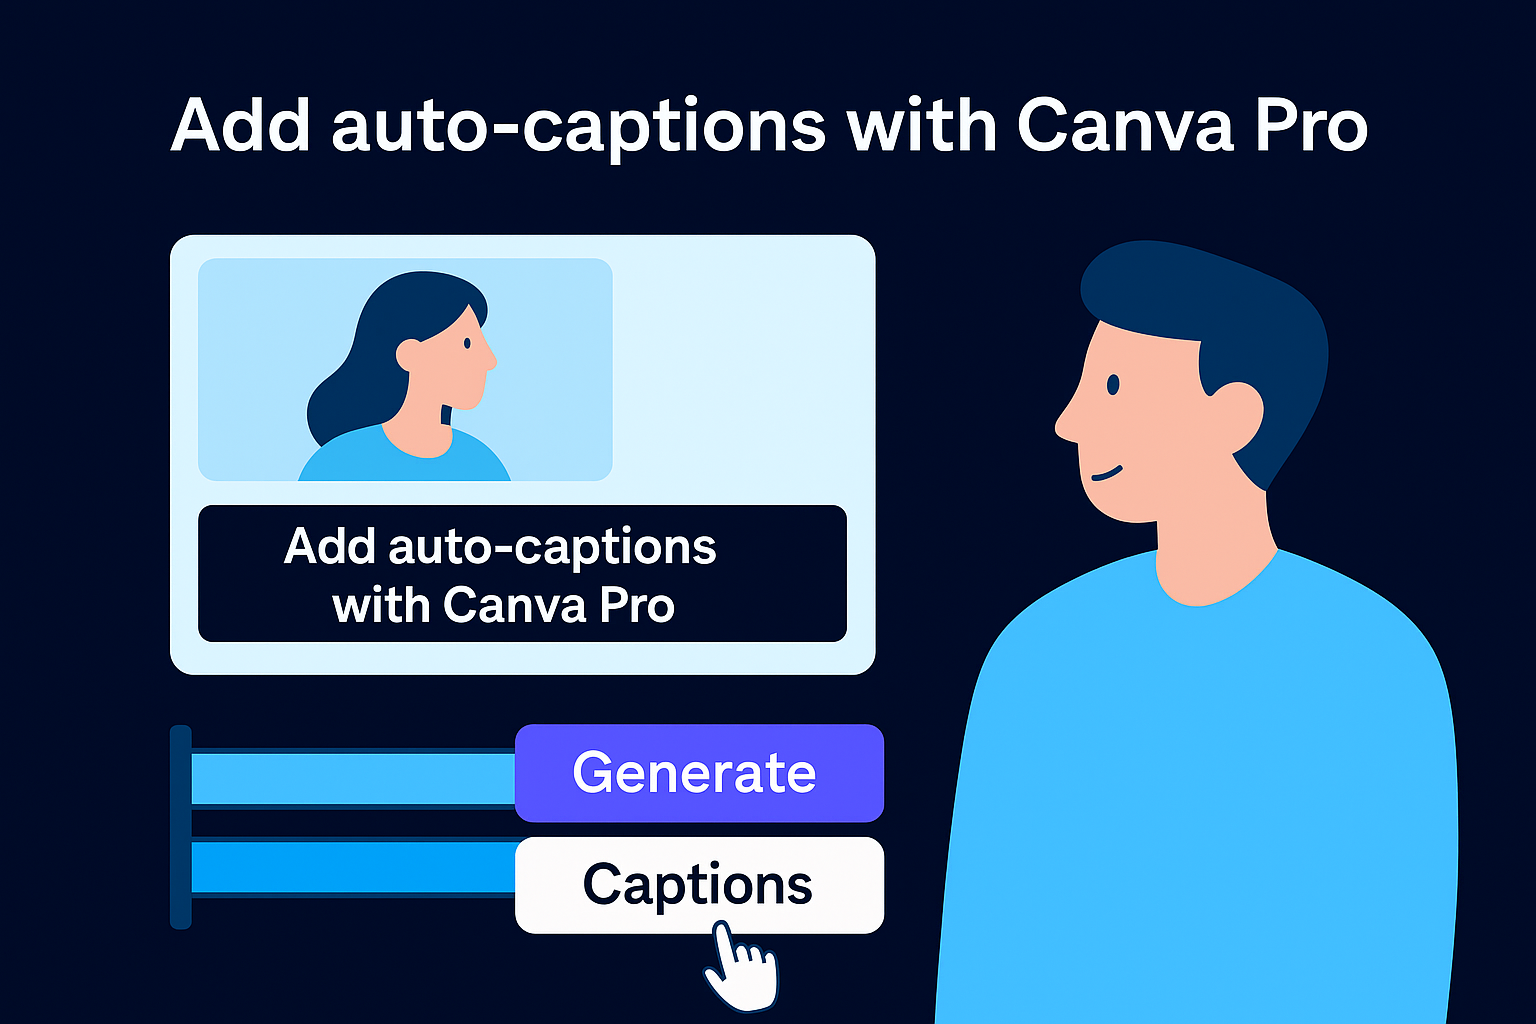
Auto-captions are not perfect transcriptions, so always read through the output and fix any errors before you export.
Once the captions generate, you can edit individual words by clicking on them in the caption panel. Change the font, size, color, and position of the caption block the same way you would any other text element. Keeping captions near the lower third of the frame prevents them from covering important visuals while remaining readable on both phone and desktop screens.
Add text overlays manually
For titles, labels, and call-to-action text, click the "Text" tab in the left panel and drag a text box onto the canvas. Canva gives you three default sizes: heading, subheading, and body text. Select the one closest to your intended use, then adjust the font and size from the top toolbar. On the timeline, the text element appears as its own track. Drag the edges of that track to control exactly when the text appears and disappears during playback, which lets you time a label to land on a specific cut.
Apply animations to text and elements
Animations make text entries feel intentional rather than static. Select any text or graphic element on the canvas, then click "Animate" in the top toolbar. Canva shows you entrance, exit, and continuous animation options. For short-form content, entrance animations like "Rise" or "Pop" keep energy high without looking overproduced. Apply the same animation style across all your text elements to maintain visual consistency throughout the video. Mixing too many different animation types in a single project reads as unfocused and pulls viewer attention in the wrong direction.
Step 5. Add music, voiceover, and sound effects
Audio is what transforms a passable video into one that keeps people watching. Poorly balanced sound or a generic music track that fights your voiceover signals low production quality immediately, and viewers respond to that signal by scrolling past. This step of the canva video editor tutorial covers three audio layers you'll work with: background music, spoken voiceover, and sound effects.
Add background music from the Canva library
Click the "Audio" tab in the left panel to open Canva's built-in music library. You can browse by mood, genre, or search by keyword. Drag a track directly onto the timeline and it creates a dedicated audio track below your video clips. From there, drag the edges of the audio track to match the length of your video, or let it loop automatically if the track supports it.
Pick music with a consistent energy level throughout rather than tracks that build to a dramatic peak, because sudden volume swings distract from your message.
Canva Pro gives you access to a significantly larger catalog of licensed tracks. The free plan includes a smaller selection, but it still covers basic moods like upbeat, calm, and motivational. Every track in both libraries is cleared for commercial use, which matters if you're publishing content to promote a business or monetized channel.
Record or upload a voiceover
You have two options for adding spoken audio. To record directly inside Canva, click the microphone icon that appears in the audio panel and follow the prompt to allow microphone access. Canva records your audio and drops it onto the timeline immediately as a new track. If you've already recorded a voiceover externally using a separate tool or microphone setup, drag your audio file from the Uploads tab straight onto the timeline instead.
Position your voiceover track so it aligns with the correct visual moments. Use the same drag-the-edge trimming technique from your video clips to cut silence from the start or end of the recording.
Mix and balance your audio levels
Click any audio track on the timeline to reveal the volume slider in the toolbar above the canvas. Lower your background music to around 20 to 30 percent of its original level when a voiceover is present so the two tracks don't compete. Adjust your voiceover track separately to sit clearly above the music without peaking into distortion. Canva does not have automatic ducking, so you handle this balance manually by ear on each track.
Step 6. Use AI features and get ready to export
Canva's AI tools sit inside the Magic Studio panel and give you production shortcuts that would otherwise take significantly longer to complete manually. Before you export your finished project, run through these tools to check which ones apply to your clip, then lock in the right export settings so your video lands on each platform at the quality it deserves. This final step of the canva video editor tutorial brings everything together.
Use Magic Studio AI tools
Magic Studio is Canva's umbrella label for its AI-powered features, and several of them directly improve video quality with minimal effort. The most useful for video work are Beat Sync, Background Remover, and the Magic Eraser.
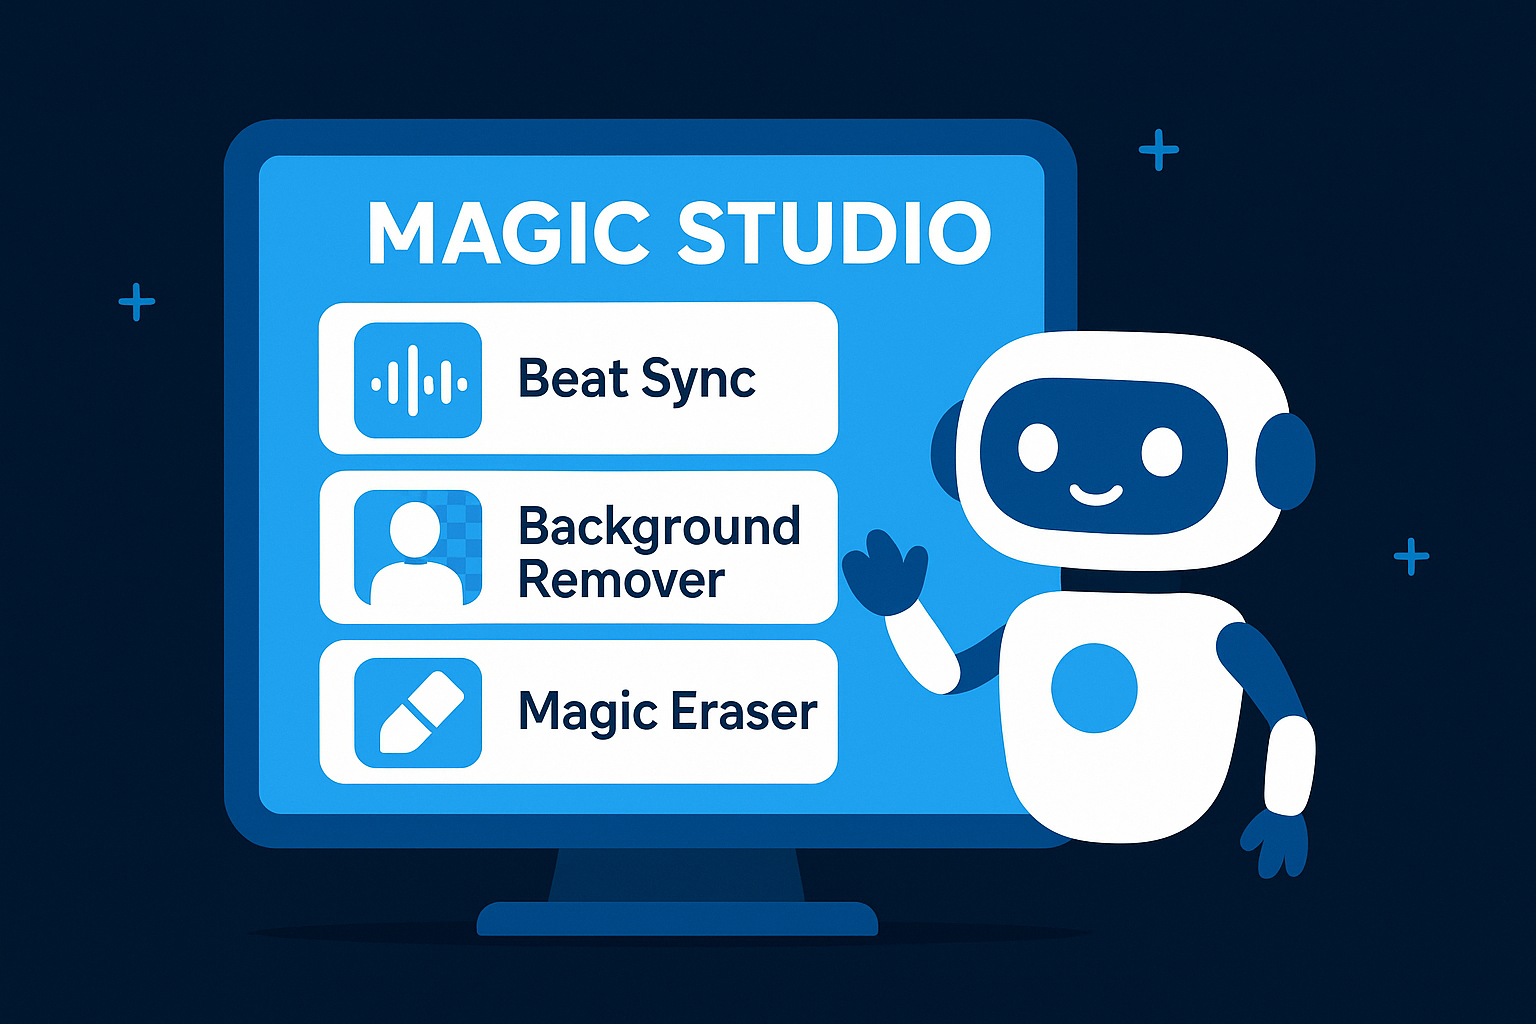
Running Beat Sync before you finalize your cut order saves you from manually adjusting every clip timing to match the music, which is one of the most time-consuming parts of short-form editing.
Beat Sync automatically aligns your video cuts to the beats of your background music track. Select your video and audio together on the timeline, then click the "Beat Sync" button that appears in the toolbar. Canva analyzes the music and repositions your clip transitions to land on the beat. Review the result in playback and manually adjust any cuts that don't align visually with what you want to emphasize.
Background Remover (Pro only) works on both images and video clips. Click your clip, open the "Edit video" panel, and select "Background Remover." Canva processes each frame and strips the background, leaving you with an isolated subject you can place over any custom background built inside the editor. Use this for talking-head clips where the original background does not match your brand.
Export your video with the right settings
Once your edit is complete, click the "Share" button in the top-right corner and select "Download." Choose MP4 as your file format for the best compatibility across every major platform. Under the quality dropdown, select 1080p for standard publishing or 4K if you have a Pro account and your footage was shot at that resolution. Compressing to a lower resolution than your source footage saves file size but permanently reduces visual quality.
Here are the recommended export settings by platform:
| Platform | Format | Resolution | Notes |
|---|---|---|---|
| TikTok / Reels / Shorts | MP4 | 1080 x 1920 | Vertical only |
| YouTube | MP4 | 1920 x 1080 | 4K if available |
| MP4 | 1920 x 1080 | Keep under 5 minutes | |
| Instagram Feed | MP4 | 1080 x 1080 | Square crops cleanest |
Deselect any pages you do not want included in the final download using the page selector that appears before you confirm the export. Canva downloads the file directly to your device, and you can upload it to your platform of choice immediately after.
Next steps after your first edit
Completing this canva video editor tutorial gives you a working foundation, but one clean edit is not a content system. The gap between occasional videos and consistent growth comes down to repeatable process, not individual effort. Take what you built here and run the same workflow on your next three clips before you change anything. Repetition is how you spot which steps slow you down and which decisions you make the same way every time, and that's when you can start streamlining.
Once you've built the habit, the next constraint most founders hit is time and production quality at scale. Editing in Canva works, but managing scripts, hooks, captions, audio, and distribution alongside a business drains the hours fast. If you want a done-for-you content system built around data and consistent output, apply to work with the SocialRevver team and get a free 40-slide social media strategy built for your brand.