
DaVinci Resolve has become the go-to editing software for creators who want professional results without the subscription fees. Whether you're cutting your first video or transitioning from another NLE, this DaVinci Resolve tutorial walks you through the core workflow, from importing footage to exporting a polished final product with color correction applied.
At SocialRevver, we use professional editing pipelines daily to produce short-form content that drives real business results. We've seen firsthand how understanding these fundamentals separates amateur-looking content from scroll-stopping videos. Even if you're not editing yourself, knowing what goes into quality production helps you communicate better with editors and evaluate the work being done for your brand.
This guide covers the essential edit and color workflow that every beginner needs. You'll learn how to navigate the interface, make precise cuts, apply basic color grades, and export your video correctly. No fluff, no unnecessary detours, just the practical steps to get you editing confidently.
What you need before you start in DaVinci Resolve
Before you dive into this DaVinci Resolve tutorial, you need to ensure your system meets the basic requirements and you have the software installed. The free version of DaVinci Resolve gives you access to all core editing tools, including professional color grading, making it more than adequate for most content creation workflows. You'll also want to organize your source files and understand the basic interface layout before you start cutting.
System requirements and installation
Your computer needs at least 16GB of RAM and a dedicated graphics card to run DaVinci Resolve smoothly. While the software can technically run on 8GB, you'll experience lag when scrubbing through footage or applying effects. Download the free version directly from Blackmagic Design's website, which supports both Windows and Mac systems.
A dedicated GPU handles real-time playback and color grading tasks far better than integrated graphics.
The installation process takes about 10 minutes and requires roughly 1GB of disk space for the application itself. You'll need additional storage for your media cache and project files, ideally on a separate drive from your operating system to maintain performance during playback.
Essential workspace setup
Create a dedicated folder structure before importing any footage. Organize your source files into clear categories like video clips, audio, graphics, and music so you can locate assets quickly during the edit. This prevents the common beginner mistake of searching through random folders mid-project.
Position your playback monitor at eye level and ensure you're working in a calibrated viewing environment if color accuracy matters for your content. Your workspace directly impacts editing speed and decision-making quality.
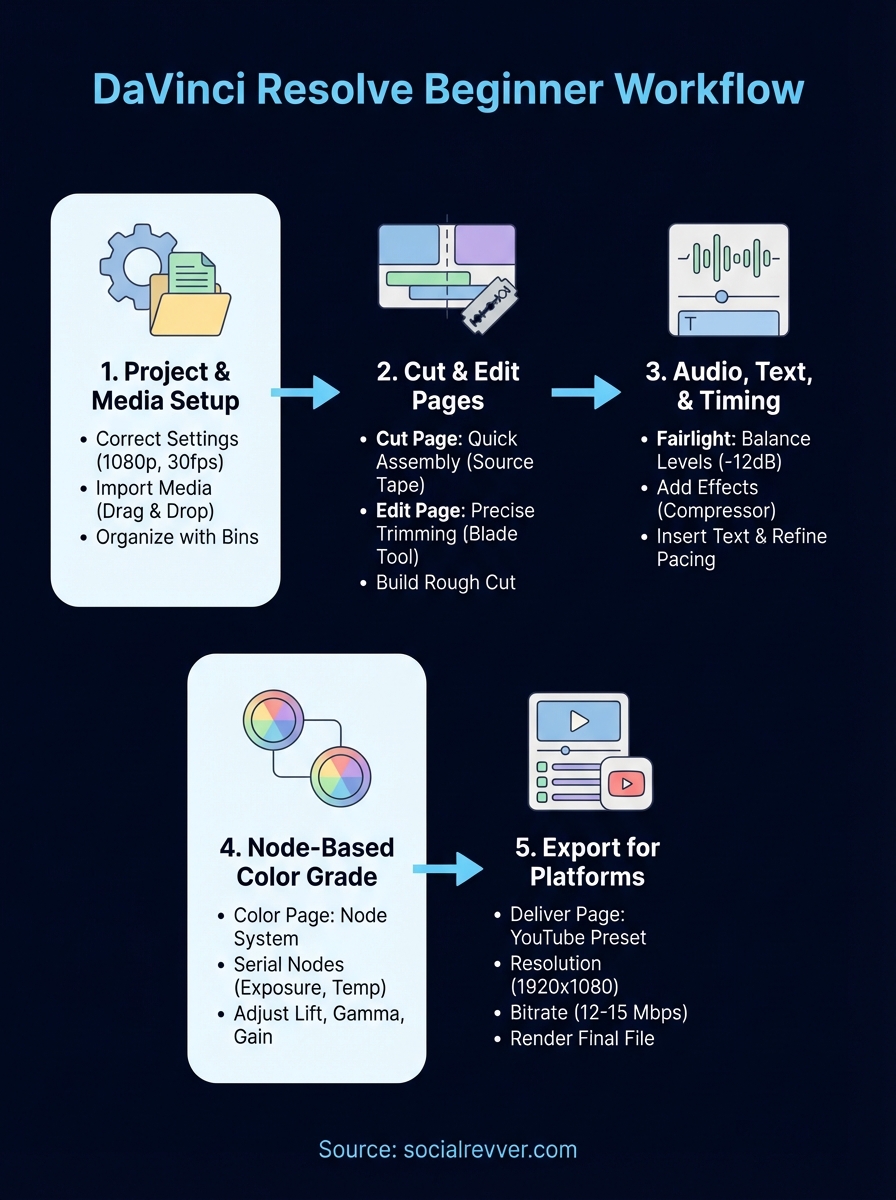
Step 1. Create a clean project setup and import media
Starting your DaVinci Resolve tutorial with a properly configured project prevents downstream headaches with resolution mismatches and frame rate issues. You'll establish your project settings first, then bring in your media using the correct import method. This foundation ensures smooth playback and accurate exports later in your workflow.
Create a new project with correct settings
Launch DaVinci Resolve and select "New Project" from the project manager. Name your project something descriptive like "ClientName_VideoType_Date" to stay organized. Before importing any footage, navigate to the gear icon in the bottom right to access project settings.
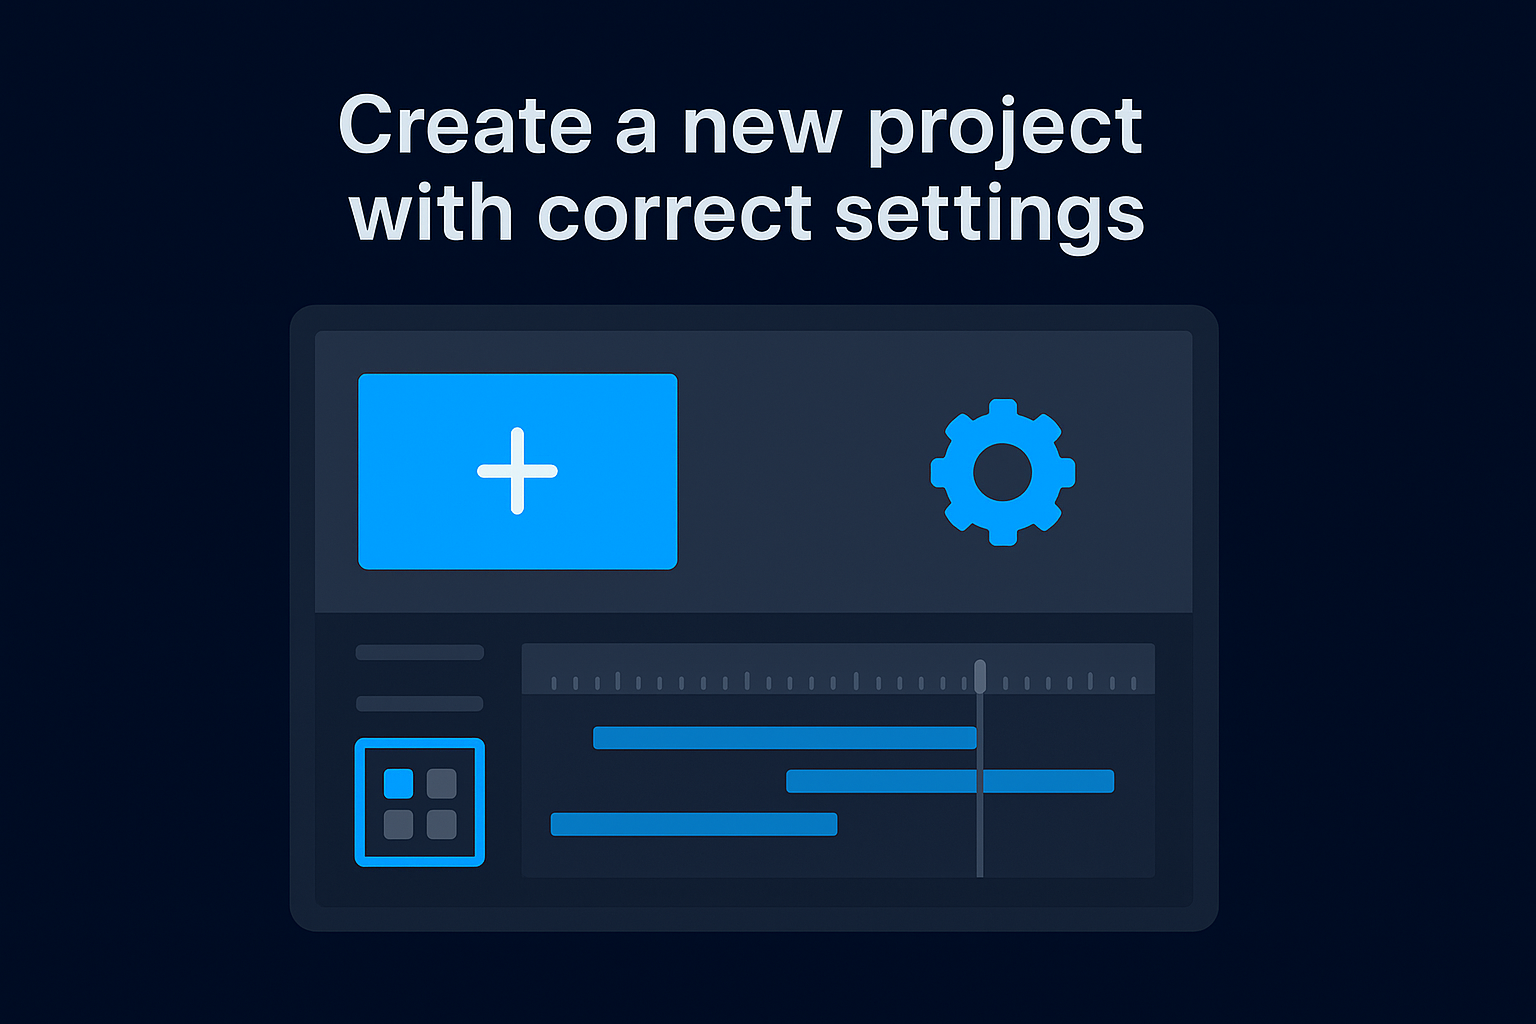
Set your timeline resolution to match your final export target, typically 1920x1080 for most content. Choose 30fps for short-form platforms or 24fps for cinematic content. These settings lock your project specifications and prevent resolution conflicts when you start editing.
Import and organize your media files
Click the Media Pool icon in the top left corner of the Media page. Right-click inside the media pool and select "Import Media" to browse your organized folder structure. You can also drag files directly from your file explorer into this window for faster importing.
Create bins within the media pool by right-clicking and selecting "Add Bin" to separate video clips, audio tracks, and graphics. This organizational step saves you minutes on every edit by keeping assets accessible without scrolling through a cluttered timeline.
Step 2. Build a strong rough cut on the Cut and Edit pages
The rough cut stage separates your raw footage from a coherent story. You'll use the Cut page to quickly assemble clips in sequence, then move to the Edit page for precise trimming and arrangement. This two-phase approach speeds up your workflow by matching tool functionality to task complexity.
Assemble clips quickly on the Cut page
Navigate to the Cut page icon in the bottom toolbar. This workspace streamlines fast assembly with a dual timeline view that shows your entire project and current edit point simultaneously. Drag your best takes from the media pool directly onto the timeline in the order you want them to appear.
Use the Source Tape feature to scrub through all imported clips without opening each individually. Mark in and out points with "I" and "O" keys, then click "Append" to add clips to your timeline end. This method eliminates the repetitive clicking that slows down traditional editing.
The Cut page reduces assembly time by 40% compared to traditional three-point editing workflows.
Refine timing on the Edit page
Switch to the Edit page by clicking its icon in the bottom toolbar. You now have access to multi-track editing and advanced trimming tools for precise control. Use the blade tool (B key) to cut clips exactly where you need transitions or timing changes.
Step 3. Polish the edit with audio, text, and timing
Your rough cut establishes the structure, but professional polish comes from audio balance and strategic text placement. This step transforms your timeline from a functional sequence into content that holds attention. You'll adjust volume levels, add motion graphics, and fine-tune timing to create viewer engagement.
Balance audio levels and add effects
Click the Fairlight page icon to access audio mixing tools. Drag the volume slider on your timeline clips to around -12dB for dialogue and -18dB for background music. This prevents audio clipping while maintaining clear vocal presence across platforms.
Apply a compressor effect from the Effects Library to even out volume inconsistencies in your dialogue tracks. This professional touch ensures viewers don't adjust their volume constantly while watching your content.
Consistent audio levels reduce viewer drop-off by eliminating the frustration of constant volume adjustments.
Add text and refine timing
Return to the Edit page and access the Effects Library to find text templates. Drag a title or lower third directly onto a track above your video clips. Double-click the text in the viewer window to customize your copy and font.
Trim your clips tighter by removing pauses longer than 0.5 seconds between sentences. This pacing adjustment keeps viewers engaged without sacrificing comprehension.
Step 4. Color grade with a simple node-based workflow
The Color page in DaVinci Resolve uses a node-based system that separates each adjustment into individual containers. This approach gives you non-destructive editing control where you can modify or disable any correction without affecting others. Your color grade transforms flat-looking footage into polished content that matches your brand aesthetic.
Access the Color page and add nodes
Click the Color page icon in the bottom toolbar to reveal the node editor below your viewer. You'll see one node automatically created for your selected clip. Right-click in the node area and select "Add Node" then "Add Serial" to create a second node connected in sequence.

Use the first node for exposure and contrast corrections, then use the second node for color temperature adjustments. This separation lets you toggle individual corrections on and off to compare your changes against the original footage.
Apply basic primary corrections
Adjust the Lift wheel to control shadow brightness and the Gamma wheel to modify midtones. Push your highlights slightly using the Gain wheel to add dimension. Keep adjustments subtle by staying within 10-15 points of movement on each control to maintain natural-looking results.
Step 5. Export the right way for YouTube and short-form
Your final export settings determine whether your content displays correctly across platforms. You'll configure resolution, codec, and bitrate settings to match platform requirements while maintaining quality. This final step in your DaVinci Resolve tutorial ensures your work translates from timeline to published video without compression artifacts or formatting errors.
Configure export settings for platform specifications
Navigate to the Deliver page by clicking its icon in the bottom toolbar. Select "YouTube" from the preset list on the left panel, which automatically configures H.264 codec and MP4 container format. Adjust your resolution to 1920x1080 for standard content or 1080x1920 for vertical short-form videos.
Set your bitrate to 12-15 Mbps for YouTube uploads to maintain quality after platform compression. Lower bitrates cause visible banding in gradients and motion blur during fast movements.
Platform-optimized export settings prevent quality loss and reduce upload rejection rates.
Render your final file
Click "Add to Render Queue" after confirming your settings, then hit the "Render All" button to begin processing. Your export time depends on clip length and effect complexity, typically taking 2-3 minutes per minute of finished content.
Next steps
You now understand the complete editing workflow from import to export. This DaVinci Resolve tutorial covered the essential steps that professional editors use daily, including organizing media, building rough cuts, balancing audio, and applying color grades through node-based workflows. Your next project should focus on speed rather than perfection as you build muscle memory with keyboard shortcuts and timeline trimming techniques.
Practice each stage separately by recreating short 30-second test edits that force you to use every tool covered here. Start with simple cuts, then add one complexity layer per project until you're combining audio mixing, text animation, and color grading simultaneously. Repetition builds the technical foundation that transforms editing from a chore into an efficient production system.
Building a consistent content system requires more than editing skills alone. If you want to transform your content into a predictable revenue engine rather than random posts, apply to work with our team and receive a comprehensive 40+ slide social media strategy tailored to your business goals.