
Adobe Premiere Pro is the industry standard for video editing, and for good reason. Whether you're cutting together your first YouTube video or building out short-form content for a brand, it gives you professional-grade control over every frame. But cracking it open for the first time? That can feel overwhelming. The timeline, the panels, the export settings, there's a lot going on. That's exactly why we put together this Adobe Premiere Pro tutorial.
At SocialRevver, our editing team lives inside Premiere Pro daily, producing thousands of optimized short-form videos through our AI-supported editing pipeline. We know what beginners struggle with because we've trained editors through those exact growing pains. The fundamentals covered here are the same ones that form the foundation of our production workflow.
This guide walks you through everything step by step, from setting up your first project and navigating the interface to making cuts, adding transitions, working with audio, and exporting a finished video. No fluff, no skipped steps. By the end, you'll have the core skills to edit real videos in Premiere Pro and a clear understanding of how the software actually works so you can keep building from there.
What to know before you start
Before you open Premiere Pro and start editing, a few things are worth getting straight first. Understanding the basics upfront saves you from hitting frustrating roadblocks mid-edit, like discovering your computer can't run the software smoothly or not knowing what a sequence is when the timeline doesn't behave as expected. This section covers what you need system-wise, which panels matter most, and the terminology that will make every step in this adobe premiere pro tutorial easier to follow.
System requirements and installation
Premiere Pro is resource-intensive. If your machine doesn't meet the minimum specs, you'll experience lag, dropped frames, and crashes that have nothing to do with your actual editing ability. Adobe recommends at least 16GB of RAM for smooth performance, though 32GB is better if you plan to work with 4K footage or multiple effects layers. You'll also want a dedicated GPU with at least 4GB of VRAM to take advantage of hardware acceleration in the Mercury Playback Engine.
Running Premiere Pro on a machine that barely meets the minimum specs will slow down your learning curve significantly. Get the hardware right before you start.
| Component | Minimum | Recommended |
|---|---|---|
| RAM | 8GB | 32GB |
| GPU VRAM | 2GB | 4GB+ dedicated |
| Storage | HDD | NVMe SSD |
| OS | Windows 10 / macOS 12 | Latest version |
| CPU | Multi-core Intel or AMD | 8-core or higher |
You can download and install Premiere Pro through Adobe Creative Cloud. A subscription gives you access to the full Adobe suite, including After Effects and Audition, both of which connect directly with Premiere Pro. If you're on a tight budget, Adobe offers a free seven-day trial so you can follow along with this guide before committing.
The five panels you'll use every time
Most of your editing time in Premiere Pro happens across five core panels. Getting familiar with these before you start cutting removes confusion and saves time. You don't need to memorize every feature right now, just know what each one is for so you can orient yourself quickly once you're inside the software.
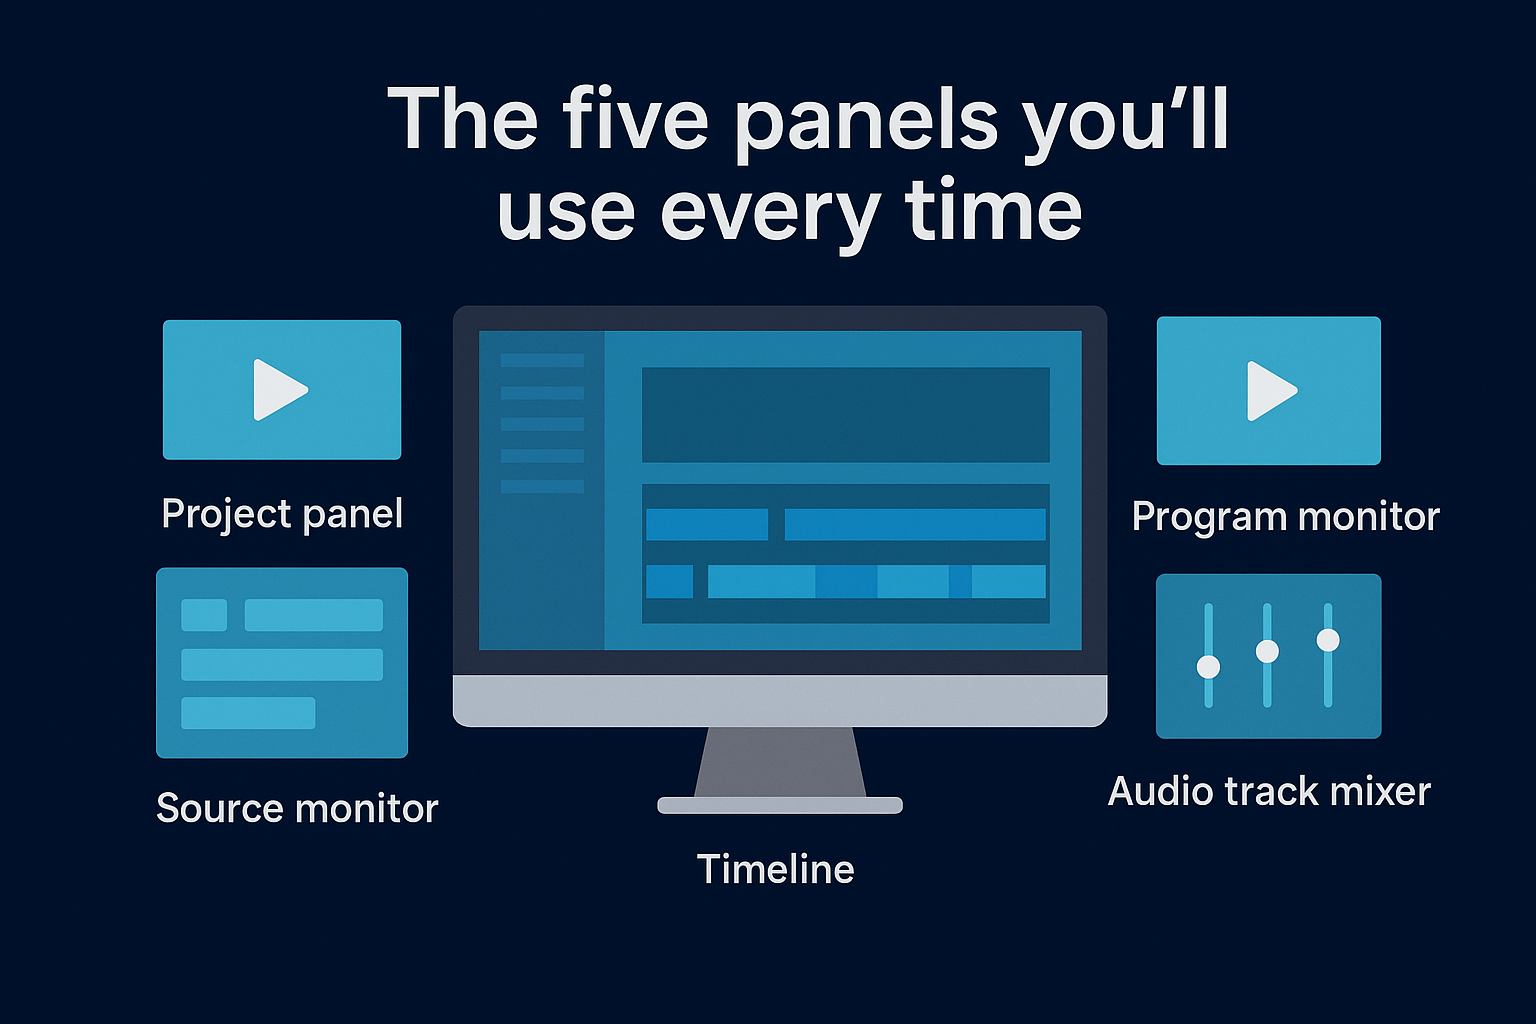
- Project panel: stores all your imported media files
- Source Monitor: previews individual clips before you place them in the timeline
- Program Monitor: shows your timeline playback in real time
- Timeline: where you build and arrange your full edit
- Audio Track Mixer: controls volume levels across all your tracks
Key terms you'll see throughout
The software uses specific language that shows up constantly on any project. Knowing these terms before you start means you won't need to stop and search mid-edit, which breaks your focus and slows progress. Each term below maps to a real action or element you'll work with in the steps ahead.
- Sequence: the container that holds your edit in the timeline
- Clip: any individual piece of media, whether video, audio, or image
- In/Out points: the start and end markers you set on a clip before placing it
- Render: processing effects so playback runs without dropping frames
- Export: the final step of turning your sequence into a finished video file
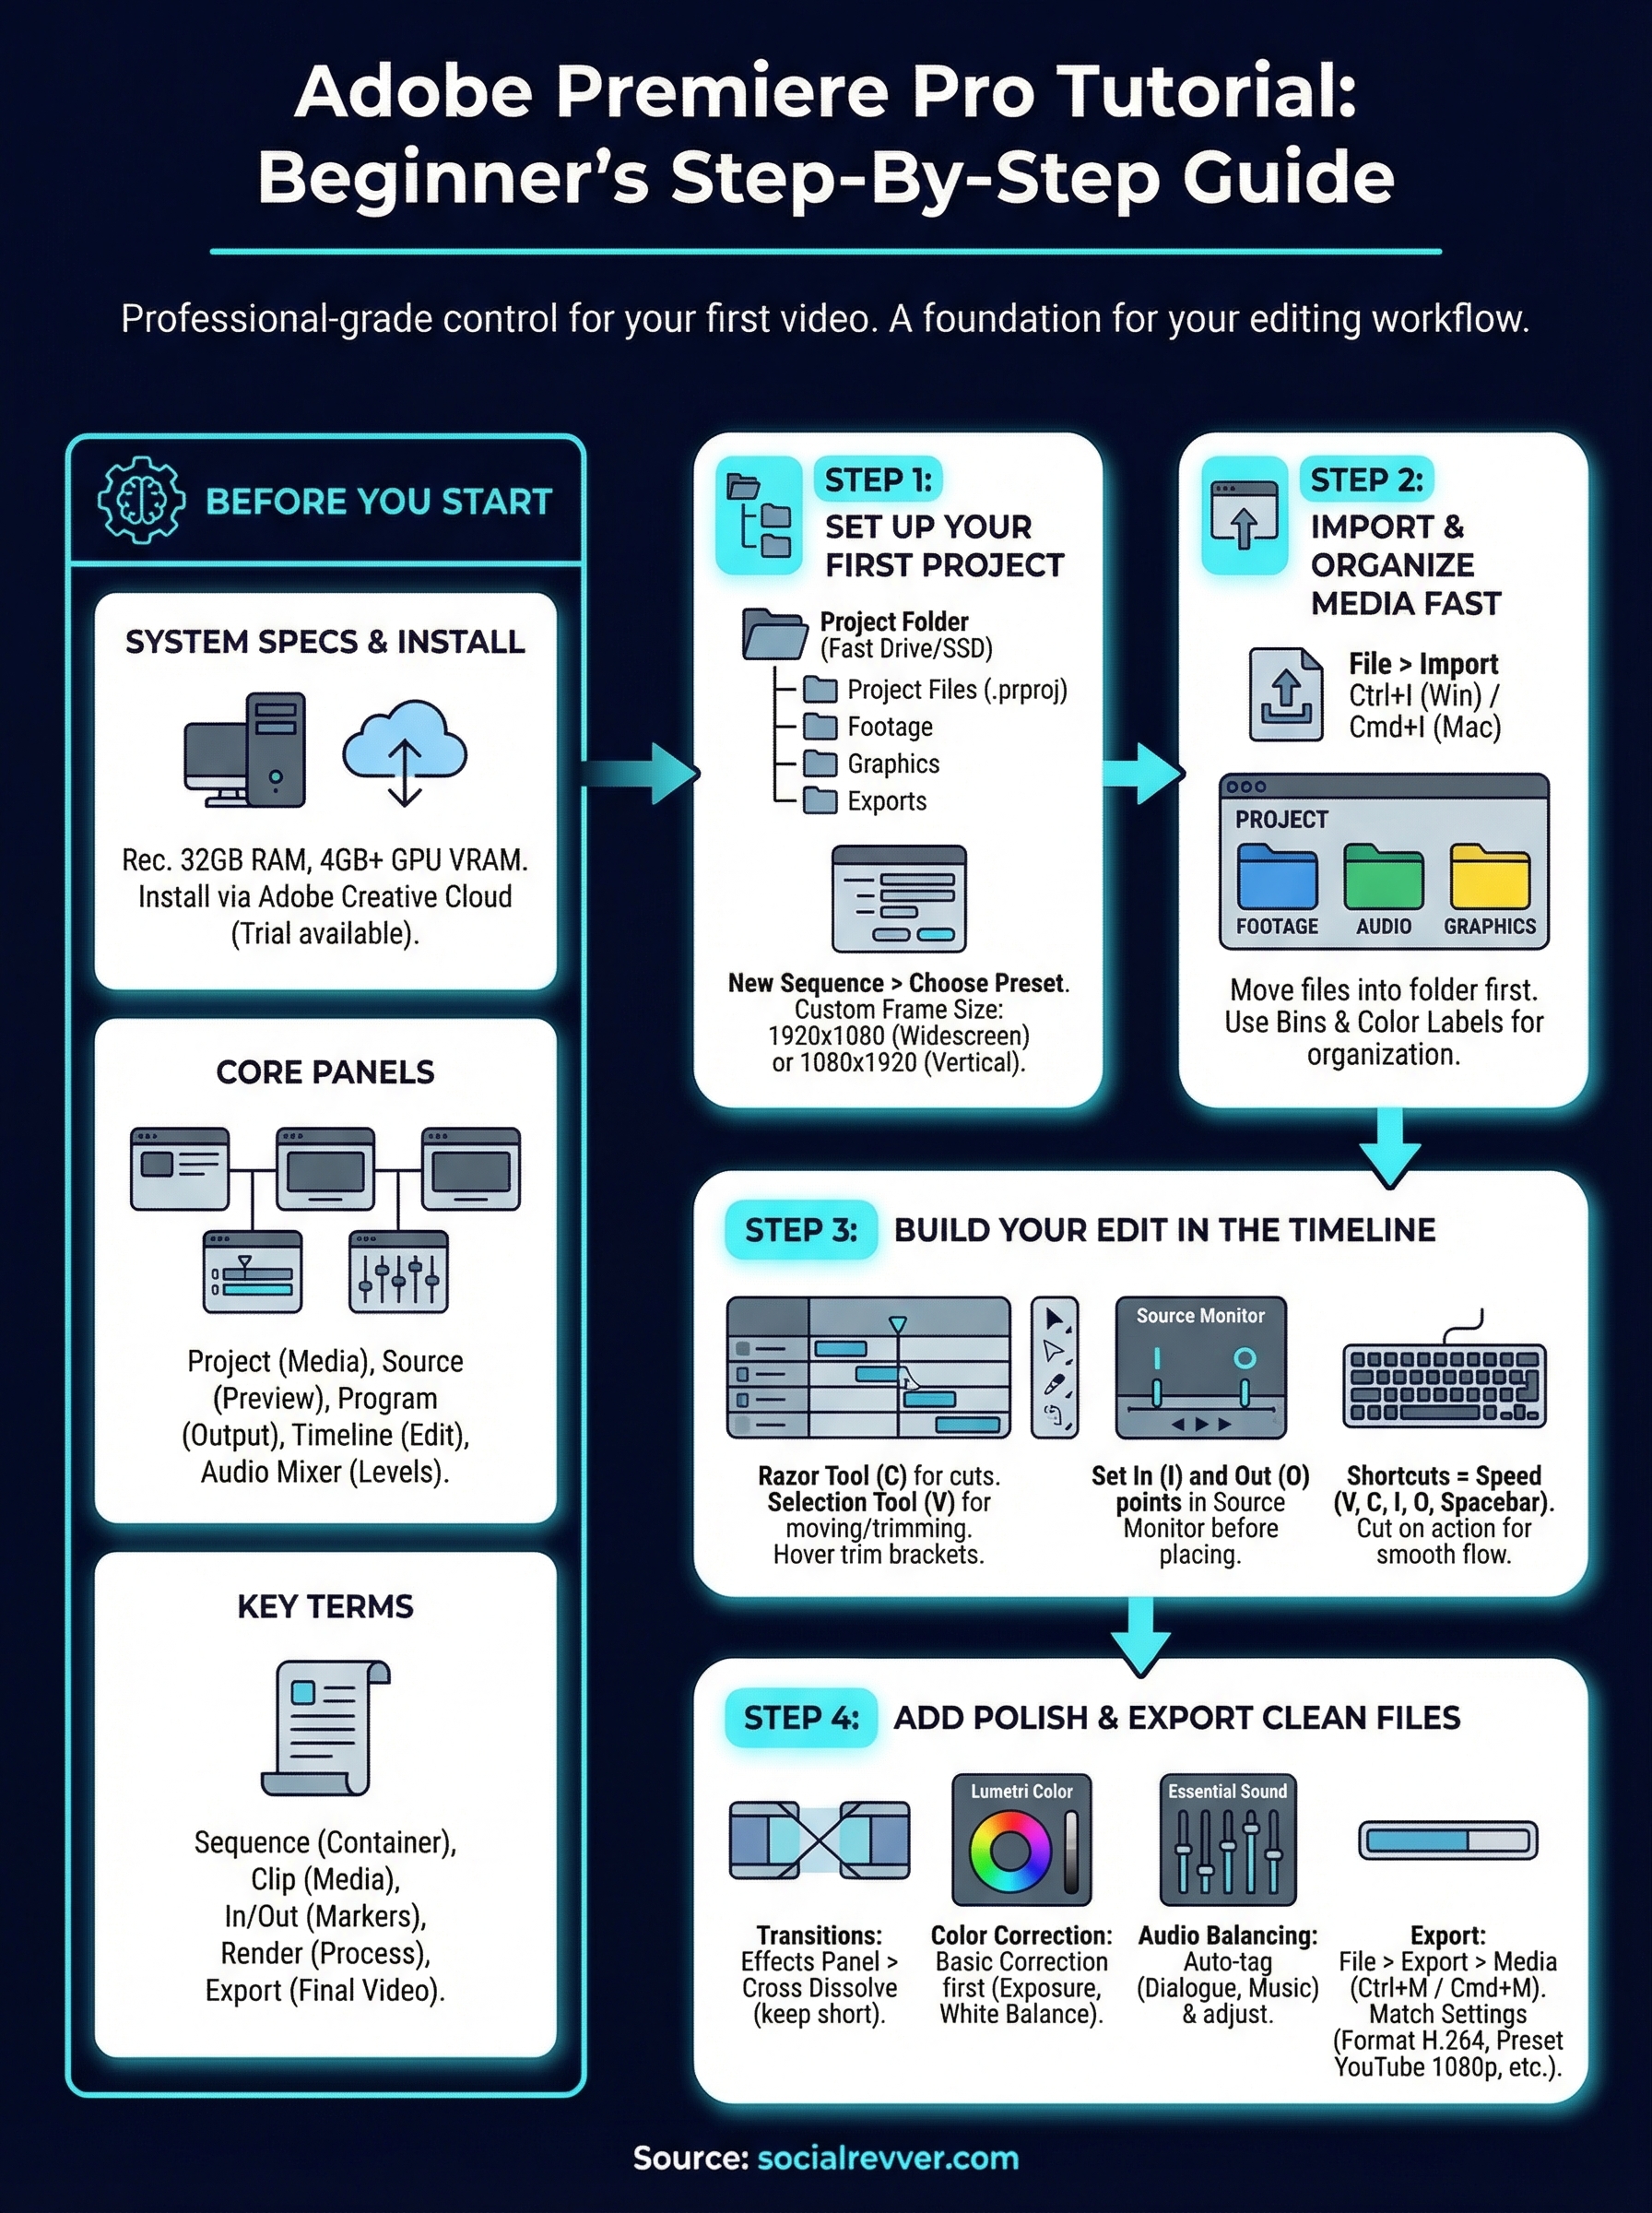
Step 1. Set up your first project
Opening Premiere Pro for the first time drops you straight onto a project creation screen. Before you click anything, understand that your project file is not your video. It is a container that references your media files and stores all your editing decisions. Keeping this separation clear will help you stay organized as your projects grow in complexity.
Create a new project the right way
Click New Project on the Home screen and you land in the project setup dialog. Give your project a clear name like "Client_Name_Video_01" rather than "Untitled Project," then set your storage location to a dedicated folder on your fastest drive, ideally an NVMe SSD. Premiere Pro reads and writes constantly during editing, so a slow drive causes real performance problems.
Use this folder structure for every project you start:
- Project Files: your .prproj file lives here
- Footage: all raw video and audio files
- Graphics: logos, overlays, and still images
- Exports: finished video files ready to deliver
Setting up this folder structure before you import anything is one of the simplest habits that separates organized editors from ones who lose files mid-project.
Configure your sequence settings
Once your project is open, you need to create a sequence before you can start editing. Go to File > New > Sequence and choose a preset that matches your footage. If you are working with standard 1080p footage shot at 30fps, select the AVCHD 1080p30 preset. If you are editing short-form vertical content, you will adjust the frame size after creation.
To set a custom frame size, go to Sequence > Sequence Settings after creating your sequence, then input the width and height manually. For vertical short-form content, use 1080 x 1920. For standard widescreen, use 1920 x 1080. Getting this right upfront means you will not deal with black bars or cropped frames in your final export. This step appears in every reliable adobe premiere pro tutorial for good reason: wrong sequence settings create problems that are frustrating to fix later.
Step 2. Import and organize media fast
With your project and sequence set up, importing your media is the next move. Premiere Pro does not copy your files into the project. It creates references to wherever your files live on your hard drive, which means moving or renaming files after import breaks those links and leaves you with offline media errors. Keep your files inside the folder structure you set up in Step 1 before you bring anything in.
Import your footage correctly
To import media, go to File > Import or use the keyboard shortcut Ctrl+I on Windows or Cmd+I on Mac. Navigate to your footage folder, select your files, and click Import. You can also drag files directly from your desktop into the Project panel. Both methods work, but using a defined folder structure makes the drag-and-drop approach faster when you are managing multiple clips across a project.
Never import files from a desktop or downloads folder. Always move footage into your designated project folder first so your reference links stay intact.
Premiere Pro supports a wide range of formats including MP4, MOV, MXF, and AVI. If your footage comes from a camera card, use File > Import and navigate directly to the card. Do not copy individual files manually from the card root, as some camera formats store metadata in companion files that Premiere Pro needs to read the footage correctly.
Organize bins before you cut
A bin in Premiere Pro works exactly like a folder inside your Project panel. Right-click inside the Project panel and select New Bin to create one. Name your bins by media type: Footage, Audio, Graphics, and Sequences. This keeps your Project panel clean and prevents you from hunting for clips mid-edit, which breaks your focus and slows the whole process down.
This step in any solid adobe premiere pro tutorial often gets skipped, but organized bins directly speed up every edit you build from this point forward. Use color labels on your clips by right-clicking any clip and selecting Label to visually separate b-roll from talking head footage, or music tracks from voiceover recordings.
Step 3. Build your edit in the timeline
With your media organized, you are ready to start building the actual edit. The timeline is where all your creative decisions come together, and understanding how to work efficiently inside it will determine how fast your editing improves. Drag a clip from the Project panel directly onto the timeline to place it in your sequence. Premiere Pro will snap the clip to the playhead position by default.
Place and trim your clips
Dragging footage into the timeline gives you a rough cut to work with, but trimming it down to only what works is where the real editing starts. Select the Razor tool (C) to cut a clip at any point on the timeline, then switch back to the Selection tool (V) to move or delete segments. For faster trimming without switching tools, hover over the edge of any clip with the Selection tool until you see a red trim bracket appear, then drag inward to shorten the clip.
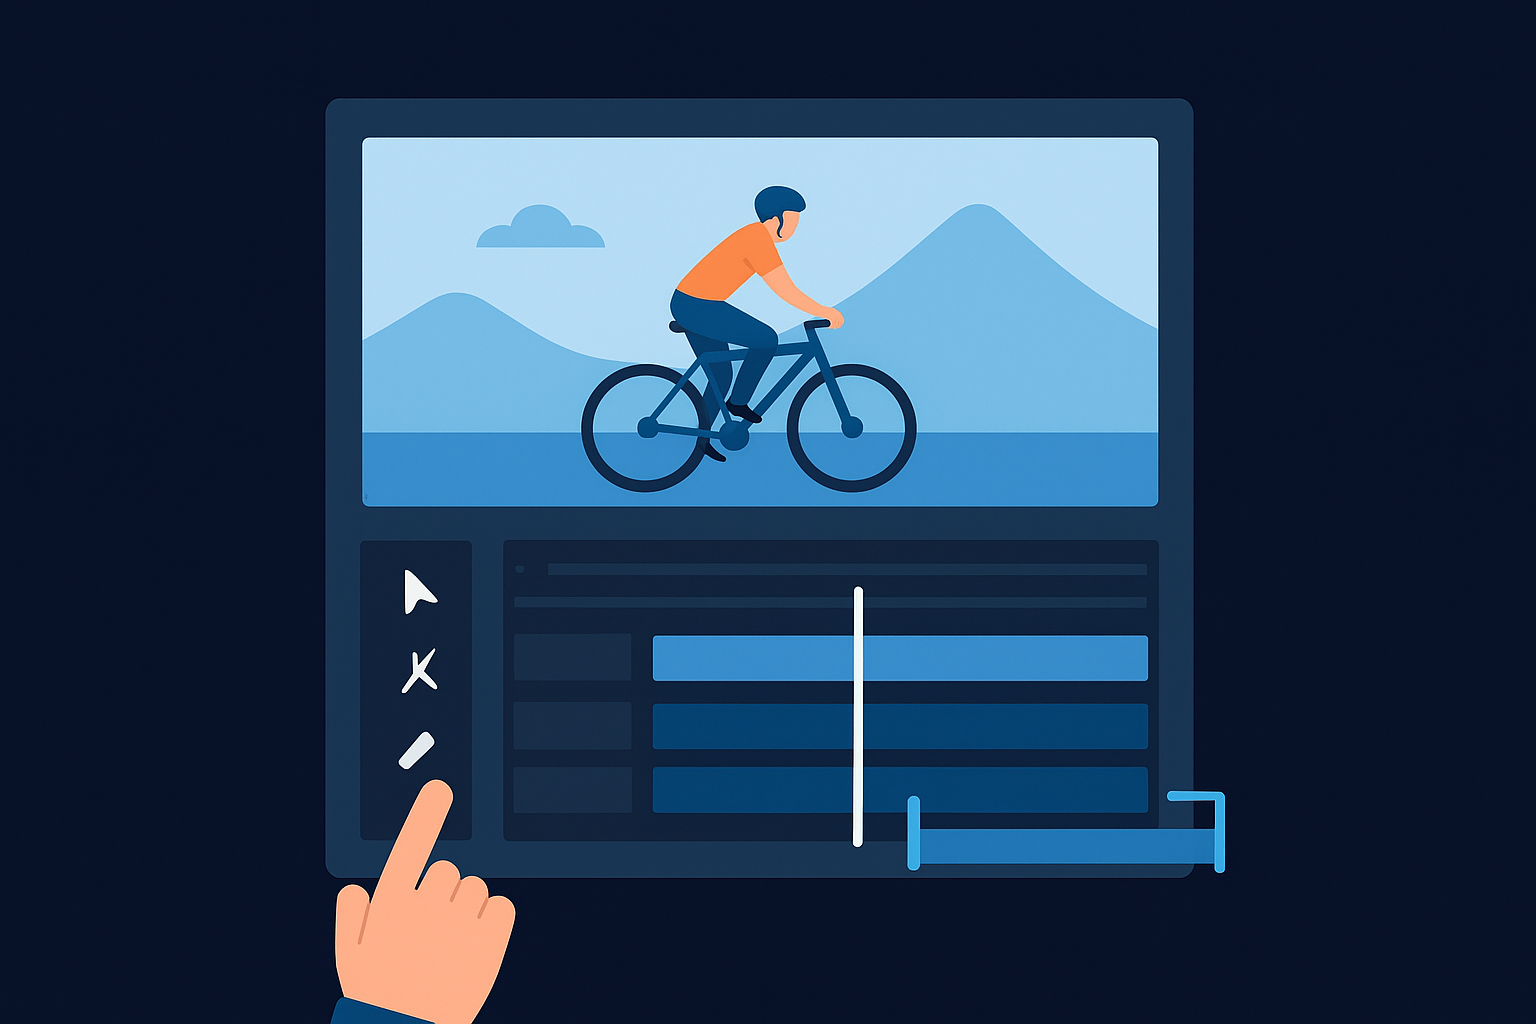
Use the keyboard shortcut I to set an In point and O to set an Out point on any clip in the Source Monitor before placing it. This lets you drop only the exact section you want into the timeline without placing the full clip and trimming afterward. It is one of the fastest workflow habits covered in any solid adobe premiere pro tutorial and one worth building early.
Keyboard shortcuts are not optional in Premiere Pro. Learning just five core ones, V, C, I, O, and the spacebar, cuts your editing time significantly from day one.
Cut to the rhythm, not just the visuals
Every cut you make should serve the pacing of the video, not just remove dead space. Play your sequence back using the spacebar and ask yourself whether each cut feels natural to the viewer. Cutting on action, where a subject starts or finishes a movement, creates smoother transitions than cutting on a static hold. Practice this on a 60-second clip before moving to longer edits so the habit forms quickly.
Step 4. Add polish and export clean files
Once your cuts are in place, polishing the edit is what separates a rough assembly from a finished video. This step covers transitions, color correction, audio balancing, and export settings, each of which affects how professional your final file looks and sounds. Skipping any of them shows in the output, and viewers notice even if they can't name exactly what's off.
Apply transitions and fix your color
Transitions in Premiere Pro live in the Effects panel, which you open by going to Window > Effects. The most-used transition is Cross Dissolve, found under Video Transitions > Dissolve. Drag it between two clips on the timeline to apply it. Keep transitions short, typically under 15 frames, to avoid making your edit feel slow. For audio, open the Essential Sound panel under Window > Essential Sound, tag each clip as Dialogue, Music, or Ambience, and let Premiere automatically balance levels as a starting point before you adjust manually.
Color correction happens in the Lumetri Color panel, found under Window > Lumetri Color. Start with the Basic Correction tab to fix exposure, contrast, and white balance before touching anything creative. Correct first, then grade. Jumping straight to creative looks without fixing the base image almost always produces footage that looks inconsistent across your cut.
Fixing exposure and white balance before applying any creative grade will save you hours of rework later.
Export your finished video
Exporting is the final step, and in any thorough adobe premiere pro tutorial, this is where beginners make the most avoidable mistakes. Go to File > Export > Media or press Ctrl+M on Windows or Cmd+M on Mac to open the Export Settings dialog. Use the table below to match your settings to your output goal.
| Output Type | Format | Preset | Resolution |
|---|---|---|---|
| YouTube widescreen | H.264 | YouTube 1080p Full HD | 1920x1080 |
| Short-form vertical | H.264 | Custom | 1080x1920 |
| Client delivery | H.264 | Match Source - High Bitrate | Source resolution |
| Archive copy | QuickTime | Apple ProRes 422 | Source resolution |
Before you click Export, set your output file destination to your designated Exports folder, and confirm your frame rate matches your sequence settings in the Video tab to prevent choppy playback on any platform.
Wrap up and keep practicing
You now have everything you need to start editing real videos in Premiere Pro. This adobe premiere pro tutorial covered the full workflow from project setup and media organization to cutting, polishing, and exporting clean files. None of these skills come from reading alone, so open the software, load some footage, and run through each step on an actual project. The faster you get reps in, the faster your editing instincts develop.
Mistakes will happen early, and that is part of the process. Trim something too aggressively, export the wrong format, lose a clip reference and then fix it. Every problem you solve teaches you something a tutorial can't. Consistent practice over a few weeks will take you from hesitant to confident faster than you expect.
If you want your videos to convert attention into actual business results, get your free social media strategy and see how our team builds content systems that do the heavy lifting for you.