
You shot your first video, opened your editing software, and immediately felt overwhelmed by timelines, cuts, and export settings. That's normal. Learning how to edit videos for beginners feels like staring at a cockpit dashboard when all you want to do is fly. But here's the thing, editing is a learnable workflow, not a talent you're born with. Once you understand the sequence of steps, the rest is just practice and repetition.
At SocialRevver, we've built an entire production pipeline around short-form video editing. Our team processes hundreds of videos every month, and the core principles behind every polished piece of content are the same fundamentals you're about to learn. We know what separates a scroll-stopper from a skip because we've analyzed the editing patterns behind over 750,000 videos. That experience shaped this guide.
Below, you'll find a step-by-step editing workflow that covers everything from choosing your first software to exporting a finished video ready for YouTube or social media. No fluff, no theory dumps, just the exact process to go from raw footage to a clean, watchable edit. Whether you're creating content for a personal brand or your business, this is the foundation that everything else builds on.
What you need before you start editing
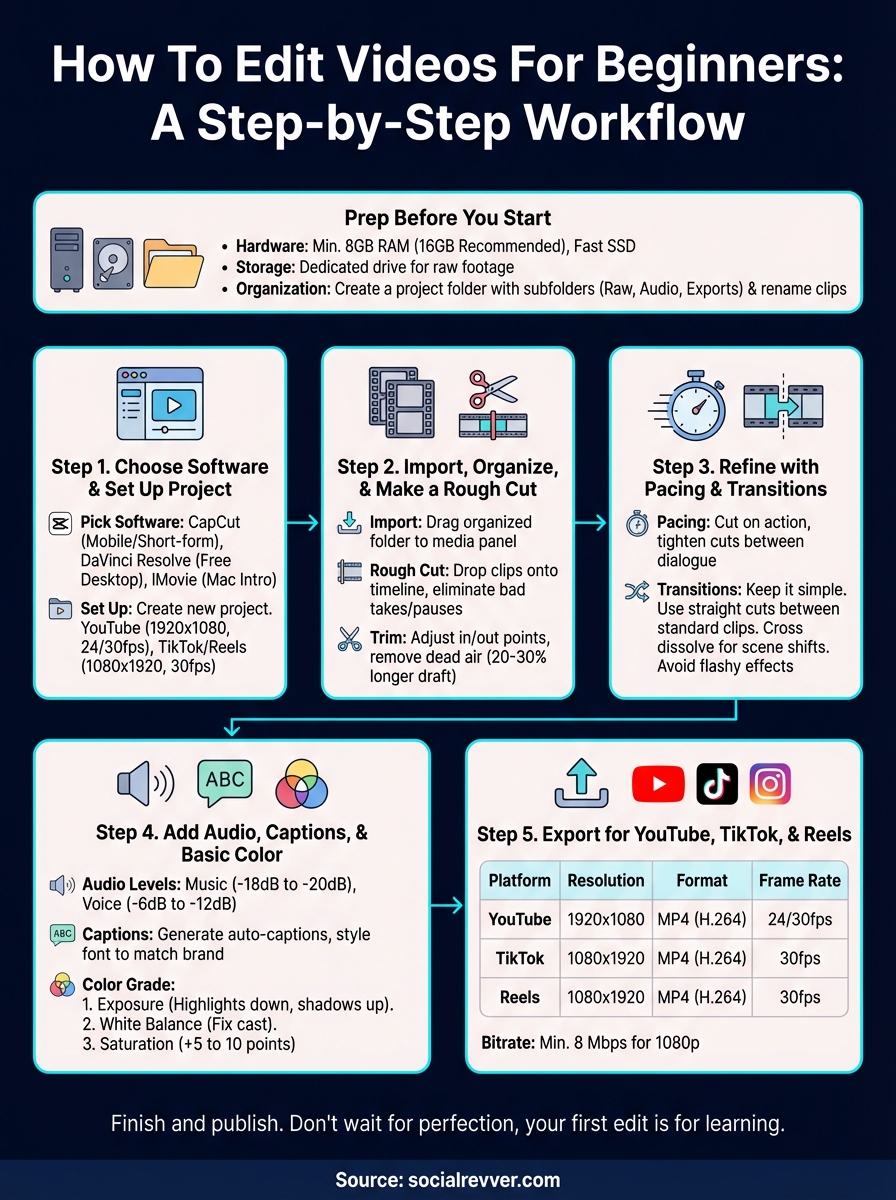
Before you dive into the how to edit videos for beginners workflow, you need to confirm your setup can handle the work. Editing software is CPU and RAM-intensive, and running a timeline on an underpowered machine creates lag, crashes, and lost progress before you even make your first cut. Getting your gear and files in order upfront saves you hours of troubleshooting later.
Hardware and storage
Your computer doesn't need to be top of the line, but it does need to meet a minimum bar. At least 8GB of RAM is the floor for editing 1080p footage without constant buffering, and 16GB is the recommended standard if you plan to work with 4K clips or multiple tracks. Storage matters just as much: keep your raw footage on a dedicated drive separate from your operating system to prevent slowdowns during playback.
A fast SSD makes a bigger difference than most beginners expect. Editing from a slow HDD turns a 30-minute project into a two-hour grind.
Footage and project files
Organizing your raw clips before you open any software is a step most beginners skip and later regret. Create a dedicated project folder on your drive with subfolders for raw footage, audio, graphics, and exports. This basic structure prevents the most common beginner mistake: losing files mid-edit because assets are scattered across your desktop. Rename your clips with short, descriptive labels so you can locate them instantly inside your editor without hunting through a wall of generic file names.
Step 1. Choose software and set up your project
Picking the right editor is the first real decision in the how to edit videos for beginners process. Free tools have closed the gap with paid software, and you don't need to spend money to produce clean, professional-looking content.
Pick the right software
The three most common starting points are CapCut (best for mobile and short-form), DaVinci Resolve (best free desktop option), and iMovie (best for Mac users new to editing). CapCut handles vertical video natively, which makes it the fastest path if TikTok or Reels is your target platform.
If you plan to edit on a desktop and want room to grow, DaVinci Resolve handles everything from basic cuts to full color grading without a price tag.
Set up your project before importing
Open your editor and create a new project with the correct resolution and frame rate before you drag in a single clip. For YouTube, use 1920x1080 at 24fps or 30fps. For TikTok and Reels, switch to 1080x1920 vertical format.
Step 2. Import, organize, and make a rough cut
With your project open, drag your organized footage folder into the media panel of your editor. Most editors like DaVinci Resolve let you import an entire folder at once, so your pre-labeled clips show up instantly without any extra sorting work on your end.
Build your rough cut first
A rough cut is your first pass at telling the story, and it's the most important step in the how to edit videos for beginners workflow. Don't obsess over precision here. Drop every clip you might use onto the timeline in order, then watch it back. Your only job at this stage is to eliminate anything that clearly doesn't belong: bad takes, long pauses, and filler footage.
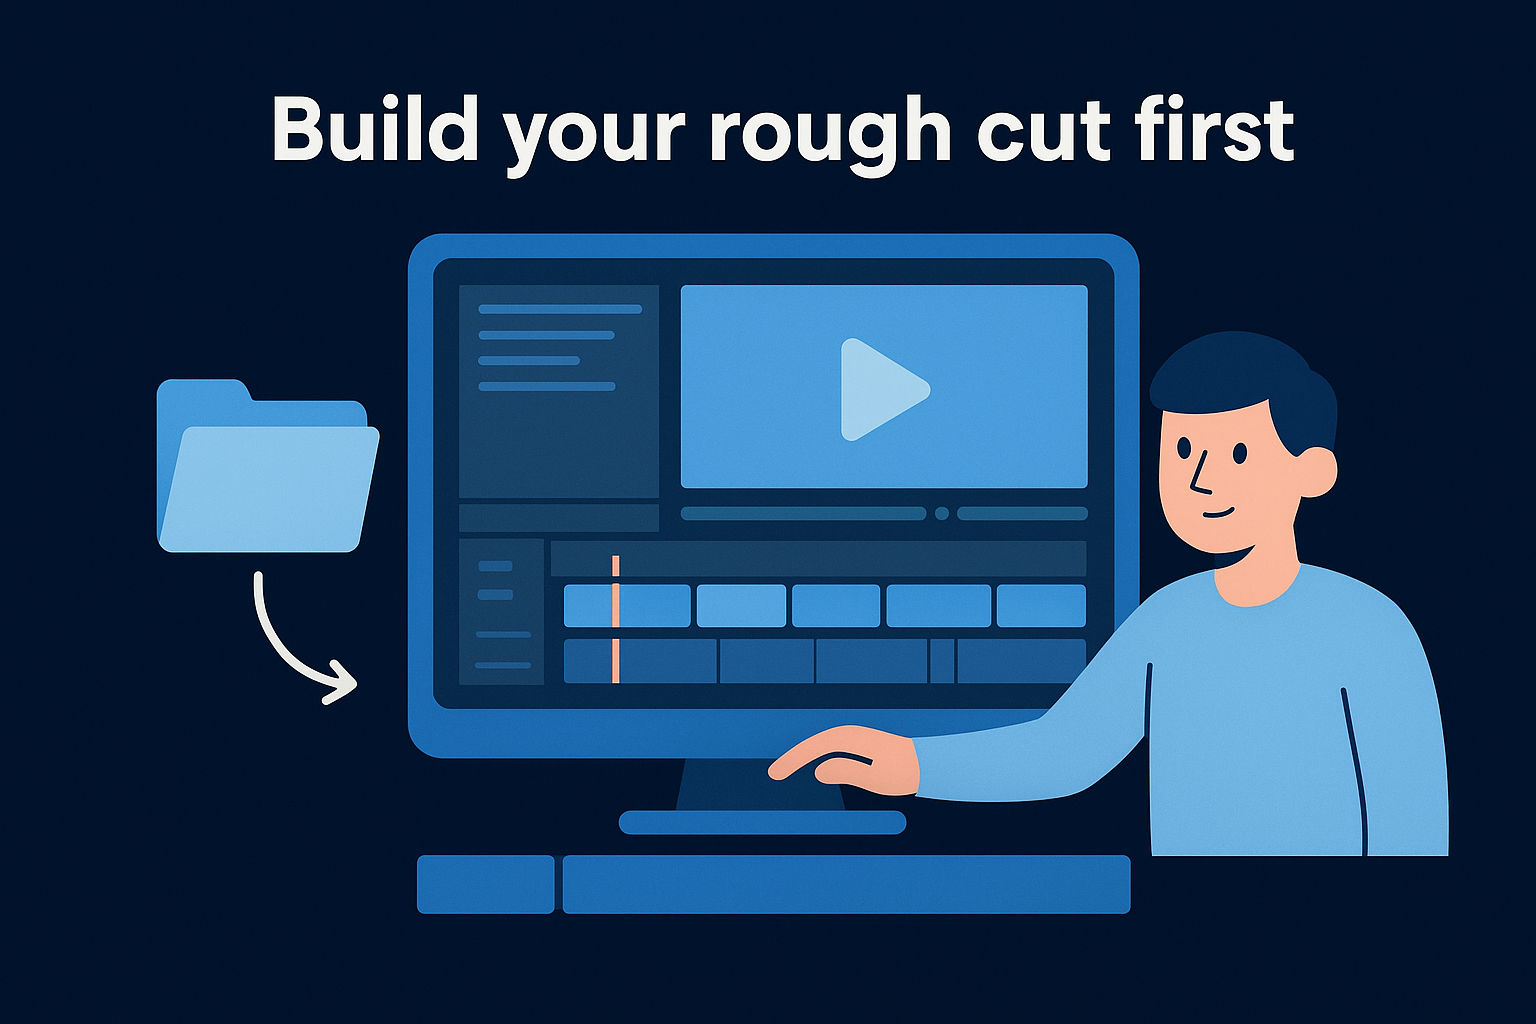
Treat your rough cut like a draft. Getting it wrong on purpose is how you figure out what actually works.
Once you've stripped the obvious waste, trim the in and out points of each clip so the timeline plays without dead air between cuts. A complete rough cut typically runs 20 to 30 percent longer than your final video, and that's exactly where it should be at this stage.
Step 3. Refine the edit with pacing and transitions
Your rough cut tells the story. Now your job is to make it move well. Pacing is the single most important skill in how to edit videos for beginners and it determines whether someone watches to the end or taps out in the first few seconds. Go through your timeline and identify anywhere the energy drops or the video stalls.
Cutting on action instead of between actions keeps the viewer's eye engaged and makes transitions feel invisible.
Tighten your cuts
Pull the end of each clip in until the next one starts right on the beat of the dialogue or movement. Remove every half-second of dead air between sentences. Tighter cuts create momentum and stop your video from feeling slow, even when the content itself is strong.
Use transitions sparingly
The straight cut is the most professional tool on your timeline. Most beginners overload their edits with flashy transitions that distract from the content. Keep it simple with these rules:
- Use a straight cut between every standard clip
- Use a cross dissolve only when shifting between scenes or time periods
- Avoid wipes, zooms, or spin transitions entirely in your first edit
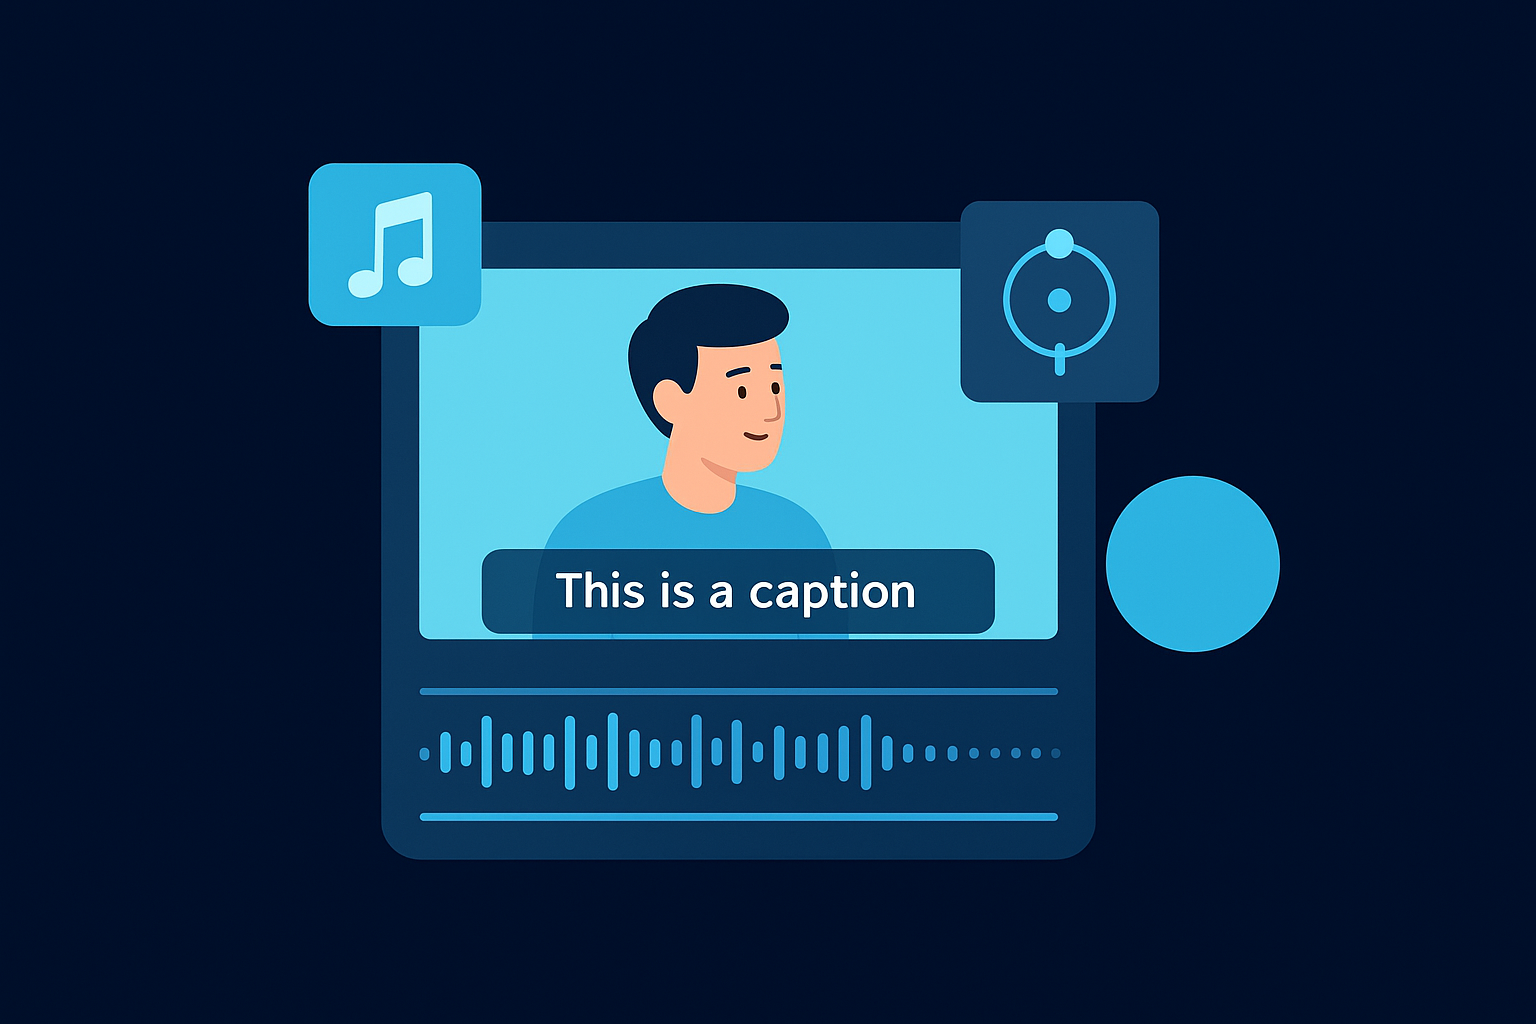
Step 4. Add audio, captions, and basic color
Audio and visuals separate a watchable video from one that feels unfinished. This step in the how to edit videos for beginners workflow covers three layers: background music, captions, and a basic color grade. Each one adds polish without requiring advanced skills.
Set your audio levels
Drop your background music onto a separate audio layer beneath your voice track. Lower the music to between -18dB and -20dB so it sits behind your voice without competing. Your spoken audio should land between -6dB and -12dB for a clean, broadcast-standard mix.
Consistent audio levels matter more than perfect visuals. Viewers tolerate average footage, but they close out bad audio immediately.
Add captions and a basic color grade
Captions keep viewers watching on mute, and every major platform rewards them. Auto-caption tools inside CapCut or DaVinci Resolve generate a draft in seconds. Review for errors, then style the font to match your brand. For color, follow this basic three-step correction:
- Exposure: Bring highlights down and lift shadows slightly
- White balance: Fix any warm or cool color cast
- Saturation: Add 5 to 10 points for color pop without oversaturation
Step 5. Export for YouTube, TikTok, and Reels
The final step in the how to edit videos for beginners workflow is exporting your finished file with the correct settings for each platform. Wrong export settings produce blurry, over-compressed, or rejected uploads, so this step carries as much weight as the edit itself.
Every platform re-compresses your video after upload. Give it the highest quality source file possible so it has something worth working with.
Platform export settings
Each platform has different resolution and file size requirements, and using a one-size-fits-all export creates problems fast. Match your settings to the platform before you hit render, using the table below as your baseline:
| Platform | Resolution | Format | Frame Rate | Max File Size |
|---|---|---|---|---|
| YouTube | 1920x1080 | MP4 (H.264) | 24/30fps | 256GB |
| TikTok | 1080x1920 | MP4 (H.264) | 30fps | 287.6MB |
| Reels | 1080x1920 | MP4 (H.264) | 30fps | 1GB |
Set your bitrate to at least 8 Mbps for 1080p footage to preserve sharpness after platform compression strips quality from your file.
Finish and publish your first edit
You now have everything you need to complete the how to edit videos for beginners workflow. Do one final review pass with fresh eyes, watching your video from start to finish without stopping. Check that your audio levels are consistent, your captions are accurate, and your export file matches the platform you're uploading to.
Publishing is where most beginners stall. Don't wait for the perfect edit because your first video will never feel ready. Post it, watch the performance data, and use what you learn to improve the next one. Every edit you finish builds the pattern recognition that separates average content from content that actually converts.
If you want a done-for-you system that handles scripting, production, and distribution while you focus on running your business, apply to work with the SocialRevver team and get a free 40+ slide social media strategy built specifically for your brand.