
Subtitles aren't optional anymore. They're one of the biggest factors in whether someone keeps watching your video or scrolls past it. The good news: CapCut auto captions make adding them fast and surprisingly accurate, even if you've never touched a video editor before. The not-so-good news: the feature has some quirks around free vs. Pro access that trip people up, and the default styling rarely matches a polished brand.
At SocialRevver, captions are a core piece of our AI-supported editing pipeline, we've processed thousands of short-form videos and know exactly where CapCut's auto-generated subtitles shine and where they need manual cleanup. That hands-on experience is baked into every recommendation in this guide.
Below, you'll get a complete walkthrough: how to generate auto captions in CapCut (desktop and mobile), how to edit the text and styling so they actually look professional, and how to export your final video with subtitles burned in. We'll also clarify what's free and what requires a Pro subscription so there are no surprises mid-project.
What CapCut auto captions do and what they cost
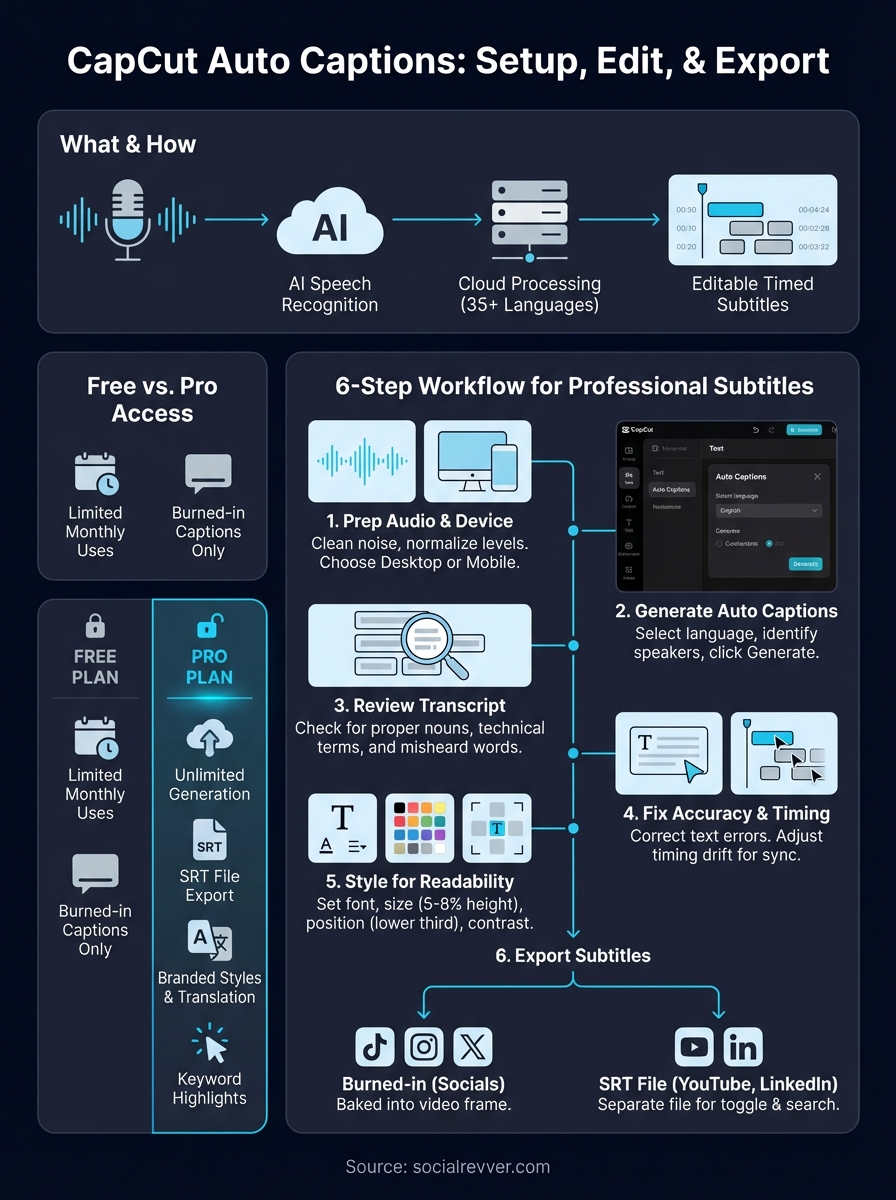
CapCut's auto captions feature uses speech recognition AI to scan your video's audio track and automatically generate timed subtitle text that syncs to each spoken word. Instead of typing out every line manually and setting in/out points by hand, you trigger the tool and get a complete transcript laid out in editable text blocks within seconds. The result is a subtitle layer you can reposition, restyle, and export without needing a separate transcription service or a technical background in video editing.
How the AI transcription engine works
The transcription runs on server-side AI processing, meaning CapCut sends your audio to its cloud infrastructure and returns a timestamped text file tied directly to your timeline. This happens automatically the moment you activate the "Auto Captions" function inside the editor. CapCut supports over 35 languages, including English, Spanish, French, Portuguese, and Mandarin, and accuracy on clean, close-mic audio typically lands between 90 and 95 percent.
Clean audio is the single biggest factor in caption accuracy. Fix your recording environment before you generate anything.
Background noise, heavy accents, overlapping speakers, or unusually fast speech will push that accuracy number down significantly. Each word receives its own timestamp in the generated output, so captions display in sync with your exact speech rhythm rather than appearing as one static block across the screen. You can adjust individual word timing, merge short segments together, or split longer ones, all inside the CapCut timeline editor without leaving the app.
Free vs. Pro: what you actually get
This is where most people run into frustration mid-project. CapCut auto captions are available on the free plan, but the feature set changes depending on your subscription tier. The free plan gives you enough to test the feature and add subtitles to occasional videos, but it has monthly generation limits and restricts some of the most useful export options. Here is a direct comparison:
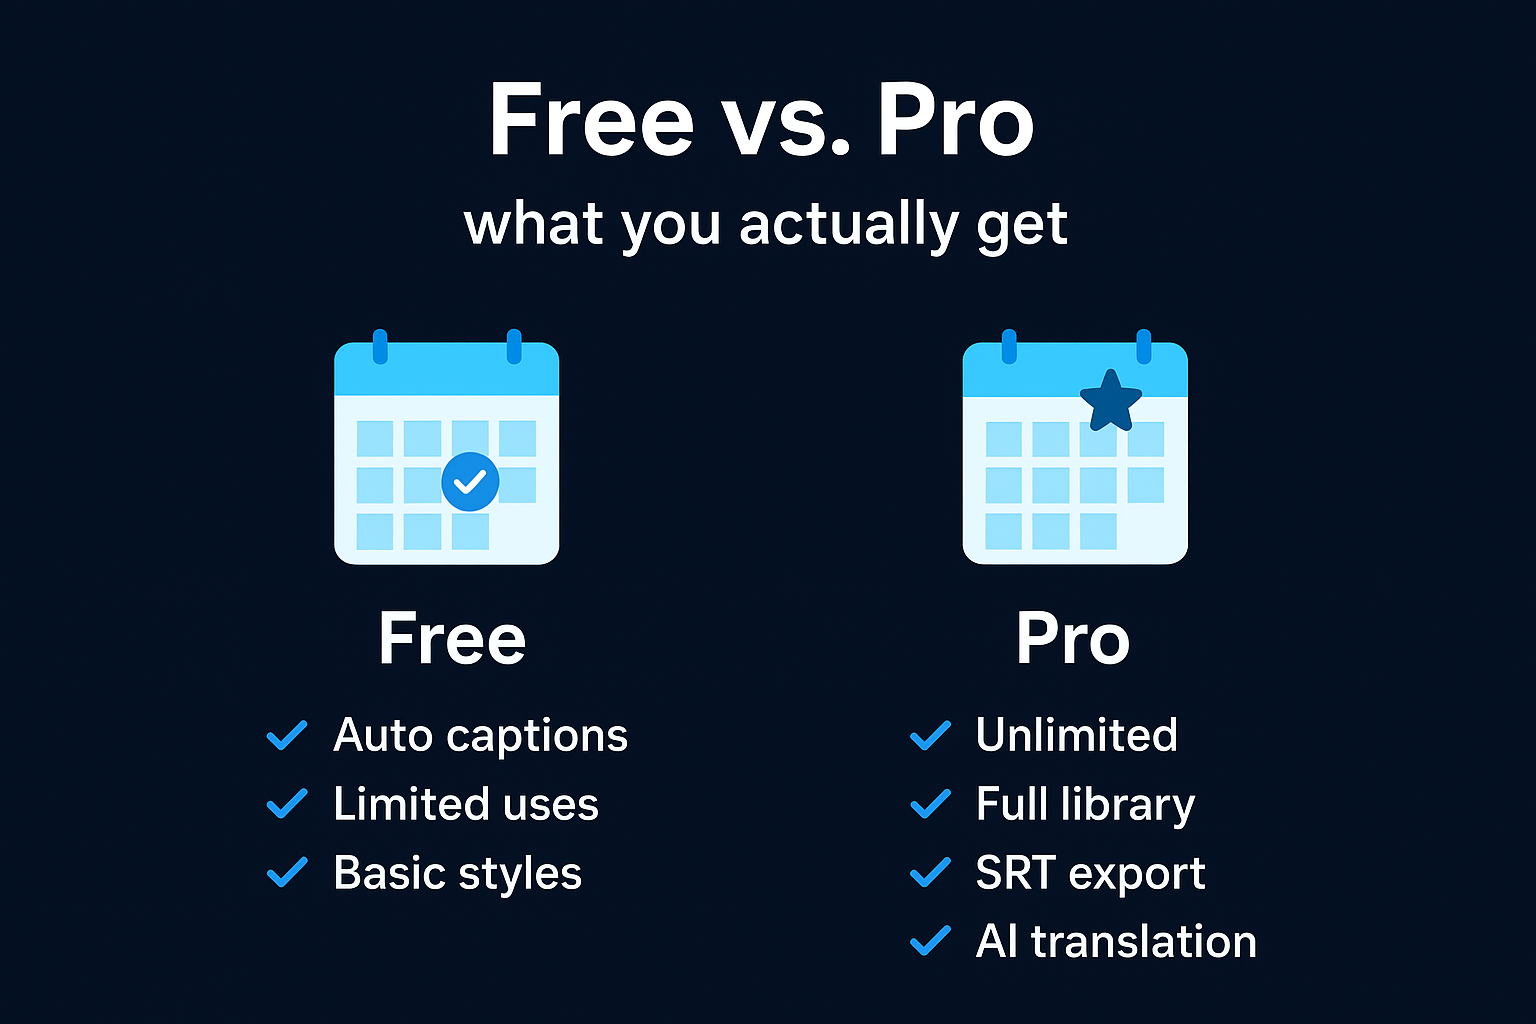
| Feature | Free Plan | Pro Plan |
|---|---|---|
| Auto caption generation | Yes, limited monthly uses | Unlimited |
| Language support | Core languages only | Full 35+ language library |
| Style templates | Basic styles | Full premium template library |
| SRT file export | No | Yes |
| Branded caption presets | No | Yes |
| AI caption translation | No | Yes |
| Keyword highlight styling | No | Yes |
The Pro plan removes generation limits and unlocks SRT export, which is the detail that matters most if you distribute content across multiple platforms. If you are producing videos consistently, you will hit the free tier's monthly cap faster than you expect.
What platforms support each export format
CapCut gives you two ways to deliver captions: burned directly into the video frame (called open captions) or as a standalone SRT file available on Pro. Burned-in captions are always visible because they are baked into the actual video, which means they work on every platform without any additional setup. TikTok, Instagram Reels, and X all display them automatically.
SRT files work differently. Platforms like YouTube and LinkedIn accept separate subtitle files, which lets viewers toggle captions on or off and allows the platform's indexing system to read your spoken content as text. That has real implications for search visibility on YouTube, since the platform uses caption data when determining what a video covers. If you regularly post to YouTube, the SRT export option is worth the Pro upgrade on its own. For creators posting short-form content to a single platform, burned-in captions through the free plan will cover most of what you need.
Step 1. Pick your device and prep your video audio
Before you generate anything, you need to make two quick decisions: which version of CapCut you're using and whether your audio is clean enough to get accurate results. CapCut runs on desktop (Windows/Mac), mobile (iOS/Android), and browser, and the auto captions workflow differs slightly between each version. Picking the right version upfront saves you from switching mid-project once you're already deep into an edit.
Choose desktop or mobile based on your workflow
Your device choice affects how much control you have over the final output. The desktop and web versions give you a larger timeline workspace, easier text editing, and better access to style controls, which makes them the stronger choice for any video you're polishing before publishing. The mobile app is faster for on-the-go edits and vertical content, but the editing canvas is smaller and switching between timeline and caption panels takes more taps. Here's a quick comparison to help you decide:
| Version | Best For | Caption Control |
|---|---|---|
| Desktop (Windows/Mac) | Long-form edits, detailed styling | Full controls, easiest editing |
| Web (browser) | Quick edits without software install | Same as desktop |
| Mobile (iOS/Android) | Vertical content, fast turnaround | Good, but smaller workspace |
Neither version generates better captions than the other since they all use the same CapCut cloud transcription engine. The difference is purely in how comfortable you'll find the editing experience after the transcript is generated.
Clean up your audio before you generate
This step gets skipped constantly, and it's the main reason people end up with inaccurate CapCut auto captions that need heavy manual correction. The AI transcription system works directly off the audio signal your video contains, so any distortion, background noise, or uneven volume you bring into the editor shows up as errors in the generated text.
Run a quick playback of your video at full volume before starting. If you struggle to hear individual words clearly, the AI will too.
Your practical audio checklist before hitting generate:
- Remove background music or lower it significantly if speech is the priority
- Cut any dead air or noise-only segments from the beginning and end of your clip
- Normalize your speech track so levels sit between -12 dB and -6 dB
- Check for audio clipping (distorted peaks) and reduce gain if you hear crackling
- Trim overlapping sections if multiple people are talking at once
Spending two minutes on this checklist will cut your caption editing time significantly once the transcript generates.
Step 2. Generate auto captions on CapCut desktop and web
The desktop and web versions of CapCut share nearly identical workflows, so these instructions apply to both. Once your video is imported and your audio is clean, generating CapCut auto captions takes under a minute. The key is knowing exactly where the function lives inside the editor and which settings to confirm before you hit generate.
Open your project and locate the captions panel
After you open your project in the CapCut desktop editor, you'll see a toolbar running along the top of the timeline panel. Look for the "Text" tab in the left sidebar. Click it, and a submenu appears. Select "Auto Captions" from that submenu, not "Add Text" or "Text Templates," which are different tools. A dialogue panel will open on the right side of your screen with language and generation options.
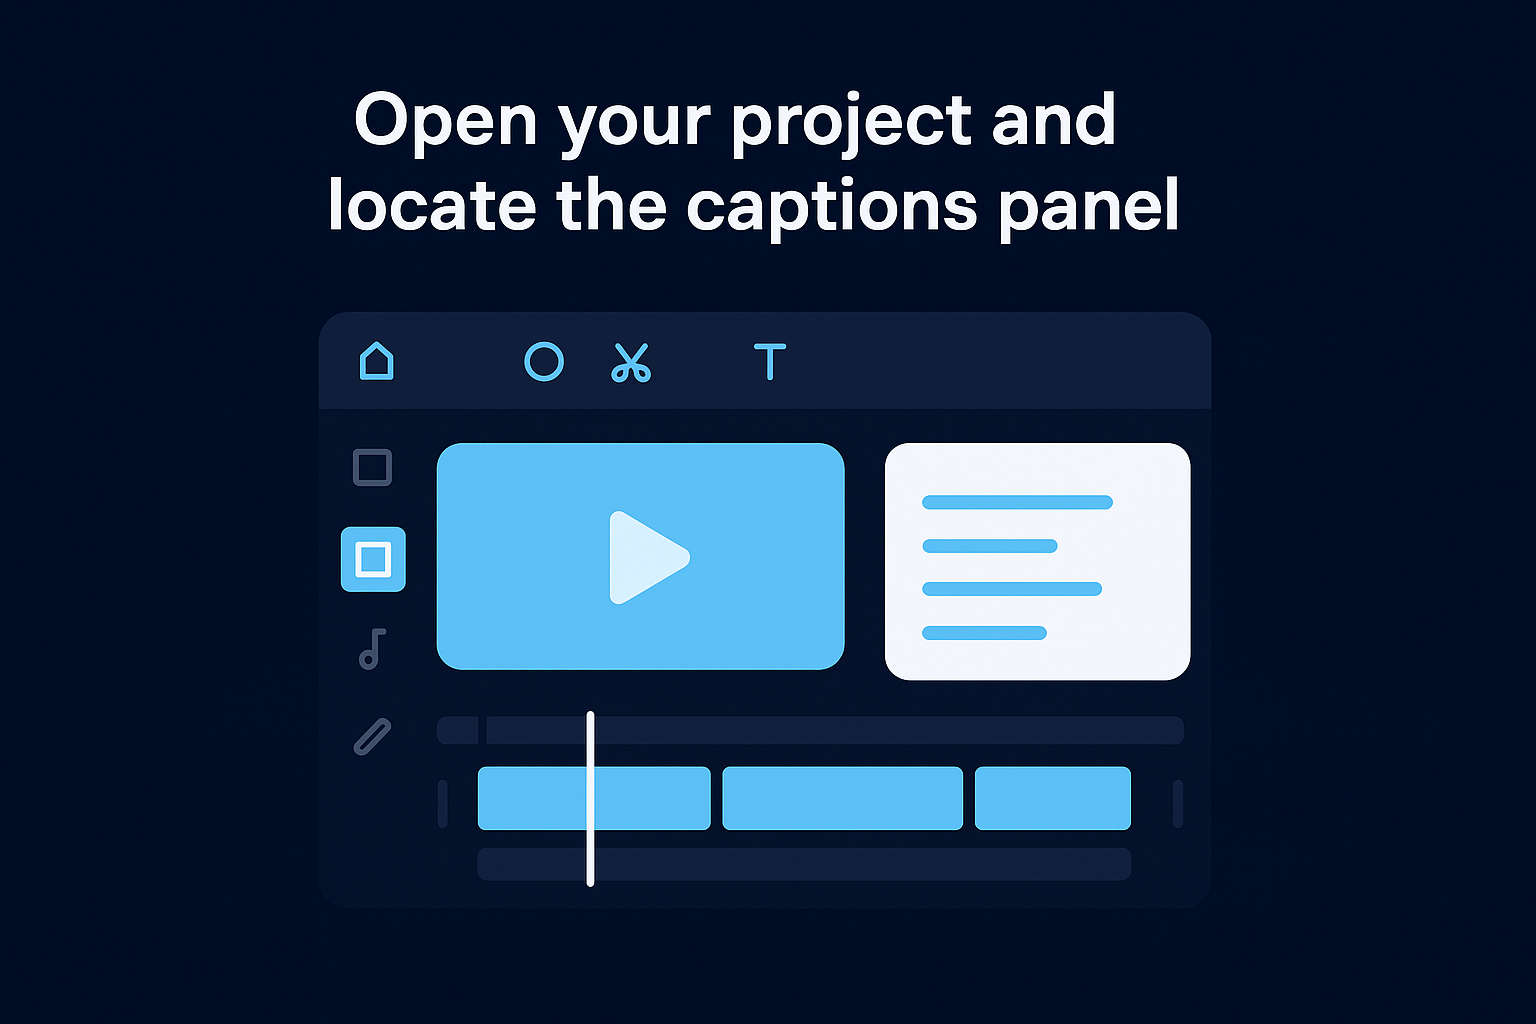
Follow these steps in order:
- Click "Text" in the left sidebar
- Select "Auto Captions" from the dropdown options
- Confirm your spoken language in the language selector (default is usually English)
- Toggle on "Identify different speakers" if your video includes more than one voice
- Click the blue "Generate" button at the bottom of the panel
- Wait 10 to 30 seconds while the cloud transcription processes your audio
- Review the generated text blocks that appear as a new track on your timeline
If the Generate button is grayed out, you've likely hit your free plan's monthly usage cap. Check your account settings to confirm your remaining generation credits.
Review and confirm the transcript output
Once the captions appear on your timeline, each caption block sits as an independent text element you can click and drag individually. Before you move on to styling or exporting, scan through the full transcript in the text panel on the right. CapCut displays a scrollable list of every caption block with the transcribed text and its timecode next to it, which makes it easy to spot obvious errors without scrubbing through the video frame by frame.
Pay specific attention to proper nouns, brand names, and technical terms since those are the words the transcription engine misreads most often. Click directly on any caption block in the list, type your correction, and the timeline updates instantly. This review pass typically takes two to five minutes on a standard short-form video and saves you from exporting a finished video with visible spelling errors in the subtitles.
Step 3. Generate auto captions on CapCut mobile
The mobile workflow for generating CapCut auto captions follows the same core logic as desktop, but the controls are in different spots and the layout is optimized for touch. Knowing exactly where to tap before you start will keep you from hunting through menus mid-edit. The steps below apply to both iOS and Android versions of the CapCut app.
Find the auto captions tool in the mobile editor
Once you open your project in the CapCut mobile app, the main editing screen shows your video preview at the top and a horizontal scrollable toolbar at the bottom. That bottom toolbar is where everything lives on mobile. Tap on "Text" in that toolbar, and a secondary menu will slide up from the bottom of the screen. Look specifically for "Auto Captions" in that secondary menu, which sits separately from the basic "Add Text" option.
Follow these steps in order to reach the generation panel:
- Open your project in the CapCut mobile app
- Tap "Text" in the bottom toolbar
- Select "Auto Captions" from the menu that appears
- Confirm your spoken language from the dropdown list
- Toggle on "Identify different speakers" if your video has more than one voice
- Tap the "Generate" button
- Wait for the transcription to complete (usually 10 to 20 seconds on a stable connection)
- Tap anywhere on the generated caption track to begin reviewing the output
If generation fails on the first attempt, check that you have a stable internet connection. The transcription runs on CapCut's cloud servers, so a weak signal will cause the process to time out.
Review the transcript on a small screen efficiently
Reviewing caption accuracy on mobile requires a slightly different approach than on desktop because your editing canvas is smaller and tapping individual words takes more precision. After the transcript generates, you'll see a new caption track appear below your video track in the timeline. Tap directly on any caption block in the timeline to open its text editor. The app highlights the active segment in your video preview simultaneously, so you can read the text and hear the audio at the same time without extra scrubbing.
Focus your review on names, technical terms, and any words spoken quickly, since those generate the most errors on mobile just as they do on desktop. Tap the text field, make your correction, and tap anywhere outside the field to confirm. Work through the full transcript in one pass before moving into styling so you're not backtracking later.
Step 4. Fix accuracy and sync issues the fast way
Even with clean audio, CapCut auto captions will produce errors in almost every video. The goal at this stage is not perfection on the first pass but fixing the errors that would actually distract your viewer or misrepresent what you said. Working through this step systematically takes less time than you think.
Correct transcript errors without re-generating
You do not need to regenerate the entire transcript every time you spot a mistake. CapCut lets you edit individual caption blocks directly inside the text panel without affecting the timing of surrounding segments. Click or tap any caption block, correct the text, and confirm. The timeline updates immediately and your other captions stay in place.
Focus your correction pass on words that change meaning when misread, not on minor stylistic quirks in the transcription.
The words that generate the most errors follow a consistent pattern. Fixing these first gets you through the review pass faster:
- Proper nouns and brand names (the AI defaults to phonetic spelling)
- Industry-specific terms your audience would immediately notice
- Numbers and statistics spoken quickly or with surrounding context
- Homophones where the AI picks the wrong version based on limited context
- Words at the very start or end of a segment where audio cuts in abruptly
After correcting the text, read the full transcript from top to bottom as a single pass. Reading it as connected prose catches missing words and run-on segments that a word-by-word scan misses.
Fix timing drift and sync problems
Timing errors appear differently from transcription errors. Instead of wrong words, you get captions that appear slightly before or after the matching speech, which feels off even when the text itself is accurate. This usually happens when your audio contains long pauses, rapid-fire delivery, or a jump cut that broke the original speech rhythm.
To fix a drifted caption block, click the block in your timeline and drag its left or right edge to extend or shorten the display duration. Drag the block itself left or right to shift when it appears. If you have multiple consecutive segments that all drift in the same direction, select them all with Shift-click and nudge them together rather than adjusting each one individually.
A simple timing check template you can run on every video before moving to styling:
- Play back from the beginning at 1.0x speed with the sound on
- Watch for any caption that appears more than half a second early or late
- Identify whether the issue is the start time, end time, or full segment position
- Adjust the relevant edge or move the whole block accordingly
- Re-play that specific segment to confirm the fix before moving forward
Step 5. Style captions for readability and retention
Raw CapCut auto captions use a default font and placement that rarely matches your brand or platform expectations. The default style gets the text on screen, but it won't keep viewers reading. Adjusting three core elements, font, position, and color, takes under five minutes and makes a visible difference in how your audience engages with the video.
Set font, size, and screen position
Your font choice directly affects how fast viewers process your captions. Bold, sans-serif fonts like Impact, Montserrat Bold, or CapCut's built-in heavy-weight options read faster on a moving background than thin or decorative typefaces. Select all caption blocks at once using Ctrl+A (desktop) or the "Select All" option on mobile, then apply your font choice globally so every segment matches.
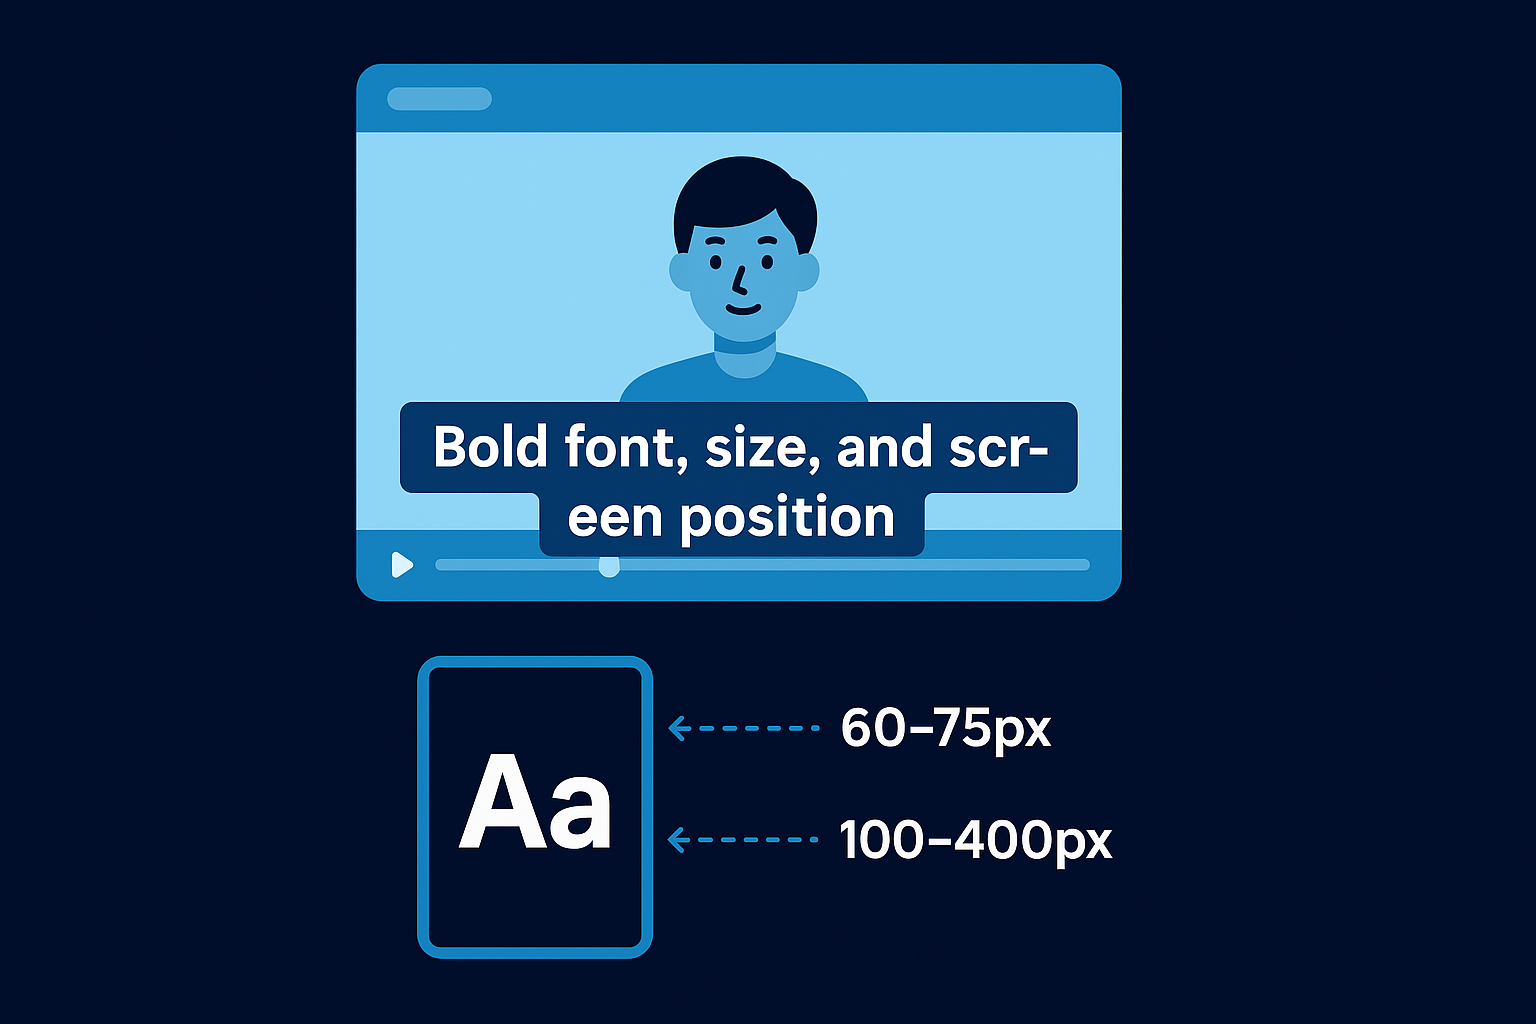
Caption text that requires any effort to read will cause viewers to stop watching, regardless of how good the content is.
Font size should sit between 5% and 8% of the total frame height for standard short-form vertical video. On a 1080x1920 frame, that translates to roughly 54 to 80 pixels. Position your captions in the lower third of the frame for most content, but shift them to the upper third if your subject's face or key visual sits in the lower portion of the shot. Use this quick sizing reference:
| Frame Size | Recommended Font Size | Safe Zone for Text |
|---|---|---|
| 1080x1920 (9:16) | 60-75px | 100-400px from bottom |
| 1920x1080 (16:9) | 48-60px | 80-200px from bottom |
| 1080x1080 (1:1) | 54-68px | 80-250px from bottom |
Apply contrast and emphasis styling
Text color and background contrast determine whether your captions are readable on any background your video contains. White text with a dark semi-transparent background box is the most reliable combination across all environments. Avoid pure yellow or red text since both create visual fatigue at small sizes.
CapCut's highlight feature lets you change the color of individual words within a caption block, which works well for emphasizing a key term or statistic. Use it selectively on one or two words per segment rather than highlighting everything, since over-styling reduces the effect entirely. Apply a stroke (outline) of 2 to 4 pixels in a contrasting color if you prefer clean text without a background box. This keeps the text legible even when it sits over a bright or busy section of your footage.
Step 6. Export subtitles as burned-in text or SRT
Once your CapCut auto captions are accurate, timed, and styled, you have two ways to get them out of the editor: burned directly into the video frame or exported as a standalone SRT file. The method you choose depends entirely on where the video is going, so make this decision before you hit export.
Export burned-in captions for social platforms
Burned-in captions are the right choice for TikTok, Instagram Reels, YouTube Shorts, and X because those platforms display captions as part of the video image itself rather than reading an attached subtitle file. There are no toggling options for the viewer and no compatibility issues across devices. The text is part of the frame permanently.
If you use burned-in captions, finalize all styling edits before exporting because you cannot adjust the text after the video renders.
Follow these steps to export with captions baked in:
- Confirm all caption blocks are visible on the timeline and none are muted or hidden
- Click the "Export" button in the top-right corner of the CapCut editor
- Set your resolution to 1080p or higher for publishing quality
- Leave the subtitle toggle in its default position since the captions are already part of your video track
- Click "Export" again to render and save the final file
- Check the first five seconds of the exported file to confirm captions appear as expected before uploading anywhere
Export an SRT file for YouTube and LinkedIn
An SRT file is a plain-text subtitle document that platforms like YouTube and LinkedIn accept as a separate upload alongside your video. This format gives viewers the option to turn captions on or off, and it allows YouTube's indexing system to read your spoken content as searchable text. That distinction matters for long-form content where search discoverability drives a meaningful share of views.
SRT export is a Pro-only feature in CapCut. If your account is on a free plan, the export panel will show the option but lock it behind an upgrade prompt. To export an SRT file on a Pro account, open the Export panel, look for the "Subtitle" or "Caption" export section, and select "Export SRT" rather than embedding the captions in the video. Save the SRT file to the same folder as your video so both files stay together when you upload to your platform.
Once you have both files, upload the video first on YouTube, then navigate to Subtitles in the video settings, select "Upload file," choose SRT format, and attach the file. The platform will sync it automatically to your video's timeline.
Final takeaways
CapCut auto captions give you a fast, accessible way to add subtitles without manual transcription, but the real work happens after the AI generates the text. Clean audio before you generate, a careful correction pass on proper nouns and technical terms, and intentional styling choices are what separate a polished video from one that looks rushed.
The free plan covers occasional use, but if you publish consistently across platforms like YouTube and LinkedIn, the SRT export on the Pro plan pays for itself quickly in time saved and search visibility gained. Follow the six steps in this guide in order, and you'll have properly captioned, platform-ready videos without guesswork.
If you want a system that handles caption strategy, production, and distribution for you at scale, apply to work with the SocialRevver team and get a free 40+ slide social media strategy built around your brand.