
Nothing kills a video's credibility faster than distracting background noise. You could have the perfect script, flawless delivery, and sharp visuals, but if your audience hears buzzing, hissing, or traffic rumbling underneath your voice, they're clicking away. Knowing how to remove background noise in video is one of the most practical skills you can build for producing content that actually holds attention.
At SocialRevver, audio clarity is a non-negotiable part of our AI-supported editing pipeline. Every video we produce goes through sound design optimization because we've seen firsthand how clean audio directly impacts watch time and conversions. It's not a minor detail, it's a performance lever.
This guide walks you through the best tools, techniques, and step-by-step methods for stripping unwanted noise from your videos, whether you're using free online tools, mobile apps, or professional editing software, while keeping your voice crisp and natural.
What counts as background noise and what you can fix
Background noise falls into several distinct categories, and knowing which type you're dealing with changes how you approach the fix. Consistent noise like HVAC hum, computer fans, or fluorescent light buzz is the easiest to remove because it has a predictable frequency. Intermittent noise like a dog barking, a door slamming, or a passing car is harder to eliminate cleanly because it overlaps with your voice at unpredictable moments.
The type of noise you're dealing with determines which tool or technique will actually work, so identifying it first saves you time and prevents over-processing your audio.
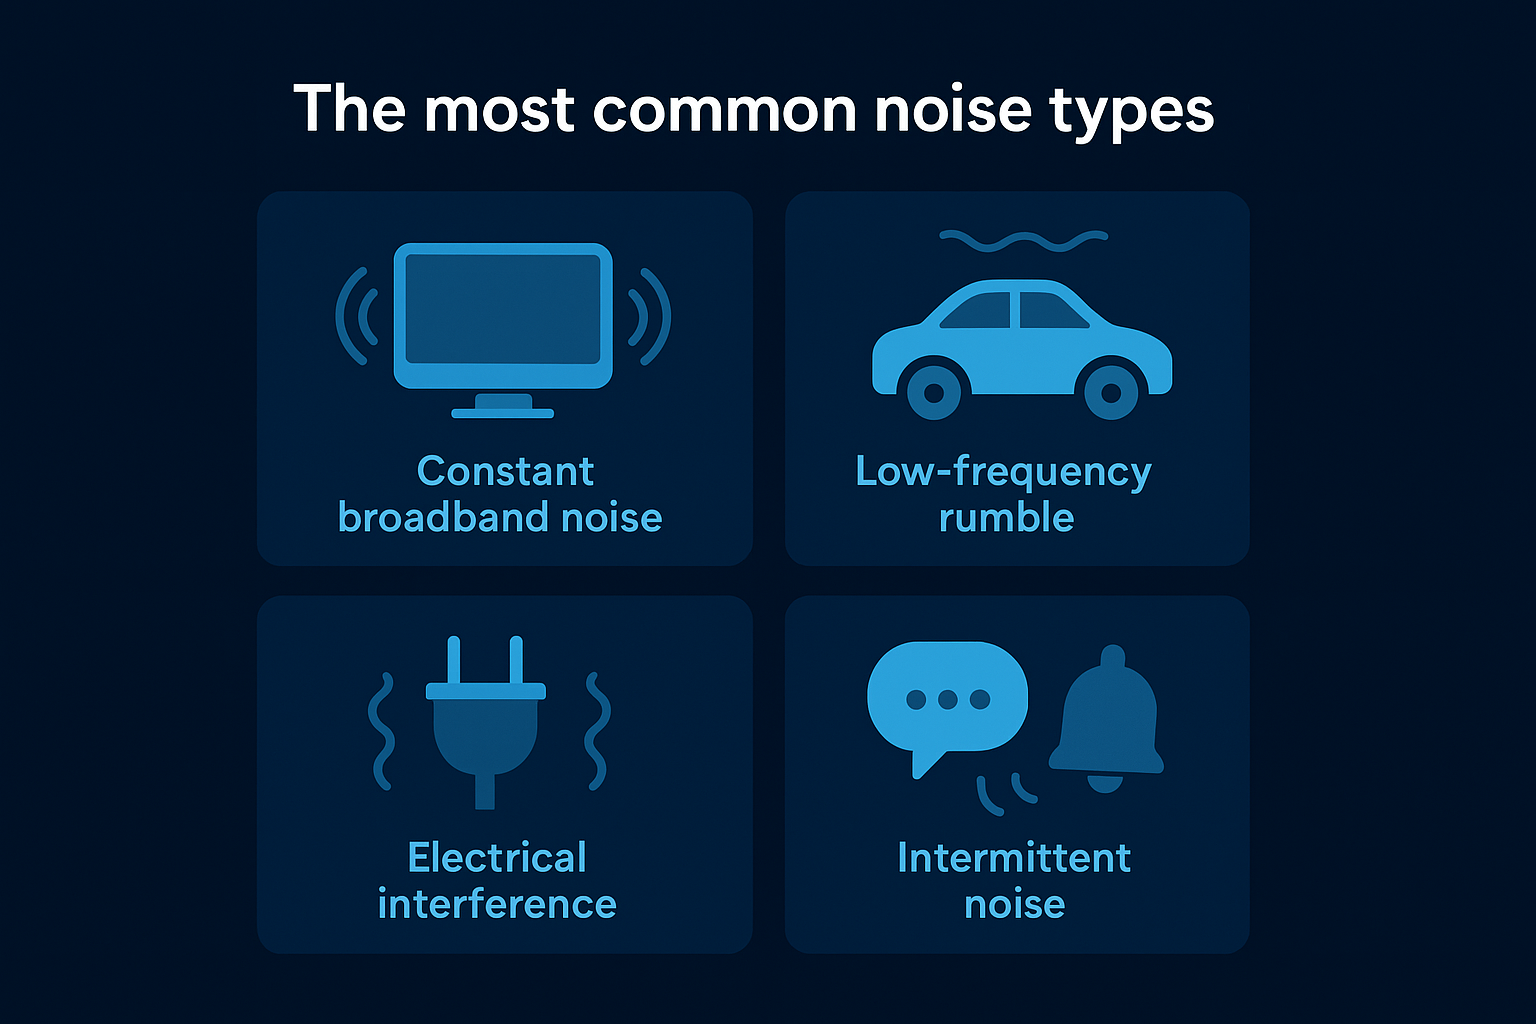
The most common noise types
Before you learn how to remove background noise in video, you need to know exactly what you're targeting. Broadband noise covers most of the frequency spectrum at a steady level, while tonal noise sits at a specific pitch, like a 60Hz electrical hum. Here's a breakdown of the most common types and how fixable each one is:
| Noise Type | Examples | Fixability |
|---|---|---|
| Constant broadband noise | Room hiss, AC hum, tape hiss | High |
| Low-frequency rumble | Traffic, wind, HVAC | High with high-pass filter |
| Electrical interference | 60Hz hum, ground loop buzz | High |
| Intermittent noise | Dogs, birds, typing, doors | Medium |
| Clipping or distortion | Peaked recording levels | Low |
What you can and cannot fix
Understanding the hard limits of noise removal protects you from wasting time trying to rescue unusable audio. If your voice and the noise share the same frequencies, aggressive processing will introduce artifacts, specifically a metallic warbling effect called "musical noise." You can cleanly fix most steady-state noise, noticeably reduce intermittent sounds, and recover mildly clipped recordings to a usable state. Severely distorted audio, or recordings where the noise floor is louder than the primary voice, are beyond any tool's ability to fix, and re-recording that clip is always the better call.
Step 1. Prep the audio before you remove noise
Before you run any noise removal on your footage, take two minutes to assess what you're working with. Skipping the prep step is the most common reason noise removal introduces artifacts rather than cleaning things up. Open your audio in any editor and look at the waveform to spot obvious problem zones like dead silence, clipping, or sections where noise spikes above your voice.
Running noise removal on un-prepped audio is like painting over rust. It covers the problem temporarily but creates more damage underneath.
Normalize and trim before processing
Normalizing your audio brings the overall volume to a consistent level before processing, which helps noise removal algorithms work more accurately. Set your peak normalization to around -3dB to -6dB before applying any noise reduction. After that, trim dead silence from the start and end of each clip, since long silent tails increase the chance of artifacts bleeding into your voice.
- Normalize peaks to -3dB or -6dB
- Trim silence at the head and tail of each clip
- Remove sections with severe clipping before noise removal
- Export a backup copy before applying any destructive processing
Step 2. Remove noise with AI tools and apps
AI-powered noise removal tools have made background noise reduction accessible without professional audio training. These tools analyze your audio waveform using machine learning, separate speech from unwanted sounds, and apply targeted suppression in seconds. The best ones handle broadband hiss, electrical hum, and low-frequency rumble without requiring you to set manual thresholds.
The fastest way to see improvement when learning how to remove background noise in video is to run your clip through an AI tool first, then manually fine-tune what remains.
Recommended workflow for AI tools
Most AI noise removal tools follow the same basic process. Upload your video or audio file, let the algorithm detect the noise profile automatically, then preview the result before exporting. Adobe Podcast Enhance processes speech-focused audio with a single upload and strips background noise in under a minute. For mobile, Apple's Final Cut Pro and similar apps include built-in noise reduction that works directly on your device without additional plugins.
- Upload the raw clip
- Set noise reduction strength to 50-70% as a starting point
- Preview the output and listen specifically for artifacts on consonants
- Export at the same sample rate as your original file
Step 3. Clean dialogue in pro editors
Professional editors like Adobe Audition, DaVinci Resolve, and Logic Pro give you surgical control over noise removal that AI tools can't match. When you're working on how to remove background noise in video at a more advanced level, these tools let you target specific frequency bands, apply dynamic noise gates, and use spectral repair to isolate and remove individual noise events without degrading your voice.
Manual EQ and spectral editing give you precision that no one-click tool can replicate, especially when your voice and noise share overlapping frequencies.
Use a noise gate and spectral repair together
A noise gate cuts audio below a set threshold, which silences dead space between your words without touching the voice itself. Set your gate threshold just above your room noise floor, typically around -40dB to -50dB, and use a slow attack and fast release to keep transitions sounding natural. In DaVinci Resolve's Fairlight panel or Adobe Audition's Spectral Frequency Display, you can also paint directly over isolated noise events on the waveform and delete them without affecting the surrounding audio.
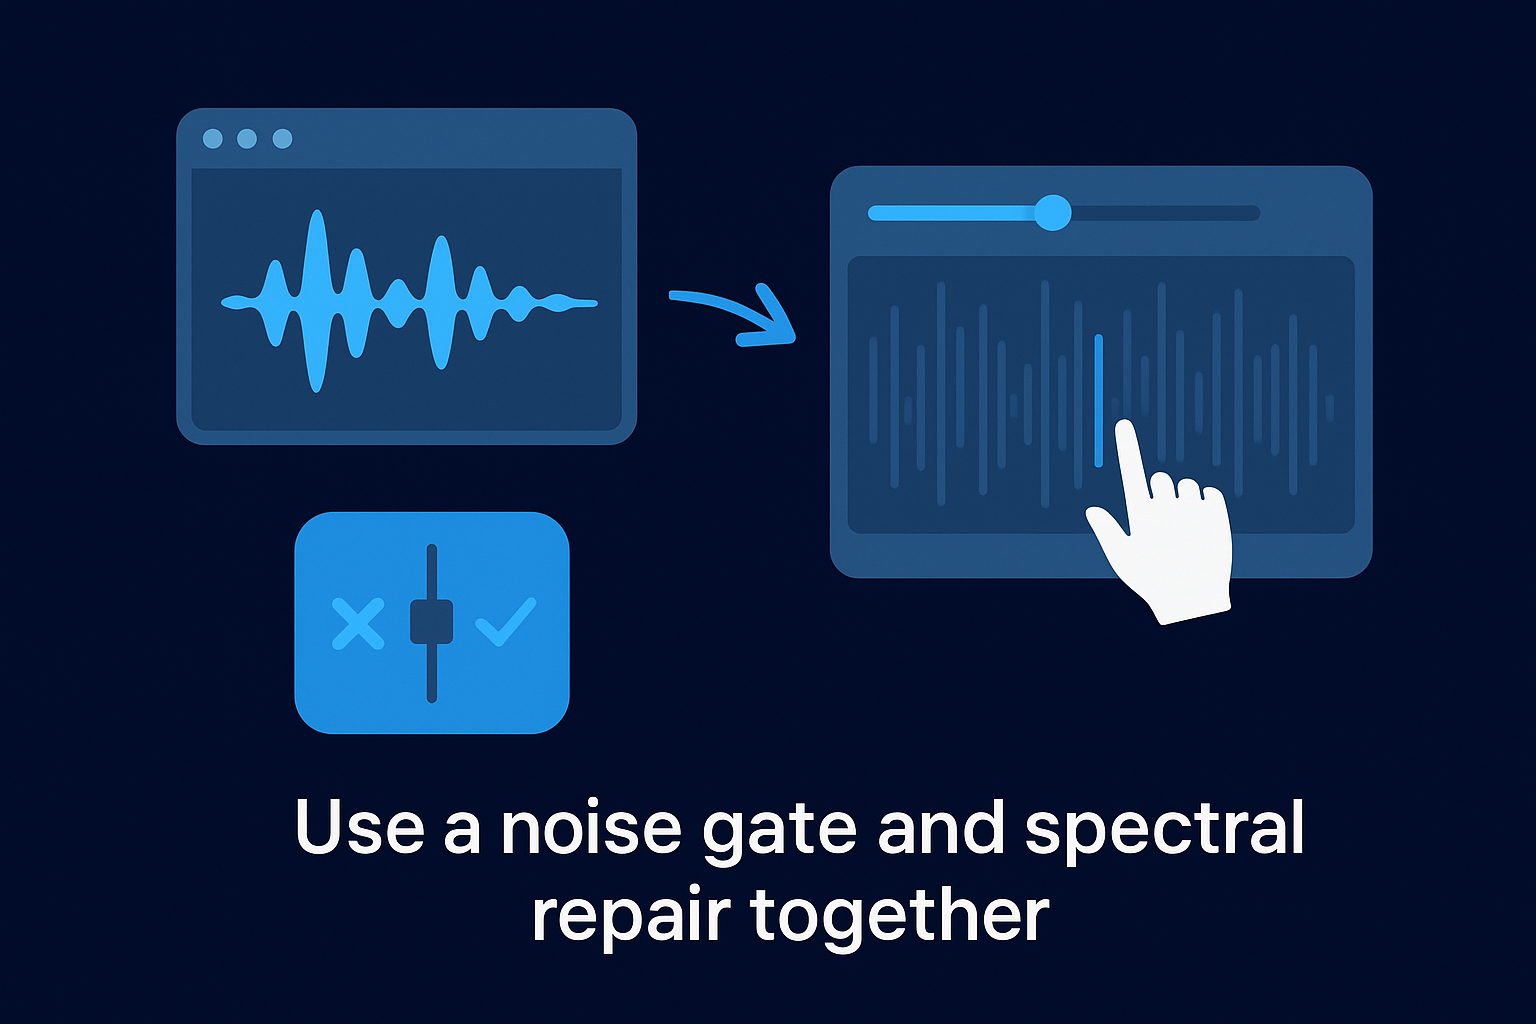
- Set noise gate threshold at -40dB to -50dB
- Use slow attack (10-20ms) and fast release (50-100ms)
- Apply spectral repair to isolated events like coughs or clicks
- Run a high-pass filter at 80Hz to eliminate low-frequency rumble
Step 4. Fix common artifacts and keep voice
Aggressive noise removal creates its own problems. The most common artifact is musical noise, a warbling metallic distortion that appears when the algorithm removes too much of the signal at once. You'll typically notice it on sustained consonants like "s" and "f" sounds or during brief pauses between words. If your processed clip sounds worse than the original, reduce your noise reduction strength by 10-15% and run it again.
Over-processing ruins more audio than background noise does, so always compare your processed output directly against the original before committing to the final export.
Restore voice presence after processing
When you're working through how to remove background noise in video, protecting your voice's natural tone matters just as much as eliminating the noise itself. Noise removal often strips the high-mid frequencies that give your voice its presence and definition. After processing, apply a gentle EQ boost around 3-5kHz, roughly 2-3dB, to bring that clarity back without introducing new noise to the signal.
- Reduce noise reduction strength if you hear warbling or distortion
- Boost 3-5kHz by 2-3dB to restore consonant definition
- Cut frequencies below 80Hz to remove any residual low-end rumble
- Listen back at low volume to catch artifacts your ears miss at full playback level
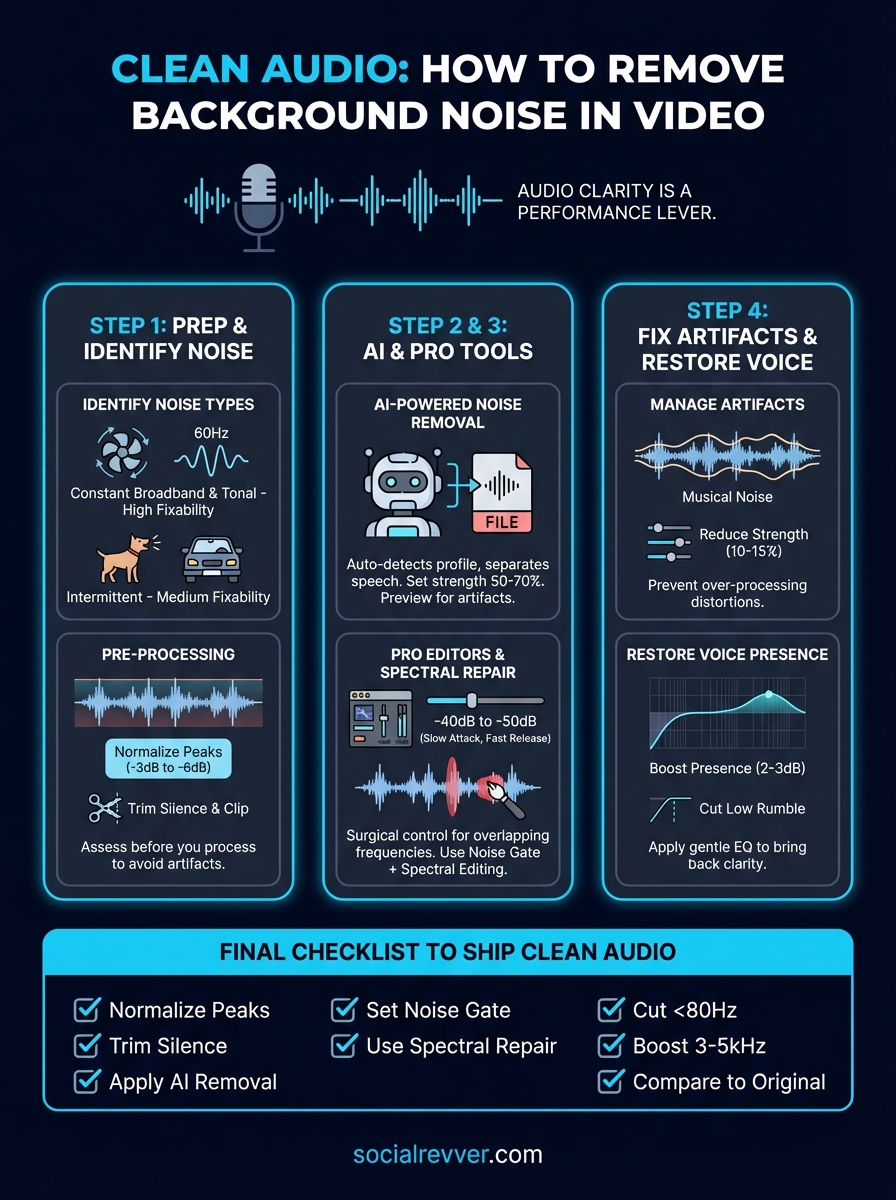
A simple checklist to ship clean audio
You now have a complete workflow for how to remove background noise in video, from identifying noise types to protecting your voice after processing. Before you export any final clip, run through this checklist to confirm your audio is ready to ship.
- Normalize peaks to -3dB or -6dB before processing
- Trim silence from the head and tail of each clip
- Apply AI noise removal at 50-70% strength as a starting point
- Set your noise gate threshold between -40dB and -50dB
- Use spectral repair for isolated events like clicks or coughs
- Cut frequencies below 80Hz with a high-pass filter
- Boost 3-5kHz by 2-3dB to restore voice presence
- Compare your processed output against the original before exporting
Clean audio is a baseline requirement for content that holds attention and builds authority. If you want a production system that handles every layer of this process for you, apply to work with our team and get a free 40+ slide social media strategy built around your brand.