
You just spent hours editing a video, the cuts are tight, the pacing is right, the story lands. Then you hit export, pick the wrong settings, and the final file looks like it was filmed through a screen door. Getting your Adobe Premiere Pro export settings right is the difference between a video that looks professional and one that gets scrolled past in half a second.
The problem is that export configurations aren't one-size-fits-all. What works for a YouTube long-form upload will fall flat on Instagram Reels or TikTok. Each platform compresses and processes video differently, which means your export needs to match the destination, or you're leaving quality (and engagement) on the table.
At SocialRevver, our editing pipeline processes thousands of short-form videos through Premiere Pro every month. We've tested export configurations across every major platform, tracked how compression affects watch-through rates, and dialed in the exact settings that preserve visual clarity after a platform re-encodes your upload. This guide is built from that hands-on production experience, not recycled default recommendations.
Below, you'll find step-by-step export settings for YouTube, TikTok, Instagram, LinkedIn, and professional delivery. We'll cover codec selection, bitrate targets, resolution, frame rate, and audio settings, plus the common mistakes that silently destroy your video quality before anyone ever sees it. Whether you're exporting a single video or building a content system, these configurations will get your footage out the door looking exactly the way you intended.
What to decide before you export
Before you even open the Export Settings dialog, you need to make four decisions that will shape every setting you configure. Skipping this step is the most common reason exports come out wrong, because you end up guessing at bitrates and formats instead of working backwards from a clear target. Getting clear on your destination, codec, resolution, and delivery constraints upfront will save you from re-exporting the same file multiple times.
Know your destination platform
Every platform you upload to runs your file through its own compression algorithm, which means your export settings need to account for what happens after you upload, not just how the file looks on your desktop. YouTube uses VP9 or H.264 for playback. TikTok and Instagram Reels aggressively compress vertical video, especially anything above 1080p. LinkedIn is more forgiving but still re-encodes on their end.
The platform's compression is the last step in your production chain. If your export is already lossy going in, the final result will show it.
Your primary decision here is simple: identify the single destination first, and treat that platform's specs as your baseline. If you need to post the same content to multiple platforms, export separate versions optimized for each target rather than one compromised middle-ground file.
Decide on resolution and frame rate before touching the timeline
Resolution and frame rate affect your sequence settings, your export settings, and your final file size. If your camera recorded in 4K at 60fps but your target is a 1080p Instagram Reel at 30fps, you need to decide whether to edit in 4K and downscale on export, or trim your sequence down to 1080p from the start.
The practical rule for most social content: edit at your source resolution, export at the platform's native target. For YouTube, that means 1080p or 4K at 24, 25, or 30fps for standard content, and up to 60fps for gaming or fast-motion video. For TikTok and Reels, 1080x1920 at 30fps is the sweet spot.
| Platform | Resolution | Frame Rate |
|---|---|---|
| YouTube (standard) | 1920x1080 or 3840x2160 | 24, 25, 30, or 60fps |
| TikTok | 1080x1920 | 30fps |
| Instagram Reels | 1080x1920 | 30fps |
| 1920x1080 | 30fps | |
| Professional delivery | Match source | Match source |
Choose your codec: H.264 or H.265
H.264 (AVC) is the most universally compatible codec and the default choice for the vast majority of social uploads. Every major platform accepts it, every player reads it, and Premiere Pro handles it efficiently. For most creators, H.264 at the right bitrate covers every use case you'll encounter day to day.
H.265 (HEVC) gives you roughly 40% smaller file sizes at equivalent visual quality, which matters when you're working with 4K content and dealing with upload times or storage limits. The tradeoff is that some older devices and platforms don't fully support H.265 playback, and it takes noticeably longer to render. For social media, use H.264. For archival masters or client deliverables where you control the playback environment, H.265 becomes worth the extra render time.
These two decisions, codec and platform destination, will determine your adobe premiere pro export settings more than any other factor in the process.
Set your quality expectation before you pick a bitrate
Bitrate is not a number you should guess. Your bitrate target depends on your resolution, your frame rate, and your platform's recommended upload spec. Going too low introduces compression artifacts, especially in fast-motion scenes or areas with fine detail like text and fabric. Going too high inflates file size without adding visible quality, since the platform will recompress the file anyway.
A clear quality expectation, such as "broadcast-ready master" versus "optimized social upload," gives you a concrete target to work backwards from when you configure bitrate in the steps ahead.
Step 1. Start with the right sequence settings
Your export will only be as good as your sequence. Sequence settings define the native resolution, frame rate, and color space that Premiere Pro uses as the baseline for everything you send to the export queue. If your sequence is set to 1080p at 30fps but your footage was shot in 4K at 24fps, Premiere Pro has already made visual compromises before you touch a single export configuration. Fixing sequence settings before you edit is far faster than troubleshooting a degraded output file after the fact.
Match your sequence to your source footage
The fastest way to build a properly matched sequence is to drag your first clip directly onto the New Item icon in the Project panel. Premiere Pro will automatically generate a sequence that mirrors the exact specs of that clip, including resolution, frame rate, and color profile. This approach eliminates guesswork and gives you a clean foundation that your adobe premiere pro export settings can build on without correcting for upstream mismatches.
If you're building a sequence manually, navigate to Sequence > Sequence Settings and confirm each of the following fields aligns with your source footage:
- Frame Size: Match your camera's capture resolution (3840x2160 for 4K, 1920x1080 for 1080p)
- Timebase: Set to your footage frame rate (23.976, 29.97, or 59.94)
- Pixel Aspect Ratio: Set to Square Pixels (1.0) for all modern digital footage
- Preview File Format: Use I-Frame Only MPEG or GoPro CineForm for smoother real-time playback
Fix mismatched clips before you export
When you drop footage into an already-configured sequence, Premiere Pro may prompt you to change the sequence to match the incoming clip. Accept this prompt when starting from scratch, but decline it if you're inserting a secondary clip into an already-edited timeline you don't want to restructure.
A red or yellow render bar along the top of your timeline signals a spec mismatch between your clip and sequence, and that mismatch carries directly into your final export if you leave it unresolved.
Mismatched frame rates cause the most damage at export. A 60fps clip placed inside a 30fps sequence will drop frames or introduce stutter unless you've intentionally configured it as slow-motion or adjusted its interpreted frame rate. Right-click the clip in your Project panel, select Modify > Interpret Footage, and set the correct frame rate before you begin cutting. This one step prevents a category of export problems that most editors only discover after they've already delivered the file.
Step 2. Pick a format and preset that fits
Once your sequence is locked, open the Export Settings dialog by pressing Ctrl+M on Windows or Cmd+M on Mac. What you see here is the full control panel for your adobe premiere pro export settings, and the two most important fields at the top are Format and Preset. Getting these two right before touching anything else will prevent you from spending time tuning settings inside a codec that was never appropriate for your output.
Choose the right format first
Format determines the codec and container your video will be encoded in. For almost every social media or web delivery use case, you want H.264 as your format. It outputs an MP4 file that every platform accepts without issues. H.265 is worth selecting when you're exporting a 4K master or a client deliverable where file size matters and you control the playback environment. Avoid formats like QuickTime or AVI unless a client or broadcast partner has specifically requested them, since neither is optimized for platform uploads.
If you're ever unsure which format to use, H.264 into an MP4 container is the correct default for anything going online.
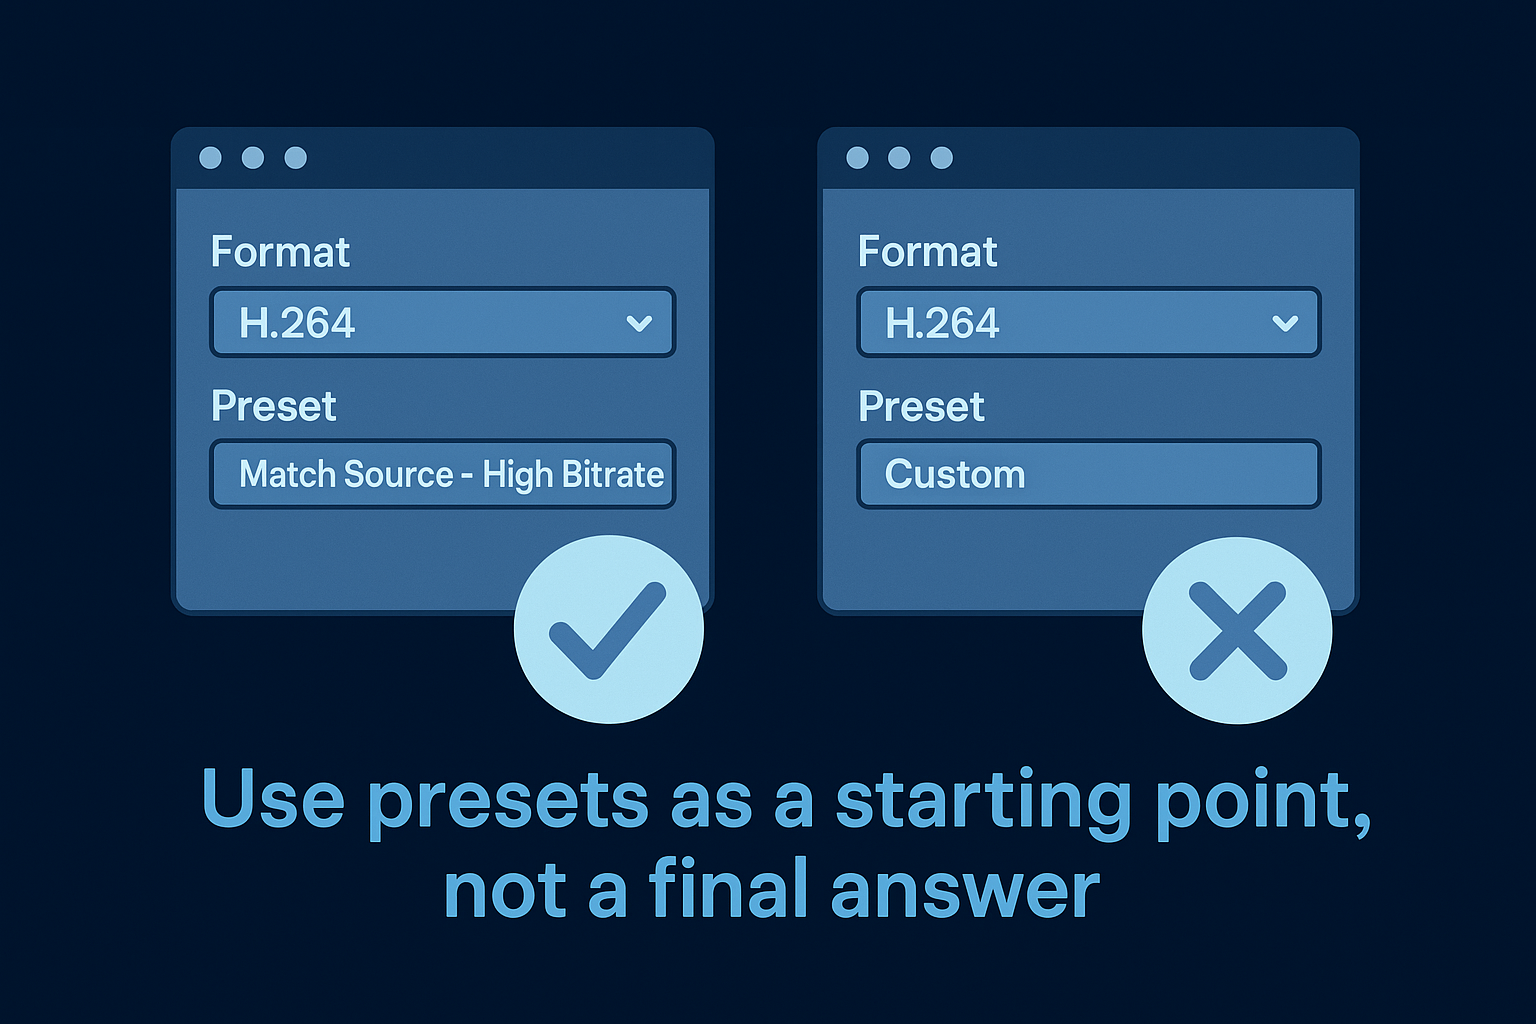
Use presets as a starting point, not a final answer
Premiere Pro ships with built-in presets for common output scenarios, and they're useful for getting into the right ballpark quickly. After selecting H.264 as your format, the Preset dropdown will populate with options including Match Source, YouTube presets, and resolution-specific options. Selecting "Match Source - High Bitrate" is the most reliable starting point for general use because it inherits your sequence resolution and frame rate, then applies a competitive bitrate automatically.
For platform-specific work, these presets give you a clean base:
| Output Target | Format | Recommended Preset |
|---|---|---|
| YouTube 1080p | H.264 | YouTube 1080p HD |
| YouTube 4K | H.264 | YouTube 2160p 4K |
| TikTok / Reels | H.264 | Match Source - High Bitrate |
| H.264 | Match Source - High Bitrate | |
| Client master | H.265 | Match Source - High Bitrate |
When to skip the preset entirely
Presets don't cover every scenario, and there are times when you should ignore the dropdown and configure your output manually. If you're exporting content for a client with a specific delivery spec, or targeting a platform bitrate ceiling to avoid re-compression artifacts, building from scratch gives you precision that no preset can match. Select your Format, then set the Preset to Custom, and configure each field in the Video and Audio tabs according to the spec you're targeting. The next step covers exactly what those numbers should be.
Step 3. Dial in video settings for quality and size
With your format and preset selected, you're now inside the Video tab, where the real adobe premiere pro export settings work happens. This is where you control bitrate, resolution, frame rate, and rendering method, and where small configuration mistakes lead to the biggest visible quality drops after a platform re-encodes your file.
Set your bitrate for the right platform
Bitrate controls how much data Premiere Pro allocates to each second of video. Too low, and you'll see compression artifacts in fast-motion scenes, along with smearing in fine-detail areas like hair, fabric, or on-screen text. Too high, and you're padding file size without any visual benefit since the platform will strip that data out during re-compression anyway.
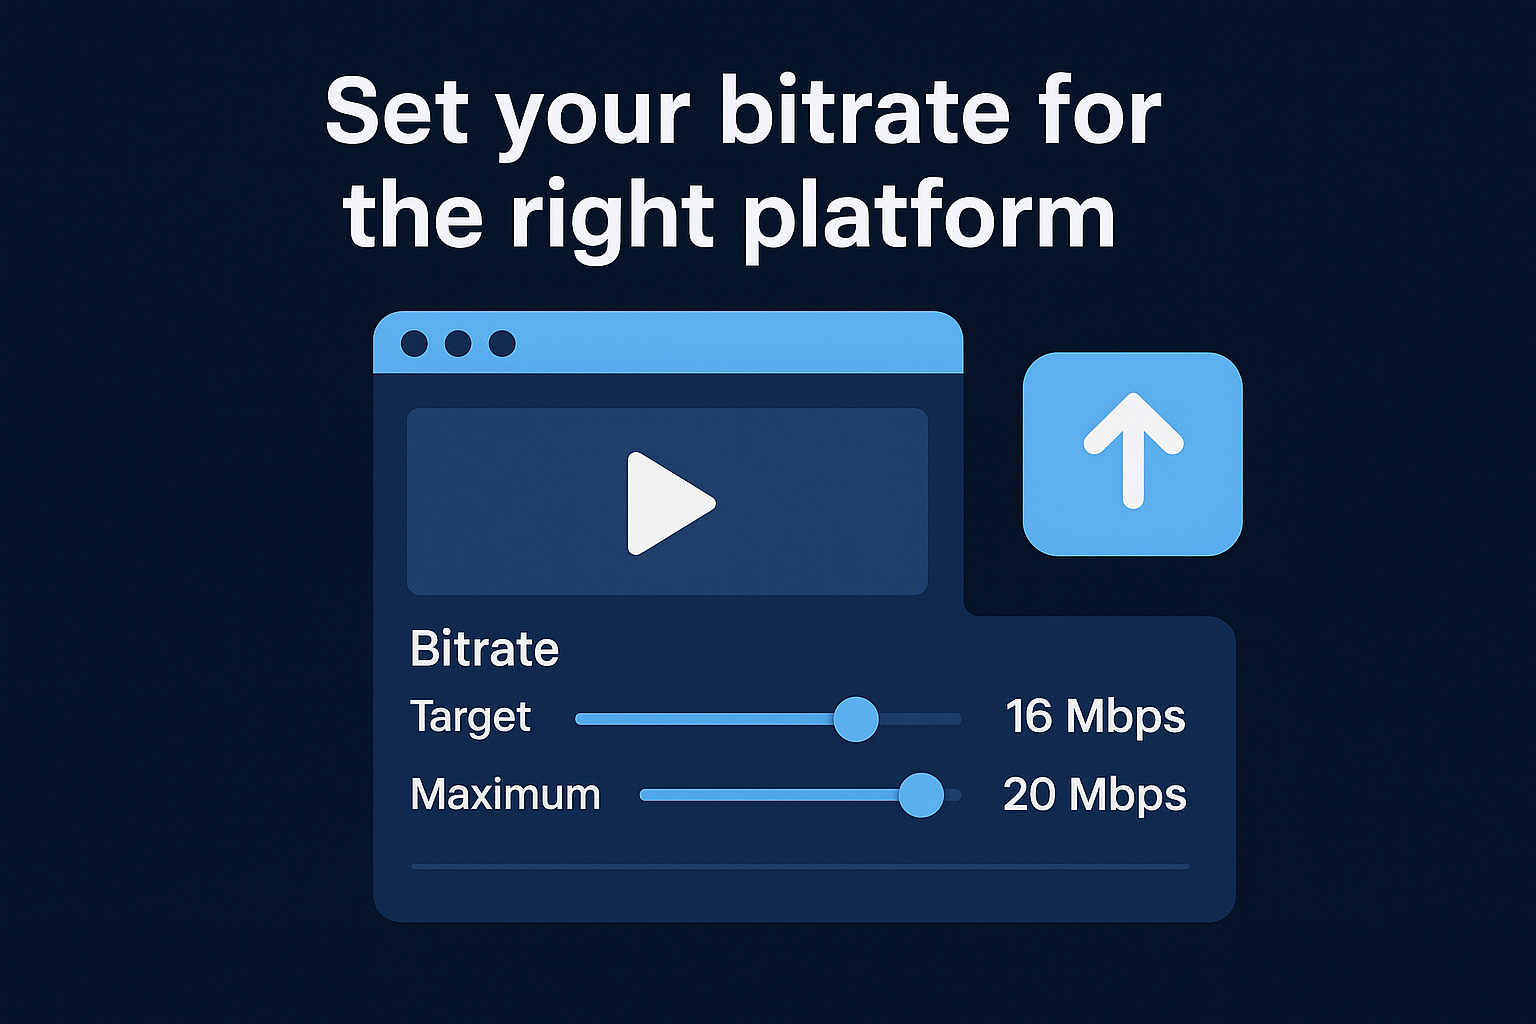
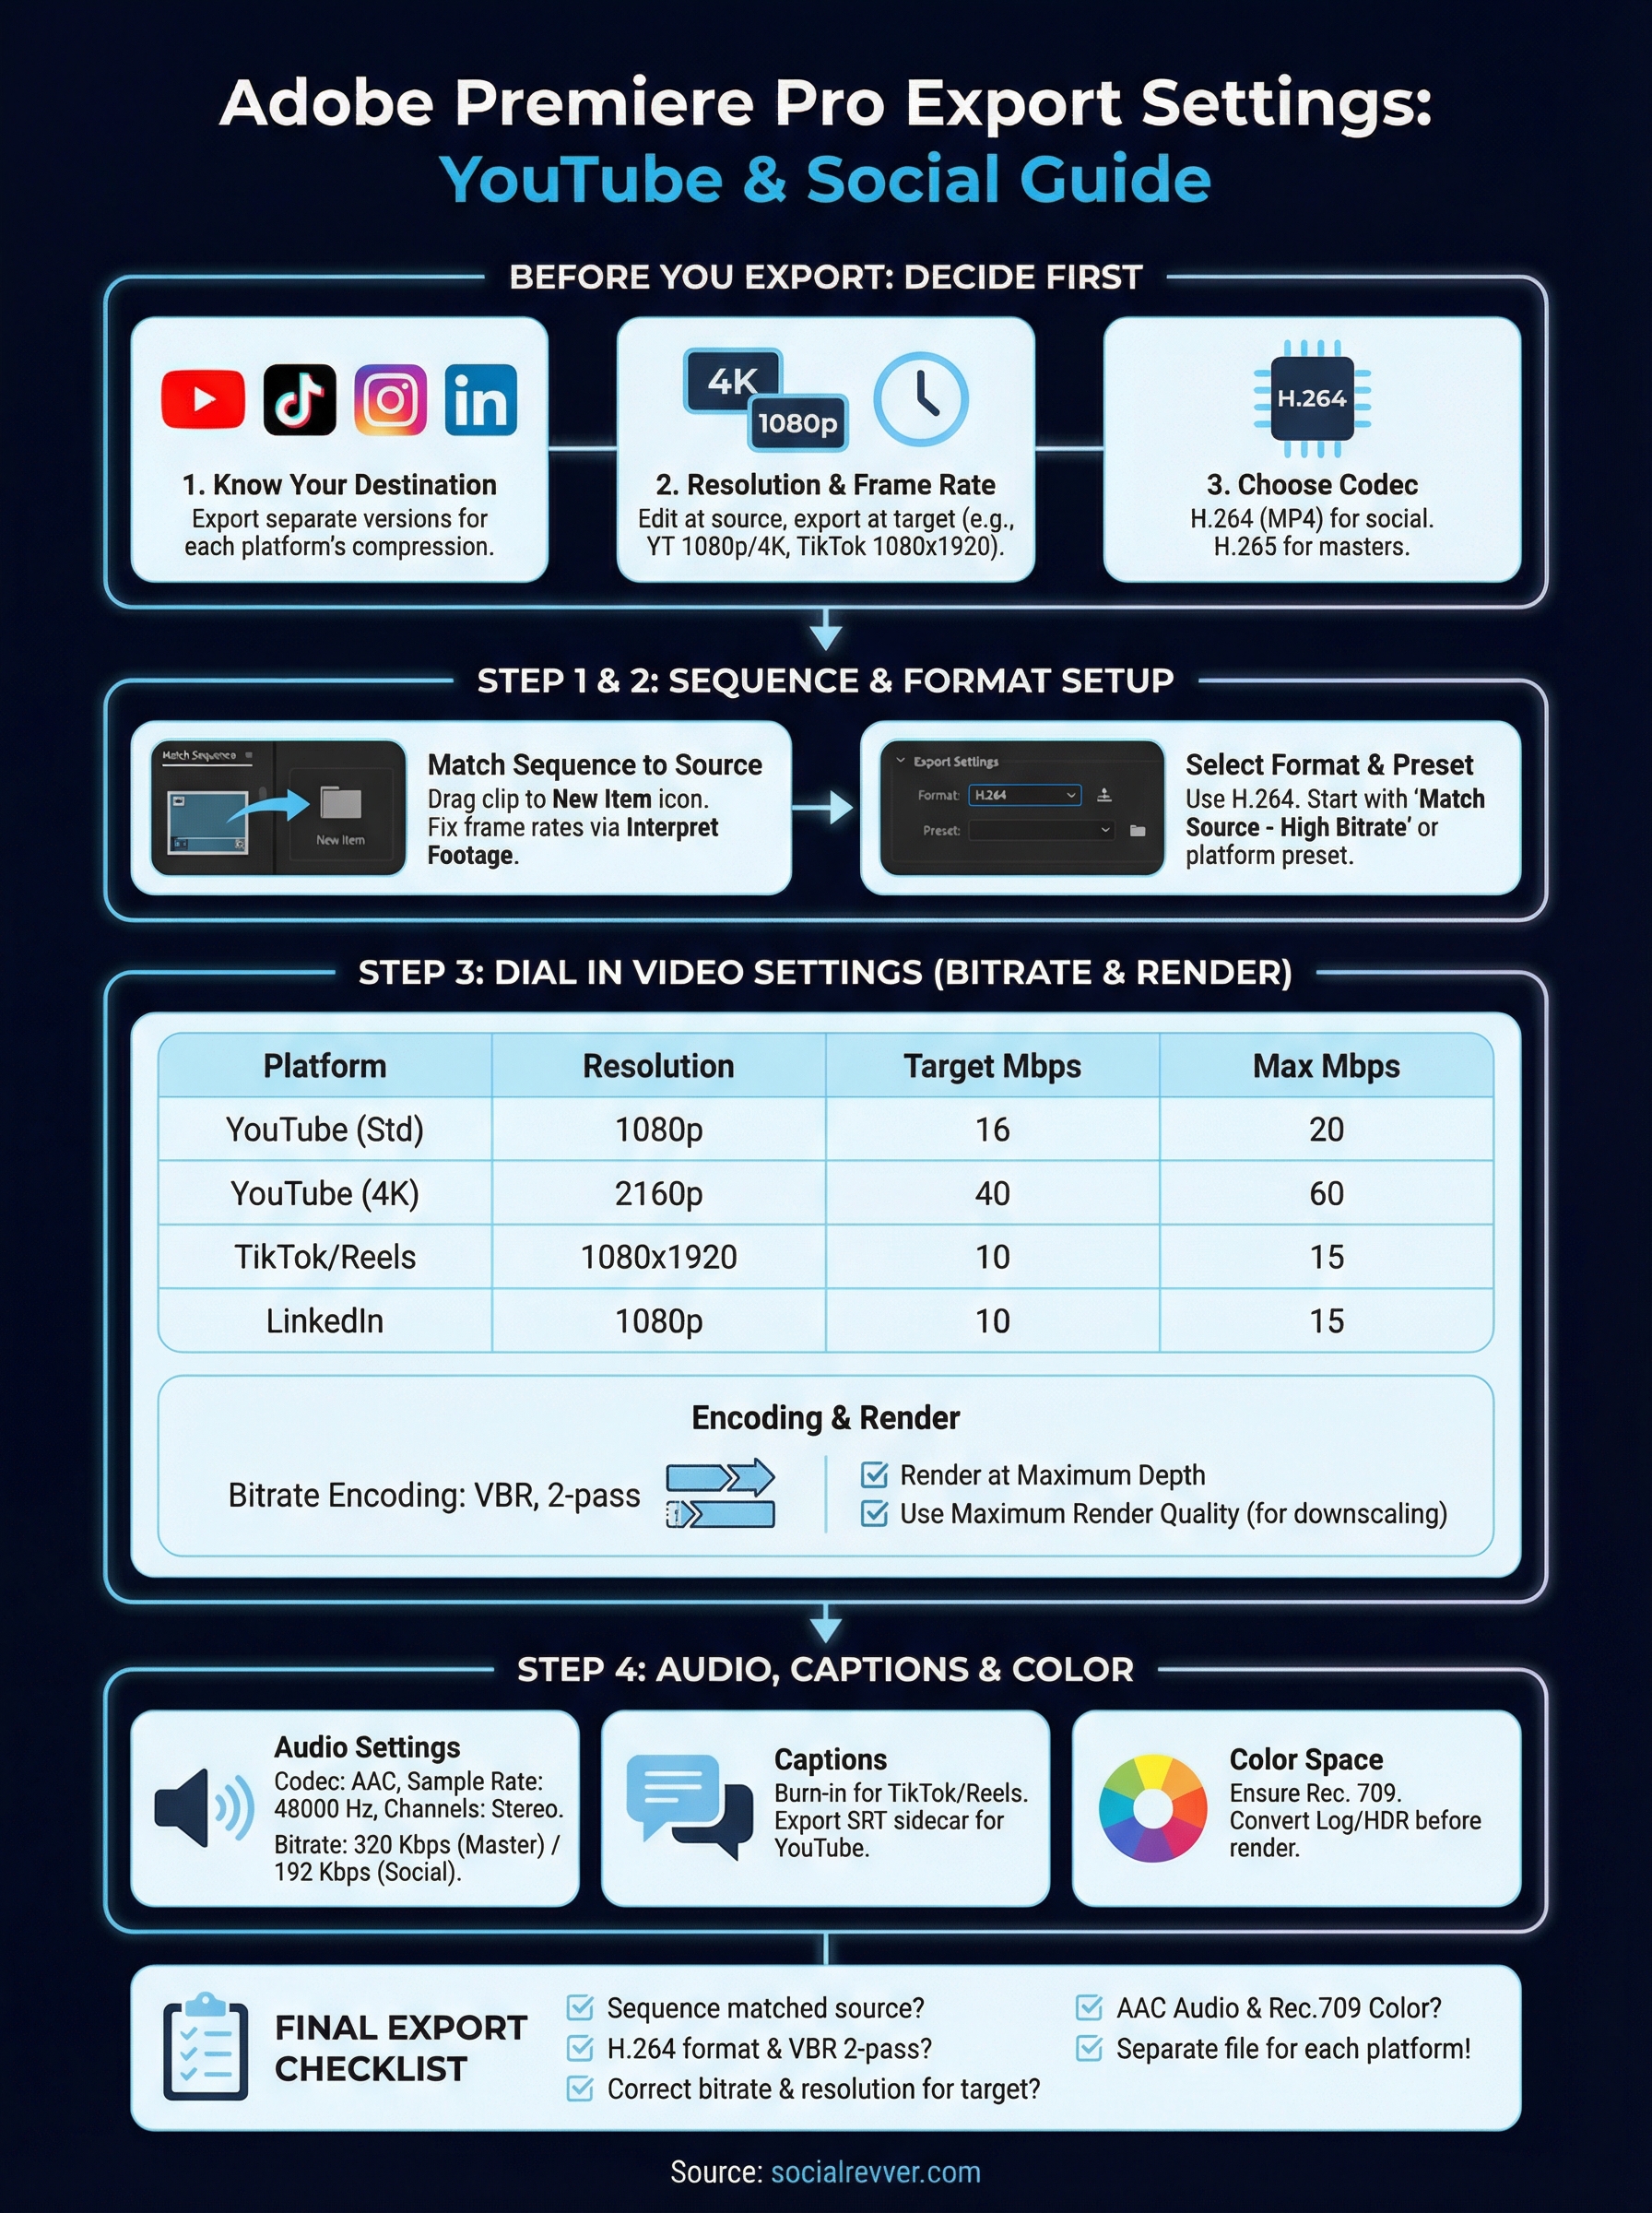
For most social and web deliverables, use VBR 2-pass (Variable Bitrate, two-pass encoding) as your Rate Control Method. VBR 2-pass analyzes your footage twice before encoding, which lets Premiere allocate higher bitrate to complex scenes and lower bitrate to static ones. The result is better-looking output at the same or smaller file size compared to CBR (Constant Bitrate). Set your Target Bitrate and Maximum Bitrate using the values below as your starting point:
| Output Target | Target Bitrate | Maximum Bitrate |
|---|---|---|
| YouTube 1080p | 16 Mbps | 20 Mbps |
| YouTube 4K | 40 Mbps | 60 Mbps |
| TikTok 1080x1920 | 10 Mbps | 15 Mbps |
| Instagram Reels | 10 Mbps | 15 Mbps |
| LinkedIn 1080p | 10 Mbps | 15 Mbps |
| Client master (H.265) | 20 Mbps | 30 Mbps |
For YouTube specifically, uploading above the recommended bitrate gives their encoder more data to work with, which typically results in a cleaner processed output on their end.
Configure resolution, frame rate, and render settings
Resolution and frame rate fields sit at the top of the Video tab, and by default they inherit from your sequence when you use a Match Source preset. Confirm that the Width, Height, and Frame Rate fields match your intended output before you start the encode. If you're exporting a vertical video for TikTok or Reels, manually change the width to 1080 and height to 1920 rather than relying on sequence inheritance, since a mismatch here crops your frame at the platform level.
For rendering, set Render at Maximum Depth and check Use Maximum Render Quality when downscaling from 4K to 1080p. These two options add render time but preserve far more detail during the resizing process, which matters most for fast-motion content where softness becomes immediately visible.
Step 4. Set audio, captions, and color correctly
Most editors focus entirely on video settings and treat audio, captions, and color as afterthoughts. That approach leads to uploads where the picture looks sharp but the audio clips at playback, captions are out of sync, or colors shift to an oversaturated mess after the platform processes the file. These three elements belong in your adobe premiere pro export settings review before every single export, not after you've already uploaded and noticed a problem.
Configure audio for clean playback
The Audio tab in the Export Settings dialog controls your codec, sample rate, and channel configuration. For every social platform, AAC is the correct audio codec, and your Sample Rate should be set to 48000 Hz, which is the broadcast standard for digital video. Anything lower risks a subtle but audible thinning of your audio, especially noticeable in voice-heavy content like talking-head videos or interviews.
Set your Audio Quality to High and your Bitrate to 320 Kbps for masters or 192 Kbps for standard social uploads. Confirm that your channels are set to Stereo, since Mono audio will play from only one side on most headphones and is immediately noticeable to your audience. If your timeline carries multiple audio tracks, collapse them to a single stereo mix inside your sequence before exporting to avoid unexpected level mismatches in the final output file.
A quick playback check on your phone after export is the fastest way to catch audio issues before you upload to any platform.
Handle captions in the export stage
Premiere Pro gives you two options for captions: burn them into the video as open captions, or export them as a separate sidecar file like an SRT. For TikTok and Instagram Reels, burning captions directly into the video gives you the most visual control, since each platform's auto-caption system formats text differently and ignores your branded styling. For YouTube, export a separate SRT file and upload it alongside your video so YouTube's search algorithm can index the full spoken transcript and serve your content in relevant searches.
Check your color space before you render
Color space mismatches produce the washed-out or oversaturated look you sometimes see after a platform re-encodes your upload. In the Export Settings dialog, confirm that your Color Space is set to Rec. 709 for all standard web and social deliverables. If you edited using a log or HDR color profile, apply a Rec. 709 conversion using a Lumetri Color adjustment layer on your sequence before you render. Exporting raw log footage without that conversion will look flat and gray on every platform, and no amount of re-uploading will fix it after the fact.
Step 5. Export for YouTube, TikTok, and Instagram
Each platform handles your upload differently, which means applying the same export file to every destination will cost you visual quality on at least two of the three. Now that your video, audio, captions, and color are configured correctly inside your adobe premiere pro export settings, the final step is rendering a platform-specific file for each target. The settings below are the exact configurations that produce the cleanest output after each platform's compression algorithm processes your upload.

Export settings for YouTube
YouTube recommends uploading at a higher bitrate than what you'd use for other platforms because their encoder uses the extra data to produce a cleaner-looking processed file on their end. Use these settings when exporting a YouTube-specific file:
| Setting | Value |
|---|---|
| Format | H.264 |
| Preset | YouTube 1080p HD or YouTube 2160p 4K |
| Resolution | 1920x1080 or 3840x2160 |
| Frame Rate | Match source (23.976, 29.97, or 59.94) |
| Rate Control | VBR, 2-pass |
| Target Bitrate | 16 Mbps (1080p) / 40 Mbps (4K) |
| Max Bitrate | 20 Mbps (1080p) / 60 Mbps (4K) |
| Audio | AAC, 48000 Hz, Stereo, 320 Kbps |
Upload your YouTube file at the highest bitrate your internet connection allows within these ranges, since YouTube's processing rewards files that give it more information to work with.
Export settings for TikTok
TikTok applies aggressive compression to vertical video, so your starting file needs to be clean and high-bitrate to survive that process with visible quality intact. Set your sequence output to 1080x1920 before you export, then use these values in the Video tab:
- Format: H.264
- Resolution: 1080x1920 (confirm Width and Height manually in the Video tab)
- Frame Rate: 30fps
- Rate Control: VBR, 2-pass
- Target Bitrate: 10 Mbps
- Max Bitrate: 15 Mbps
- Audio: AAC, 48000 Hz, Stereo, 192 Kbps
Confirm your captions are burned into the video before you render, since TikTok's auto-caption tool will override any sidecar file and apply its own formatting to your text.
Export settings for Instagram Reels
Instagram Reels uses the same 9:16 vertical format as TikTok, and its compression behavior is similar enough that the same bitrate targets apply. The one difference worth noting is file size: Instagram caps uploads at 3.6 GB, so a standard 60-90 second Reel at 10 Mbps will land well within that limit. Use the same settings as TikTok above, and export your Reels file as a separate render rather than reusing your TikTok output, since even minor spec differences between the two platforms can affect how playback looks after their respective compression passes.
Final export checklist
Before you render, run through this checklist to confirm your adobe premiere pro export settings are locked in correctly. A single missed field can silently degrade your output after the platform re-encodes your file.
- Sequence settings match your source footage resolution and frame rate
- Format is set to H.264 (or H.265 for client masters)
- Rate Control is set to VBR, 2-pass
- Bitrate targets match the platform table from Step 3
- Resolution and frame rate are manually confirmed in the Video tab
- Audio is set to AAC, 48000 Hz, Stereo
- Color Space is set to Rec. 709
- Captions are burned in for TikTok and Reels, exported as SRT for YouTube
- You've exported a separate file for each destination platform
Run this list on every export, not just your first one. Once your settings are dialed in and your system is built, the production side runs itself. If you want a team to handle that entire pipeline for you, apply to work with SocialRevver and get a free 40-slide social strategy built around your brand.