Most people who search how to create a content calendar already know they need one. The real problem isn't awareness, it's that they've tried before, kept it up for two or three weeks, and then watched the whole thing collapse under the weight of daily decisions. A blank calendar is easy to build. A calendar that actually holds up week after week requires something more deliberate.
That "something more" is structure. Not inspiration, not motivation, a repeatable system that removes guesswork from what you post, when you post it, and why each piece exists in the first place. This is the same principle we build on at SocialRevver, where our entire content infrastructure model runs on eliminating the bottleneck of manual planning so founders and business owners can stay focused on running their companies.
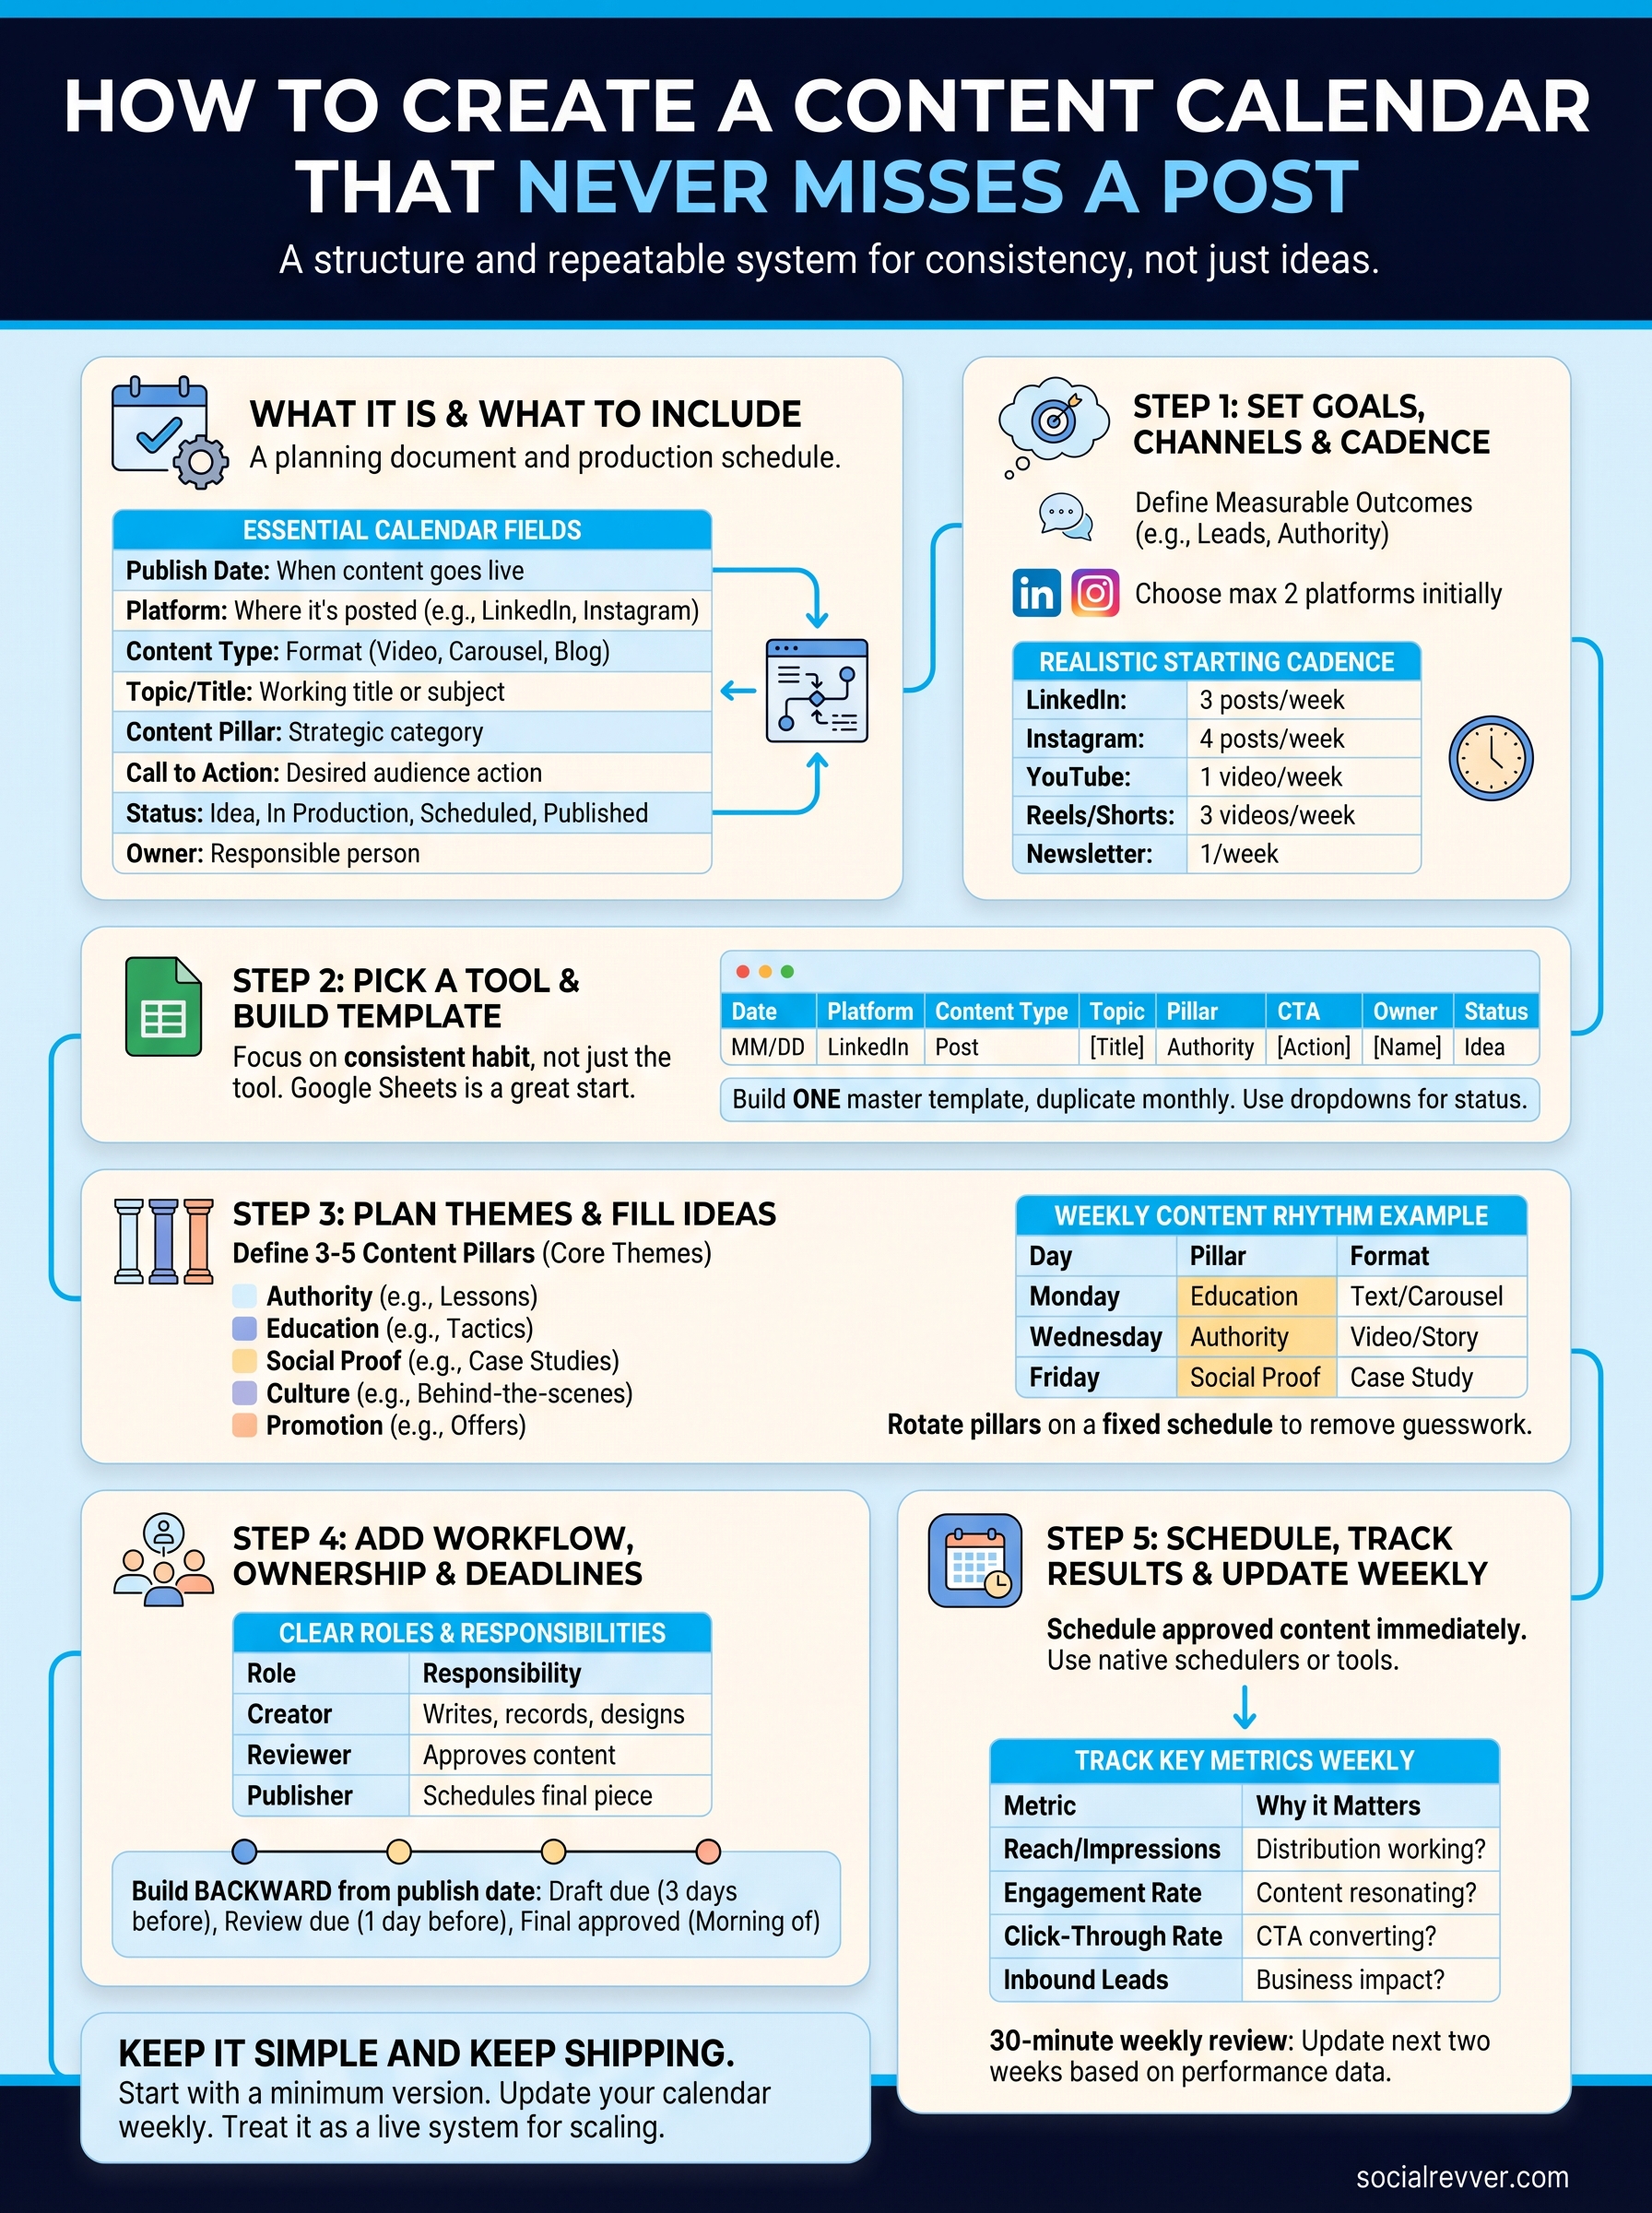
In this guide, you'll get a step-by-step breakdown for building a content calendar that doesn't fall apart after week one. We'll cover goal-setting, content pillars, scheduling workflows, and the specific tools, from Google Sheets to dedicated platforms, that make execution painless. Whether you're managing your own brand or coordinating across a team, you'll walk away with a calendar framework designed for consistency, not just good intentions.
What a content calendar is and what to include
A content calendar is a planning document that maps out exactly what you'll publish, on which platform, and when. It's not a mood board or a brainstorm dump. Think of it as a production schedule for your brand: every cell in the calendar represents a commitment, not just an idea floating in your head.
A content calendar transforms vague intentions into a concrete publishing schedule with dates, formats, and owners attached to every piece.
What separates a real calendar from a list of ideas
Most people start with a notes app or a rough spreadsheet and call it a content calendar. That's the first mistake. A real calendar includes context for every post, not just the topic. You need to know the goal behind each piece, the format it takes, the channel it lives on, and who's responsible for getting it done. Without that context, you end up with a list of ideas that nobody acts on.
Understanding how to create a content calendar that actually functions means treating each entry like a mini project. Every row is a task, and every task needs enough information attached to it that someone else could pick it up and execute it without asking you a single question.
The fields every content calendar should include
Your calendar template should capture at minimum these fields for each piece of content:
| Field | What it covers |
|---|---|
| Publish date | The exact date the content goes live |
| Platform | Where it's being posted (LinkedIn, Instagram, YouTube, etc.) |
| Content type | Format, such as short-form video, carousel, blog post, or email |
| Topic or title | A working title or clear description of the subject |
| Content pillar | The strategic category this piece belongs to |
| Call to action | What you want the audience to do after consuming it |
| Status | Current stage: idea, in production, scheduled, or published |
| Owner | The person responsible for creating or approving this content |
Starting with all eight fields at once is optional. Begin with publish date, platform, content type, and status, then add columns as your workflow grows. The goal is a document that gives you a clear picture of the next four weeks without opening another file or sending a single clarifying message to anyone on your team.
Step 1. Set goals, channels, and posting cadence
Before you fill in any dates, you need to answer three questions: what you're trying to achieve, where your audience spends time, and how often you can realistically publish. Skipping this step is why most content calendars collapse in the first month. Without clear answers, you default to posting randomly and measuring nothing.
Define your content goals first
Every piece of content you schedule should connect to a measurable business outcome. Common goals include generating inbound leads, building authority in a niche, growing an email list, or driving traffic to a product page. Pick one or two primary goals for the next 90 days and write them at the top of your calendar document.
Your content goal determines every other decision in the calendar, including format, frequency, and which platforms deserve your attention.
When you think about how to create a content calendar that actually drives results, goals come first. If your primary goal is B2B lead generation, LinkedIn posts and thought leadership articles will outperform short-form video on TikTok. Let your goal drive channel selection, not your familiarity with a particular platform.
Choose your channels and set your cadence
Start with no more than two platforms. Spreading across five channels at once guarantees thin output and inconsistent quality. Once you've picked your platforms, assign a realistic publishing frequency to each one using this starting framework:
| Platform | Minimum starting cadence |
|---|---|
| 3 posts per week | |
| 4 posts per week | |
| YouTube (long-form) | 1 video per week |
| Reels / Shorts / TikTok | 3 videos per week |
| Email newsletter | 1 per week |
Match your cadence to your current production capacity, not your ideal scenario. You can always increase frequency once the workflow runs without friction.
Step 2. Pick a tool and build your calendar template
The tool you use matters less than the habit of using it consistently. Whether you pick Google Sheets or a dedicated platform, the goal is the same: a single source of truth that your entire workflow lives inside. When you understand how to create a content calendar that holds up, you quickly realize the best tool is the one you'll open every day without friction.
Choose the right tool for your setup
Your tool choice should match your team size and your technical comfort level. A solo creator running one platform needs nothing more than a free spreadsheet. A team producing content across multiple channels needs version history, comment threads, and task assignment features built in. Here are three reliable starting points:
| Tool | Best for | Cost |
|---|---|---|
| Google Sheets | Solo creators or small teams | Free |
| Notion | Teams needing linked databases and views | Free to start |
| Airtable | Teams managing multiple content types at scale | Free to start |
Build your base template
Once you've picked your tool, build one master template and duplicate it for each new month. Below is a minimal Google Sheets layout you can copy immediately:
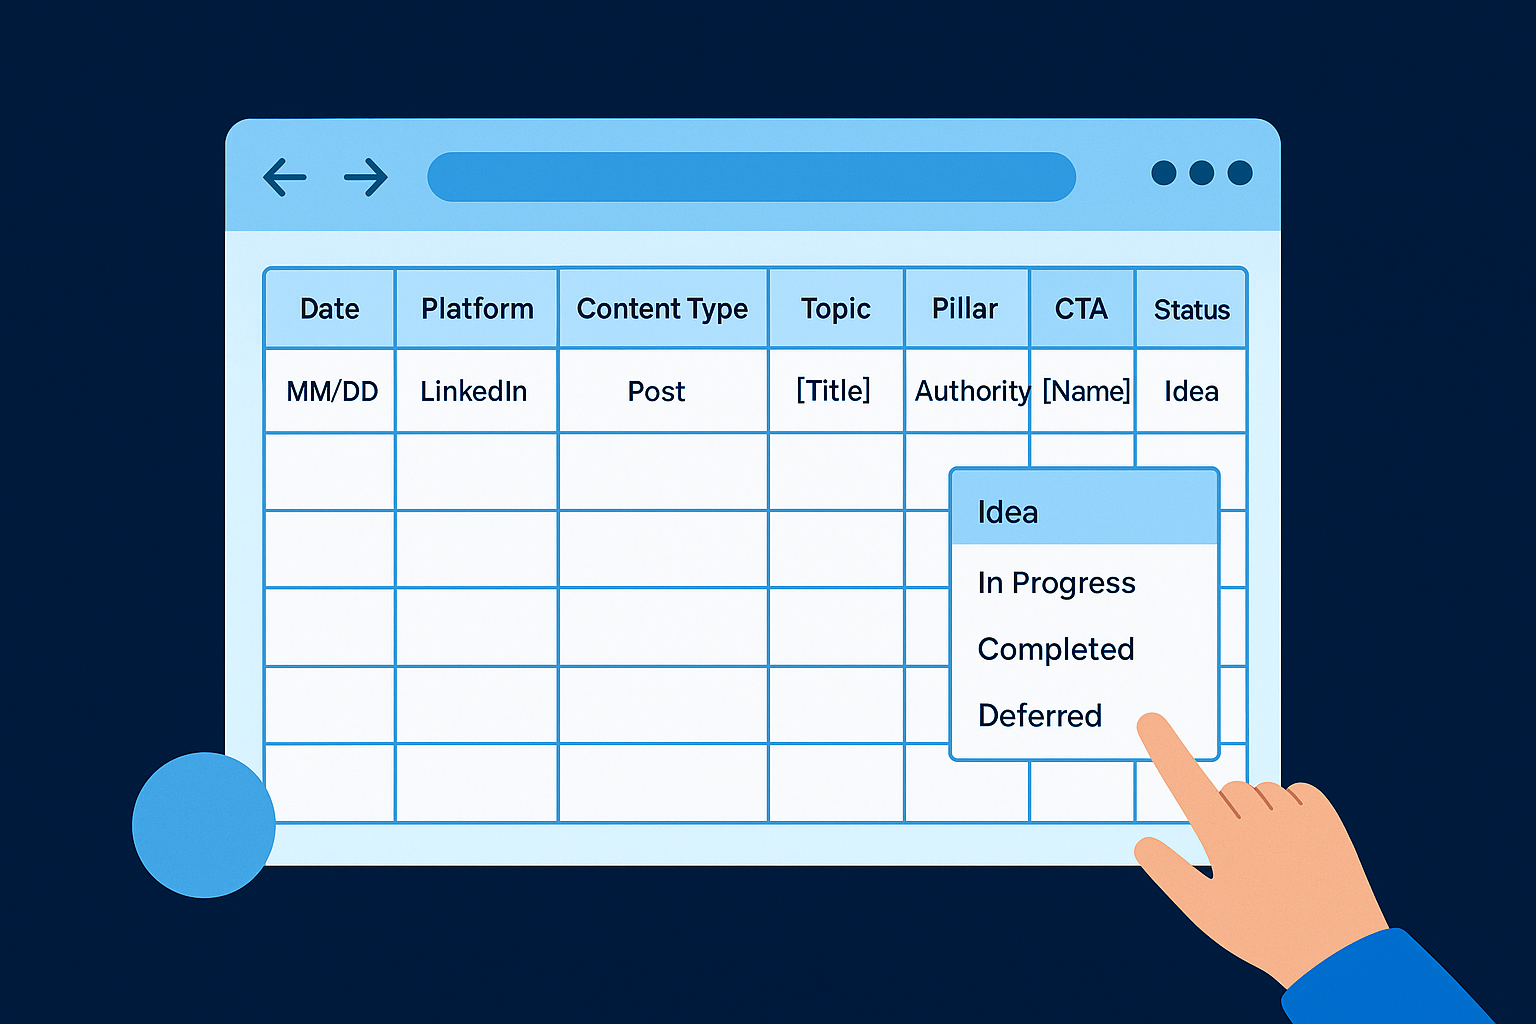
| Date  | Platform | Content Type | Topic   | Pillar    | CTA      | Owner  | Status |
|-------|----------|--------------|---------|-----------|----------|--------|--------|
| MM/DD | LinkedIn | Post         | [Title] | Authority | [Action] | [Name] | Idea   |
Fill out every row completely before production begins, not after.
Lock your column headers and add a dropdown list to the Status column so your team can update entries without breaking the structure. A protected format removes the small friction points that cause calendars to fall apart over time.
Step 3. Plan themes and fill the calendar with ideas
With your tool ready and your cadence locked, the next step is filling the calendar with organized, intentional content instead of random topics you brainstorm on the fly. This is where most people lose the thread when figuring out how to create a content calendar that holds up long-term. Without a thematic structure, every planning session starts from zero and drains energy you should be spending on execution.
Build your content pillars first
Content pillars are the three to five core themes your brand consistently covers. Every piece of content you schedule should map back to one of them. If you're a founder building authority in the B2B SaaS space, your pillars might look like this:
- Authority - Lessons from building or leading the business
- Education - Tactical advice your audience can apply immediately
- Social proof - Client results, case studies, and milestones
- Culture - Behind-the-scenes looks at how your team operates
- Promotion - Direct offers, product launches, or service announcements
Assign each pillar a color code in your spreadsheet so you can visually scan your calendar and catch imbalances before they become problems.
Fill the calendar using a weekly content rhythm
Once your pillars are defined, rotate through them on a fixed weekly schedule rather than picking a different theme each time you sit down to plan. For a three-posts-per-week LinkedIn schedule, a reliable rotation looks like:
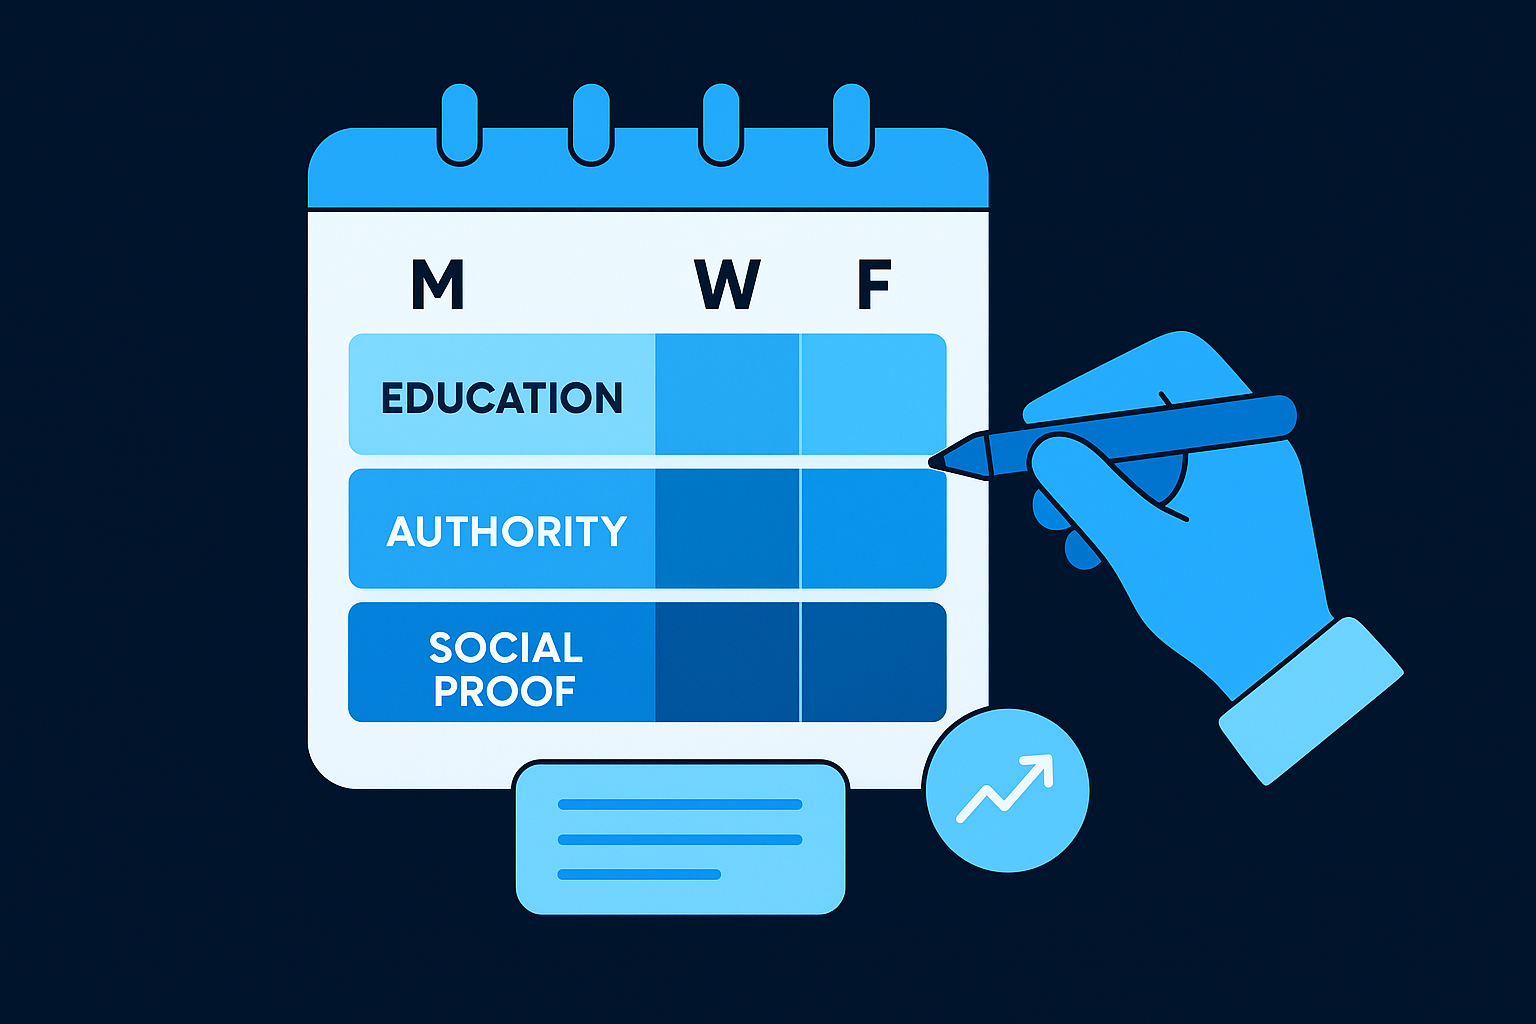
| Day | Pillar | Format |
|---|---|---|
| Monday | Education | Text post or carousel |
| Wednesday | Authority | Short-form video or story |
| Friday | Social proof | Case study or testimonial post |
A fixed rotation removes the "what should I post today?" question entirely and replaces it with a decision you only make once.
Run this rotation for four weeks, then review performance data and swap out underperforming pillars before building the next month's calendar.
Step 4. Add workflow, ownership, and production deadlines
A content calendar without assigned owners and deadlines is just a wish list. This step is where most teams discover they've been planning content without actually managing its production. When you understand how to create a content calendar that runs without constant supervision, you realize that workflow clarity is the difference between a calendar that ships consistently and one that stalls every week.
Assign an owner to every task
Every row in your calendar needs a named person attached to it, not a department or a vague role. If you're a solo creator, you're the owner of every task, which means you need to be explicit about what you're committing to and on which day. For teams, unclear ownership is the fastest way to miss a publish date because everyone assumes someone else handled the final step.
Use this structure to define three distinct roles per content piece:
| Role | Responsibility |
|---|---|
| Creator | Writes, records, or designs the content |
| Reviewer | Approves the content before it goes live |
| Publisher | Schedules or posts the final approved piece |
Set production deadlines, not just publish dates
Your publish date is the finish line, but you need checkpoint dates leading up to it or that deadline becomes meaningless. Build backward from each publish date and assign internal deadlines for every production stage.
If your publish date is Friday, your draft should be done by Wednesday and approved by Thursday morning without exception.
A simple three-step deadline structure for each piece looks like this:
- Draft due: 3 days before publish date
- Review due: 1 day before publish date
- Final approved: Morning of publish date
Step 5. Schedule, track results, and update weekly
Publishing on schedule is the last step in learning how to create a content calendar that actually delivers results, but it's also the step most people rush through. Scheduling in advance removes the daily decision of whether to post, and tracking performance weekly turns your calendar from a static plan into a learning system that gets sharper every month.
Use a scheduling tool to remove manual posting
Once your content is approved, move it into a scheduling tool immediately so nothing sits in a queue waiting on you to remember it. Native schedulers built into LinkedIn, Instagram, and YouTube are free and reliable. For multi-platform publishing, tools like Buffer or Later work well, but your primary goal is simply that no approved piece ever waits on a manual action to go live.
Approved content that isn't scheduled is content that doesn't exist yet.
Track the right metrics each week
Tracking vanity metrics wastes time. Focus on three to five numbers that connect directly to your content goals from Step 1. A simple tracking table inside your calendar document works better than a separate analytics dashboard you have to open separately.
| Metric | Why it matters |
|---|---|
| Reach or impressions | Shows if distribution is working |
| Engagement rate | Tells you if content resonates |
| Click-through rate | Measures how well your CTA converts |
| Inbound leads or signups | Tracks real business impact |
Run a weekly calendar review
Block 30 minutes every Monday to review last week's results and update the next two weeks of scheduled content. Pull your performance numbers, note which content pillar produced the best engagement, and adjust your upcoming rotation accordingly. This single habit compounds over time and keeps your calendar responsive to real audience behavior instead of assumptions you made 30 days ago.
Keep it simple and keep shipping
The biggest mistake people make after learning how to create a content calendar is overbuilding it before they've shipped a single post. Start with the minimum version that gives you a publish date, a platform, and an owner on every row. Complexity earns its place later, once you have four weeks of real data showing you what actually needs to be tracked.
Your calendar only works if you treat it as a live document, not a finished plan you revisit once a month. Open it every Monday, update your results, adjust your next two weeks, and close it. Thirty minutes of weekly maintenance keeps the whole system moving without turning planning into a second job.
When you're ready to remove yourself from the production process entirely and run a content system that scales without your daily input, apply to work with the SocialRevver team and get a free 40-slide social media strategy built for your brand.